Markdown PDF
This extension converts Markdown files to pdf, html, png or jpeg files. Japanese READMETable of Contents
- Features
- Install
- Usage
- Extension Settings
- Options
- FAQ
- Known Issues
- Release Notes
- License
- Special thanks
Features
Supports the following features * Syntax highlighting * emoji * markdown-it-checkbox * markdown-it-container * markdown-it-include * PlantUML * markdown-it-plantuml * mermaid Sample files * pdf * html * png * jpegmarkdown-it-container
INPUT::: warning
*here be dragons*
:::<div class="warning">
<p><em>here be dragons</em></p>
</div>markdown-it-plantuml
INPUT@startuml
Bob -[#red]> Alice : hello
Alice -[#0000FF]->Bob : ok
@enduml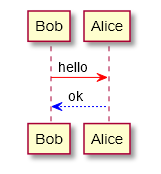
markdown-it-include
Include markdown fragment files::[alternate-text](https://github.com/yzane/vscode-markdown-pdf/blob/master/relative-path-to-file.md).
├── [plugins]
│  └── README.md
├── CHANGELOG.md
└── README.mdREADME Content:[Plugins](https://github.com/yzane/vscode-markdown-pdf/blob/master/./plugins/README.md):[Changelog](https://github.com/yzane/vscode-markdown-pdf/blob/master/CHANGELOG.md)Content of README.mdContent of plugins/README.mdContent of CHANGELOG.mdmermaid
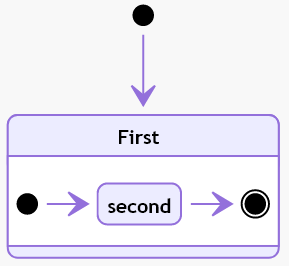
INPUT```mermaid
stateDiagram
[*] --> First
state First {
[*] --> second
second --> [*]
}
```
OUTPUT
Install
Chromium download starts automatically when Markdown PDF is installed and Markdown file is first opened with Visual Studio Code. However, it is time-consuming depending on the environment because of its large size (~ 170Mb Mac, ~ 282Mb Linux, ~ 280Mb Win). During downloading, the messageInstalling Chromium is displayed in the status bar.
If you are behind a proxy, set the http.proxy option to settings.json and restart Visual Studio Code.
If the download is not successful or you want to avoid downloading every time you upgrade Markdown PDF, please specify the installed Chrome or ‘Chromium’ with markdown-pdf.executablePath option.
Usage
Command Palette
- Open the Markdown file
- Press
F1orCtrl+Shift+P - Type
exportand select below
markdown-pdf: Export (settings.json)markdown-pdf: Export (pdf)markdown-pdf: Export (html)markdown-pdf: Export (png)markdown-pdf: Export (jpeg)markdown-pdf: Export (all: pdf, html, png, jpeg)

Menu
- Open the Markdown file
- Right click and select below
markdown-pdf: Export (settings.json)markdown-pdf: Export (pdf)markdown-pdf: Export (html)markdown-pdf: Export (png)markdown-pdf: Export (jpeg)markdown-pdf: Export (all: pdf, html, png, jpeg)

Auto convert
- Add
"markdown-pdf.convertOnSave": trueoption to settings.json - Restart Visual Studio Code
- Open the Markdown file
- Auto convert on save
Extension Settings
Visual Studio Code User and Workspace Settings- Select File > Preferences > UserSettings or Workspace Settings
- Find markdown-pdf settings in the Default Settings
- Copy
markdown-pdf.*settings - Paste to the settings.json, and change the value

Options
List
CategoryOption nameConfiguration scopeSave optionsmarkdown-pdf.typemarkdown-pdf.convertOnSavemarkdown-pdf.convertOnSaveExcludemarkdown-pdf.outputDirectorymarkdown-pdf.outputDirectoryRelativePathFileStyles optionsmarkdown-pdf.stylesmarkdown-pdf.stylesRelativePathFilemarkdown-pdf.includeDefaultStylesSyntax highlight optionsmarkdown-pdf.highlightmarkdown-pdf.highlightStyleMarkdown optionsmarkdown-pdf.breaksEmoji optionsmarkdown-pdf.emojiConfiguration optionsmarkdown-pdf.executablePathCommon Optionsmarkdown-pdf.scalePDF optionsmarkdown-pdf.displayHeaderFooterresourcemarkdown-pdf.headerTemplateresourcemarkdown-pdf.footerTemplateresourcemarkdown-pdf.printBackgroundresourcemarkdown-pdf.orientationresourcemarkdown-pdf.pageRangesresourcemarkdown-pdf.formatresourcemarkdown-pdf.widthresourcemarkdown-pdf.heightresourcemarkdown-pdf.margin.topresourcemarkdown-pdf.margin.bottomresourcemarkdown-pdf.margin.rightresourcemarkdown-pdf.margin.leftresourcePNG JPEG optionsmarkdown-pdf.qualitymarkdown-pdf.clip.xmarkdown-pdf.clip.ymarkdown-pdf.clip.widthmarkdown-pdf.clip.heightmarkdown-pdf.omitBackgroundPlantUML optionsmarkdown-pdf.plantumlOpenMarkermarkdown-pdf.plantumlCloseMarkermarkdown-pdf.plantumlServermarkdown-it-include optionsmarkdown-pdf.markdown-it-include.enablemermaid optionsmarkdown-pdf.mermaidServerSave options
markdown-pdf.type
- Output format: pdf, html, png, jpeg
- Multiple output formats support
- Default: pdf
"markdown-pdf.type": [
  "pdf",
  "html",
  "png",
  "jpeg"
],
markdown-pdf.convertOnSave
- Enable Auto convert on save
- boolean. Default: false
- To apply the settings, you need to restart Visual Studio Code
markdown-pdf.convertOnSaveExclude
- Excluded file name of convertOnSave option
"markdown-pdf.convertOnSaveExclude": [
  "^work",
  "work.md$",
  "work|test",
  "[0-9][0-9][0-9][0-9]-work",
  "work\\test"  // All '\' need to be written as '\\' (Windows)
],
markdown-pdf.outputDirectory
- Output Directory
- All
\need to be written as\\(Windows)
"markdown-pdf.outputDirectory": "C:\\work\\output",- Relative path
- If you open the
Markdown file, it will be interpreted as a relative path from the file - If you open a
folder, it will be interpreted as a relative path from the root folder - If you open the
workspace, it will be interpreted as a relative path from the each root folder - See Multi-root Workspaces
"markdown-pdf.outputDirectory": "output",- Relative path (home directory)
- If path starts with
~, it will be interpreted as a relative path from the home directory
"markdown-pdf.outputDirectory": "~/output",- If you set a directory with a
relative path, it will be created if the directory does not exist - If you set a directory with an
absolute path, an error occurs if the directory does not exist
markdown-pdf.outputDirectoryRelativePathFile
- If
markdown-pdf.outputDirectoryRelativePathFileoption is set totrue, the relative path set with markdown-pdf.outputDirectory is interpreted as relative from the file - It can be used to avoid relative paths from folders and workspaces
- boolean. Default: false
Styles options
markdown-pdf.styles
- A list of local paths to the stylesheets to use from the markdown-pdf
- If the file does not exist, it will be skipped
- All
\need to be written as\\(Windows)
"markdown-pdf.styles": [
  "C:\\Users\\<USERNAME>\\Documents\\markdown-pdf.css",
  "/home/<USERNAME>/settings/markdown-pdf.css",
],- Relative path
- If you open the
Markdown file, it will be interpreted as a relative path from the file - If you open a
folder, it will be interpreted as a relative path from the root folder - If you open the
workspace, it will be interpreted as a relative path from the each root folder - See Multi-root Workspaces
"markdown-pdf.styles": [
  "markdown-pdf.css",
],- Relative path (home directory)
- If path starts with
~, it will be interpreted as a relative path from the home directory
"markdown-pdf.styles": [
  "~/.config/Code/User/markdown-pdf.css"
],- Online CSS (https://xxx/xxx.css) is applied correctly for JPG and PNG, but problems occur with PDF #67
"markdown-pdf.styles": [
  "https://xxx/markdown-pdf.css"
],
markdown-pdf.stylesRelativePathFile
- If
markdown-pdf.stylesRelativePathFileoption is set totrue, the relative path set with markdown-pdf.styles is interpreted as relative from the file - It can be used to avoid relative paths from folders and workspaces
- boolean. Default: false
markdown-pdf.includeDefaultStyles
- Enable the inclusion of default Markdown styles (VSCode, markdown-pdf)
- boolean. Default: true
Syntax highlight options
markdown-pdf.highlight
- Enable Syntax highlighting
- boolean. Default: true
markdown-pdf.highlightStyle
- Set the style file name. for example: github.css, monokai.css …
- file name list
- demo site : https://highlightjs.org/static/demo/
"markdown-pdf.highlightStyle": "github.css",Markdown options
markdown-pdf.breaks
- Enable line breaks
- boolean. Default: false
Emoji options
markdown-pdf.emoji
- Enable emoji. EMOJI CHEAT SHEET
- boolean. Default: true
Configuration options
markdown-pdf.executablePath
- Path to a Chromium or Chrome executable to run instead of the bundled Chromium
- All
\need to be written as\\(Windows) - To apply the settings, you need to restart Visual Studio Code
"markdown-pdf.executablePath": "C:\\Program Files (x86)\\Google\\Chrome\\Application\\chrome.exe"Common Options
markdown-pdf.scale
- Scale of the page rendering
- number. default: 1
"markdown-pdf.scale": 1PDF options
- pdf only. puppeteer page.pdf options
markdown-pdf.displayHeaderFooter
- Enable display header and footer
- boolean. Default: true
markdown-pdf.headerTemplate
markdown-pdf.footerTemplate
- HTML template for the print header and footer
<span class='date'></span>: formatted print date<span class='title'></span>: markdown file name<span class='url'></span>: markdown full path name<span class='pageNumber'></span>: current page number<span class='totalPages'></span>: total pages in the document
"markdown-pdf.headerTemplate": "<div style=\"font-size: 9px; margin-left: 1cm;\"> <span class='title'></span></div> <div style=\"font-size: 9px; margin-left: auto; margin-right: 1cm; \"> <span class='date'></span></div>","markdown-pdf.footerTemplate": "<div style=\"font-size: 9px; margin: 0 auto;\"> <span class='pageNumber'></span> / <span class='totalPages'></span></div>",markdown-pdf.printBackground
- Print background graphics
- boolean. Default: true
markdown-pdf.orientation
- Paper orientation
- portrait or landscape
- Default: portrait
markdown-pdf.pageRanges
- Paper ranges to print, e.g., ‘1-5, 8, 11-13’
- Default: all pages
"markdown-pdf.pageRanges": "1,4-",markdown-pdf.format
- Paper format
- Letter, Legal, Tabloid, Ledger, A0, A1, A2, A3, A4, A5, A6
- Default: A4
"markdown-pdf.format": "A4",markdown-pdf.width
markdown-pdf.height
- Paper width / height, accepts values labeled with units(mm, cm, in, px)
- If it is set, it overrides the markdown-pdf.format option
"markdown-pdf.width": "10cm",
"markdown-pdf.height": "20cm",
markdown-pdf.margin.top
markdown-pdf.margin.bottom
markdown-pdf.margin.right
markdown-pdf.margin.left
- Paper margins.units(mm, cm, in, px)
"markdown-pdf.margin.top": "1.5cm",
"markdown-pdf.margin.bottom": "1cm",
"markdown-pdf.margin.right": "1cm",
"markdown-pdf.margin.left": "1cm",
PNG JPEG options
- png and jpeg only. puppeteer page.screenshot options
markdown-pdf.quality
- jpeg only. The quality of the image, between 0-100. Not applicable to png images
"markdown-pdf.quality": 100,markdown-pdf.clip.x
markdown-pdf.clip.y
markdown-pdf.clip.width
markdown-pdf.clip.height
- An object which specifies clipping region of the page
- number
//  x-coordinate of top-left corner of clip area
"markdown-pdf.clip.x": 0,
// y-coordinate of top-left corner of clip area
"markdown-pdf.clip.y": 0,// width of clipping area
"markdown-pdf.clip.width": 1000,// height of clipping area
"markdown-pdf.clip.height": 1000,markdown-pdf.omitBackground
- Hides default white background and allows capturing screenshots with transparency
- boolean. Default: false
PlantUML options
markdown-pdf.plantumlOpenMarker
- Oppening delimiter used for the plantuml parser.
- Default: @startuml
markdown-pdf.plantumlCloseMarker
- Closing delimiter used for the plantuml parser.
- Default: @enduml
markdown-pdf.plantumlServer
- Plantuml server. e.g. http://localhost:8080
- Default: http://www.plantuml.com/plantuml
- For example, to run Plantuml Server locally #139 :
docker run -d -p 8080:8080 plantuml/plantuml-server:jetty- plantuml/plantuml-server — Docker Hub
markdown-it-include options
markdown-pdf.markdown-it-include.enable
- Enable markdown-it-include.
- boolean. Default: true
mermaid options
markdown-pdf.mermaidServer
- mermaid server
- Default: https://unpkg.com/mermaid/dist/mermaid.min.js
FAQ
How can I change emoji size ?
- Add the following to your stylesheet which was specified in the markdown-pdf.styles
.emoji {
  height: 2em;
}
Auto guess encoding of files
Usingfiles.autoGuessEncoding option of the Visual Studio Code is useful because it automatically guesses the character code. See files.autoGuessEncoding
"files.autoGuessEncoding": true,Output directory
If you always want to output to the relative path directory from the Markdown file. For example, to output to the “output” directory in the same directory as the Markdown file, set it as follows."markdown-pdf.outputDirectory" : "output",
"markdown-pdf.outputDirectoryRelativePathFile": true,Page Break
Please use the following to insert a page break.<div class="page"/>Known Issues
markdown-pdf.styles option
- Online CSS (https://xxx/xxx.css) is applied correctly for JPG and PNG, but problems occur with PDF. #67
Release Notes
1.4.4 (2020/03/19)
- Change: mermaid javascript reads from URL instead of from local file
- Add:
markdown-pdf.mermaidServeroption - add an option to disable mermaid #175
- Add:
markdown-pdf.plantumlServeroption - support configuration of plantUML server #139
- Add: configuration scope
- extend setting ‘headerTemplate’ with scope… #184
- Update: slug for markdown-it-named-headers
- Update: markdown.css, markdown-pdf.css
- Update: dependent packages
- Fix: Fix for issue #186 #187
- Fix: move the Meiryo font to the end of the font-family setting
- Meiryo font causing \ to show as ¥ #83
- Backslash false encoded #124
- Errors in which 한글(korean word) is not properly printed #148
- Fix: Improve the configuration schema of package.json
- Some settings can now be set from the settings editor.

NEXT
Ruby for Visual Studio Code
This extension provides enhanced Ruby language and debugging support for Visual Studio Code.Features
- Automatic Ruby environment detection with support for rvm, rbenv, chruby, and asdf
- Lint support via RuboCop, Standard, and Reek
- Format support via RuboCop, Standard, Rufo, Prettier and RubyFMT
- Semantic code folding support
- Semantic highlighting support
- Basic Intellisense support
Installation
Search forruby in the VS Code Extension Gallery and install it!
Initial Configuration
By default, the extension provides sensible defaults for developers to get a better experience using Ruby in Visual Studio Code. However, these defaults do not include settings to enable features like formatting or linting. Given how dynamic Ruby projects can be (are you using rvm, rbenv, chruby, or asdf? Are your gems globally installed or via bundler? etc), the extension requires additional configuration for additional features to be available.Using the Language Server
It is highly recommended that you enable the Ruby language server (via the Use Language Server setting orruby.useLanguageServer config option). The server does not default to enabled while it is under development but it provides a significantly better experience than the legacy extension functionality. See docs/language-server.md for more information on the language server.
Legacy functionality will most likely not receive additional improvements and will be fully removed when the extension hits v1.0
Example Initial Configuration:
"ruby.useBundler": true, //run non-lint commands with bundle exec
"ruby.useLanguageServer": true, // use the internal language server (see below)
"ruby.lint": {
  "rubocop": {
    "useBundler": true // enable rubocop via bundler
  },
  "reek": {
    "useBundler": true // enable reek via bundler
  }
},
"ruby.format": "rubocop" // use rubocop for formattingRuby section in the VS Code settings UI. Each option is associated with a name and description.
Debug Configuration
See docs/debugger.md.Legacy Configuration
docs/legacy.md contains the documentation around the legacy functionalityTroubleshooting
See docs/troubleshooting.mdOther Notable Extensions
- Ruby Solargraph — Solargraph is a language server that provides intellisense, code completion, and inline documentation for Ruby.
- VSCode Endwise — Wisely add “end” in Ruby

Comment Divider
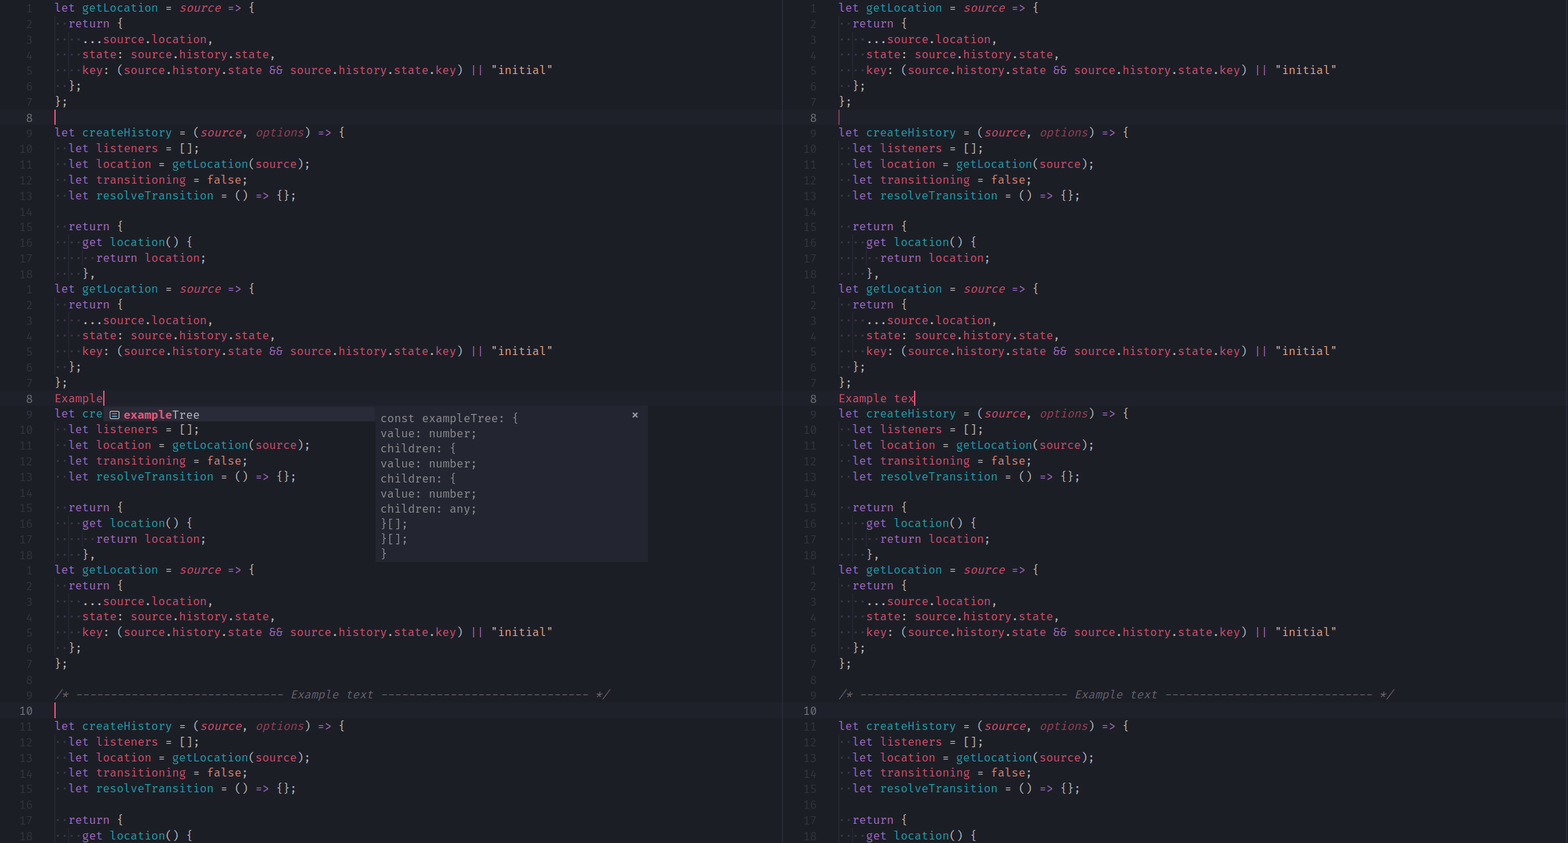
This is Visual Studio Code extension, which provides commands for generating comment-wrapped separators from line content. Supports all common languages.Install
https://marketplace.visualstudio.com/items?itemName=stackbreak.comment-dividerDemo
Commands
Make main header
- Default Shortcut:
Shift+Alt+X- Default Style:
/* -------------------------------------------------------------------------- */ /* Example text */ /* -------------------------------------------------------------------------- */
Make subheader
- Default Shortcut:
Alt+X- Default Style:
/* ------------------------------ Example text ------------------------------ */
Insert solid line
- Default Shortcut:
Alt+Y- Default Style:
/* -------------------------------------------------------------------------- */
Language Support
Extension uses relevant comment characters for all common languages. For example, in python files subheader looks like# ------------------------------ python example ------------------------------ #<!-- ---------------------------- html example ----------------------------- -->Default Configuration
Common
// Set line length for all dividers.
  "comment-divider.length": 80,
Main Header
// "Set symbol for main header line filling (only one).
  "comment-divider.mainHeaderFiller": "-",
// Set main header vertical style.
"comment-divider.mainHeaderHeight": "block", // Set main header text align.
"comment-divider.mainHeaderAlign": "center", // Set main header text transform style.
"comment-divider.mainHeaderTransform": "none",Subheader
// "Set symbol for subheader line filling (only one).
  "comment-divider.subheaderFiller": "-",
// Set subheader vertical style.
"comment-divider.subheaderHeight": "line", // Set subheader text align.
"comment-divider.subheaderAlign": "center", // Set subheader text transform style.
"comment-divider.subheaderTransform": "none",Solid Line
// Set symbol for solid line filling.
  "comment-divider.lineFiller": "-",
Languages Configuration
If some language is not supported out of the box, or you want to change default comment characters for an already supported language, it is possible to do it in the settings."comment-divider.languagesMap": {
"toml": ["#", "#"],
"scss": ["//"]
}toml and overrides scss defaults. As a result, the subheaders for these languages look like this:
# ------------------------------ toml subheader ------------------------------ #// ----------------------------- scss subheader --------------------------------Issues
Request features and report bugs using GitHub.
NEXT
Auto Import — ES6, TS, JSX, TSX (VSCode Extension)
Automatically finds, parses and provides code actions and code completion for all available imports. Works with JavaScript (ES6) and TypeScript (TS). Forker from old repo vscode-extension-auto-import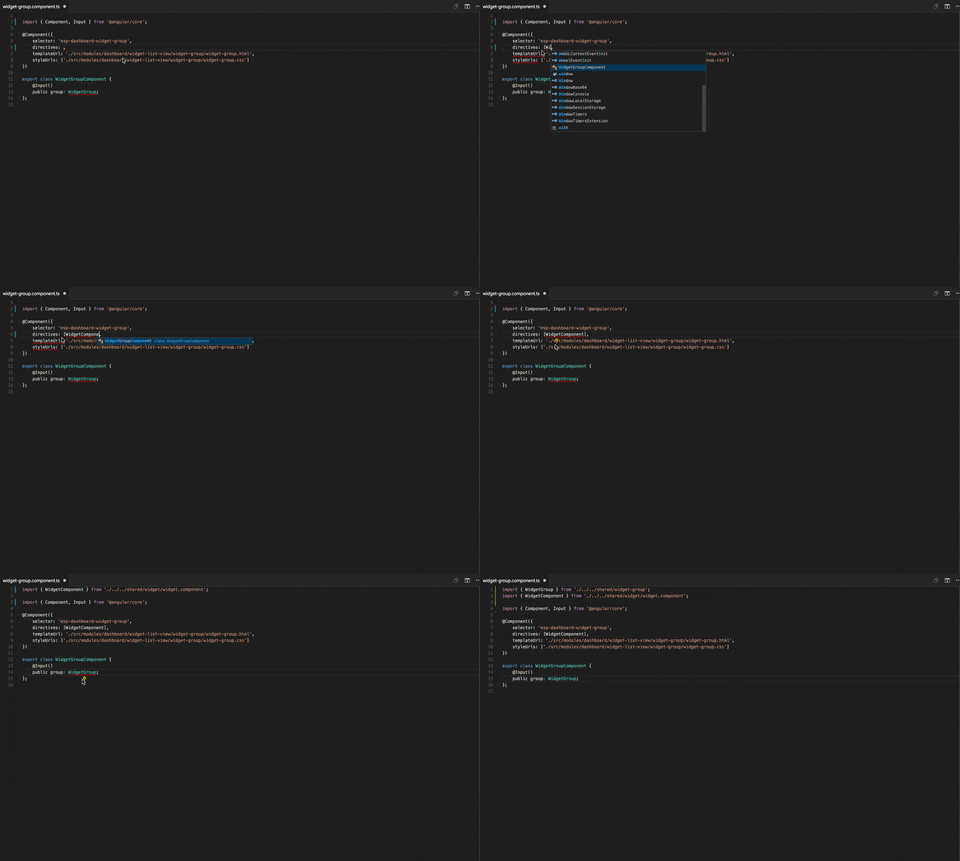
PostgreSQL for Visual Studio Code
Welcome to PostgreSQL for Visual Studio Code! An extension for developing PostgreSQL with functionalities including:- Connect to PostgreSQL instances
- Manage connection profiles
- Connect to a different Postgres instance or database in each tab
- View object DDL with ‘Go to Definition’ and ‘Peek Definition’
- Write queries with IntelliSense
- Run queries and save results as JSON, csv, or Excel
Quickstart
- Open the Command Palette (Ctrl + Shift + P).
- Search and select ‘PostgreSQL: New Query’
- In the command palette, select ‘Create Connection Profile’. Follow the prompts to enter your Postgres instance’s hostname, database, username, and password.
- You can type a query like ‘SELECT * FROM pg_stat_activity’;
- Right-click, select ‘Execute Query’ and the results will show in a new window.
Offline Installation
The extension will download and install a required PostgreSQL Tools Service package during activation. For machines with no Internet access, you can still use the extension by choosing theInstall from VSIX... option in the Extension view and installing a bundled release from our Releases page. Each operating system has a .vsix file with the required service included. Pick the file for your OS, download and install to get started. We recommend you choose a full release and ignore any alpha or beta releases as these are our daily builds used in testing.
Support
Support for this extension is provided on our GitHub Issue Tracker. You can submit a bug report, a feature suggestion or participate in [discussions].
JS JSX Snippets
Supported languages (file extensions)
- JavaScript (.js)
- TypeScript (.ts)
- JavaScript React (.jsx)
- TypeScript React (.tsx)
Usage
After install this snippets add this inside your settings"editor.snippetSuggestions": "top",Snippets
Import and export
TriggerContentimpimport name from 'module';imdimport { } from 'module';
Import package
TriggerContentDescriptionimrimport React from 'react';useful in testiptimport PropTypes from 'prop-types';
Basic methods
TriggerContentcomComment Blockclgconsole.log()
React components
Only contain class component and function component. TriggerContentrccclass component skeletonrccpclass component skeleton with prop types after the classrfcfunction component skeletonrfcpfunction component with prop types skeletonconclass default constructor with propsestempty state objectcdmcomponentDidMount methodscushouldComponentUpdate methodcdupcomponentDidUpdate methodcwuncomponentWillUnmount methodgsbugetSnapshotBeforeUpdate methodgdsfpstatic getDerivedStateFromProps methodcdccomponentDidCatch methodsstthis.setState with object as parameterssfthis.setState with function as parameterpropsthis.propsstatethis.statebndbinds the this of method inside the constructoruseStateuseState blockuseEffectuseEffect blockuseContextuseContext block
Jest
TriggerContentdescribedescribe Blocktesttest Blockitit Block
PropTypes
TriggerContentptaPropTypes.array,ptarPropTypes.array.isRequired,ptoPropTypes.object.,ptorPropTypes.object.isRequired,ptbPropTypes.bool,ptbrPropTypes.bool.isRequired,ptfPropTypes.func,ptfrPropTypes.func.isRequired,ptnPropTypes.number,ptnrPropTypes.number.isRequired,ptsPropTypes.string,ptsrPropTypes.string.isRequired,ptndPropTypes.node,ptndrPropTypes.node.isRequired,ptelPropTypes.element,ptelrPropTypes.element.isRequired,ptiPropTypes.instanceOf(ClassName),ptirPropTypes.instanceOf(ClassName).isRequired,ptePropTypes.oneOf(['News', 'Photos']),pterPropTypes.oneOf(['News', 'Photos']).isRequired,ptetPropTypes.oneOfType([PropTypes.string, PropTypes.number]),ptetrPropTypes.oneOfType([PropTypes.string, PropTypes.number]).isRequired,ptaoPropTypes.arrayOf(PropTypes.number),ptaorPropTypes.arrayOf(PropTypes.number).isRequired,ptooPropTypes.objectOf(PropTypes.number),ptoorPropTypes.objectOf(PropTypes.number).isRequired,ptshPropTypes.shape({color: PropTypes.string, fontSize: PropTypes.number}),ptshrPropTypes.shape({color: PropTypes.string, fontSize: PropTypes.number}).isRequired,

NEXT
Indent-Rainbow
A simple extension to make indentation more readable
If you like this plugin, please consider a small donation:
This extension colorizes the indentation in front of your text alternating four different colors on each step. Some may find it helpful in writing code for Nim or Python.
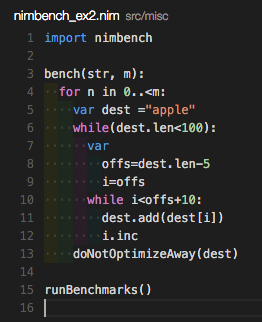
Configuration
Although you can just use it as it is there is the possibility to configure some aspects of the extension:// For which languages indent-rainbow should be activated (if empty it means all).
"indentRainbow.includedLanguages": [] // for example ["nim", "nims", "python"] // For which languages indent-rainbow should be deactivated (if empty it means none).
"indentRainbow.excludedLanguages": ["plaintext"] // The delay in ms until the editor gets updated.
"indentRainbow.updateDelay": 100 // 10 makes it super fast but may cost more resourcesincludedLanguages and excludedLanguages does not make much sense. Use one of both!
You can configure your own colors by adding and tampering with the following code:
// Defining custom colors instead of default "Rainbow" for dark backgrounds.
  // (Sorry: Changing them needs an editor restart for now!)
  "indentRainbow.colors": [
    "rgba(255,255,64,0.07)",
    "rgba(127,255,127,0.07)",
    "rgba(255,127,255,0.07)",
    "rgba(79,236,236,0.07)"
  ]
// The indent color if the number of spaces is not a multiple of "tabSize".
"indentRainbow.errorColor": "rgba(128,32,32,0.6)" // The indent color when there is a mix between spaces and tabs.
// To be disabled this coloring set this to an empty string.
"indentRainbow.tabmixColor": "rgba(128,32,96,0.6)"Notice:Skip error highlighting for RegEx patterns. For example, you may want to turn off the indent errors for JSDoc’s valid additional space (disabled by default), or comment lines beginning witherrorColorwas renamed fromerror_colorin earlier versions.
//
// Example of regular expression in JSON (note double backslash to escape characters)
  "indentRainbow.ignoreLinePatterns" : [
    "/[ \t]* [*]/g", // lines begining with <whitespace><space>*
    "/[ \t]+[/]{2}/g" // lines begininning with <whitespace>//
]markdown and haskell (which is the default)
"indentRainbow.ignoreErrorLanguages" : [
    "markdown",
    "haskell"
]"indentRainbow.colorOnWhiteSpaceOnly": true // false is the defaultnpm install
npm run vscode:prepublishnpm run compile makes the compiler recompile on file change.

NEXT
Path Intellisense
Visual Studio Code plugin that autocompletes filenames.Sponsors

Installation
In the command palette (cmd-shift-p) select Install Extension and choose Path Intellisense. To use Path Intellisense instead of the default autocompletion, the following configuration option must be added to your settings:{ "typescript.suggest.paths": false }Usage
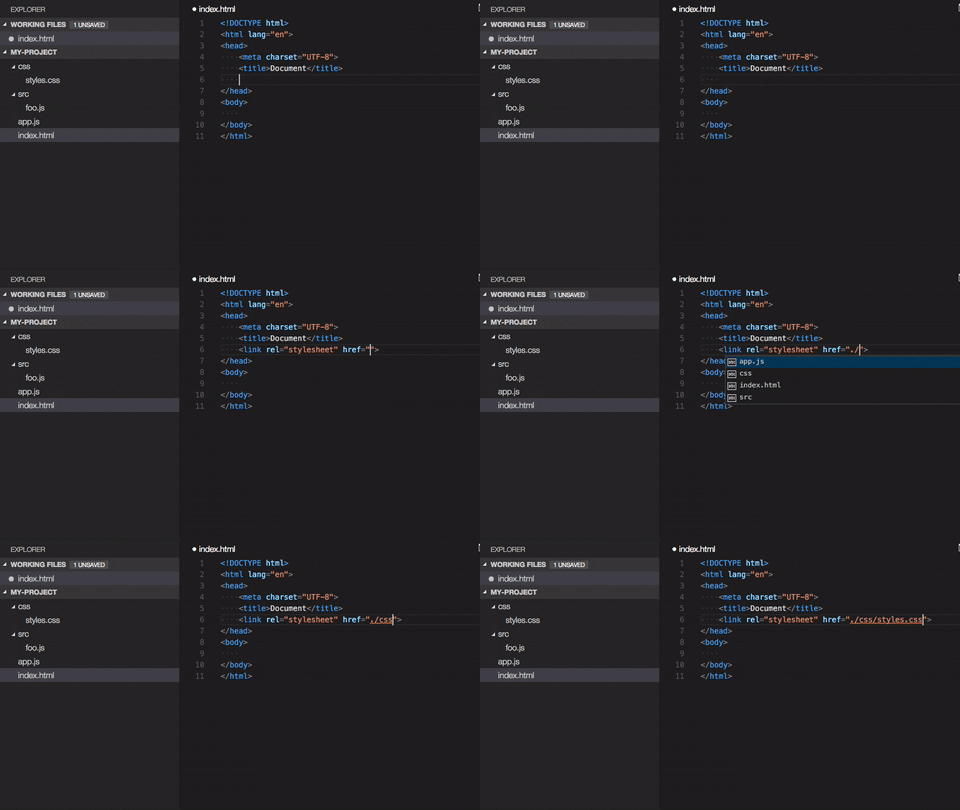
Node packages intellisense
Use npm intellisenseBaseUrl
Pathintellisense uses the ts.config.compilerOptions.baseUrl as a mapping. So no need to define it twice. There is no support for paths at the moment. For example:{
"baseUrl": "src",
}{
import {} from "src/mymodule";
}Settings
File extension in import statements
Path Intellisense removes the file extension by default if the statement is a import statement. To enable file extensions set the following setting to true:{
"path-intellisense.extensionOnImport": true,
}Show hidden files
Per default, hidden files are not displayed. Set this to true to show hidden files.{
"path-intellisense.showHiddenFiles": true,
}{
"files.exclude": {
"**/*.map.js": true
}
}Auto slash when navigating to folder
Per default, the autocompletion does not add a slash after a directory.{
"path-intellisense.autoSlashAfterDirectory": false,
}Absolute paths
Per default, absolute paths are resolved within the current workspace root path. Set it to false to resolve absolute paths to the disk root path.{
"path-intellisense.absolutePathToWorkspace": true,
}Mappings
Define custom mappings which can be useful for using absolute paths or in combination with webpack resolve options.{
"path-intellisense.mappings": {
"/": "${workspaceFolder}",
"lib": "${workspaceFolder}/lib",
"global": "/Users/dummy/globalLibs"
},
}
turbo-js
Turbo-js for vscode is forked from atom-turbo-javascriptDeclarations
l=⇥ let assignment
let ${1:name} = ${2:value}co⇥ const statement
const ${1:name}co=⇥ const assignment
const ${1:name} = ${2:value}Flow Control
if⇥ if statement
if (${1:condition}) {
  ${0}
}
ife⇥ else statement
if (${1:condition}) {
  ${0}
} else {}fo⇥ for of loop (ES6)
for (let ${1:key} of ${2:source}) {
  ${0}
}
wl⇥ while loop
while (${1:condition}) {
  ${0}
}
tc⇥ try/catch
try {
 ${0}
} catch (${1:err}) {}Functions
fn⇥ named function
function ${1:name}(${2:arguments}) {
  ${0}
}
iife⇥ immediately-invoked function expression (IIFE)
(function (${1:arguments}) {
  ${0}
})(${2});
af⇥ arrow function (ES6)
(${1:arguments}) => ${2:statement}afb⇥ arrow function with body (ES6)
(${1:arguments}) => {
\t${0}
}
Iterables
fe⇥ forEach loop (chainable)
${1:iterable}.forEach((${2:item}) => {
  ${0}
});
reduce⇥ reduce function (chainable)
${1:iterable}.reduce((${2:previous}, ${3:current}) => {
  ${0}
}${4:, initial});
filter⇥ filter function (chainable)
${1:iterable}.filter((${2:item}) => {
  ${0}
});
find⇥ ES6 find function (chainable)
${1:iterable}.find((${2:item}) => {
  ${0}
});
Objects and classes
cls⇥ class (ES6)
class ${1:name} {
  constructor(${2:arguments}) {
    ${0}
  }
}
cex⇥ child class (ES6)
class ${1:name} extends ${2:base} {
  constructor(${2:arguments}) {
    super(${2:arguments});
    ${0}
  }
}
med⇥ method (ES6 syntax)
${1:method}(${2:arguments}) {
  ${0}
}
get⇥ getter (ES6 syntax)
get ${1:property}() {
  ${0}
}
set⇥ setter (ES6 syntax)
set ${1:property}(${2:value}) {
  ${0}
}
proto⇥ prototype method (chainable)
${1:Class}.prototype.${2:methodName} = function (${3:arguments}) {
  ${0}
};
oa⇥ Object assign
Object.assign(${1:dest}, ${2:source})ok⇥ Object.keys
Object.keys(${1:obj})Promises
rp⇥ return Promise (ES6)
return new Promise((resolve, reject) => {
  ${0}
});
ES6 modules
ex⇥ module export
export ${1:member};exd⇥ module default export
export default ${1:member};im⇥ module import
import ${1:*} from '${2:module}';ima⇥ module import as
import ${1:*} as ${2:name} from '${3:module}';Console
cl⇥ console.log
console.log(${0});ce⇥ console.error
console.error(${0});cw⇥ console.warn
console.warn(${0});Timers
st⇥ setTimeout
setTimeout(() => {
  ${0}
}, ${1:delay});
si⇥ setInterval
setInterval(() => {
  ${0}
}, ${1:delay});
sim⇥ setImmediate
setImmediate(() => {
  ${0}
});
Node.js specifics
re⇥ require a module
require('${1:module}');cre⇥ require a module
const ${1:name} = require('${2:module}');me⇥ module.exports
module.exports = ${1:name};Miscellaneous
us⇥ use strict
'use strict';vscode-standardjs-snippets
Optinionated set of JS snippets. Originally forked from https://github.com/gaboesquivel/atom-standardjs-snippets, but we’ve added couple more. Also these are not using special characters because vscode doesn’t accept them in the snippets.Standard JavaScript Snippets for Visual studio code
A collection of javascript and react snippets for faster JavaScript development in Visual studio Code. This collection is complementary to atom/language-javascript. It’s based on extrabacon/atom-turbo-javascript.Code style
Yes!, no semicolons:- Are Semicolons Necessary in JavaScript?
- An Open Letter to JavaScript Leaders Regarding Semicolons
- JavaScript Semicolon Insertion — Everything You Need to Know
Snippets
Snippets are optimized to be short and easy to remember. Shortest are the ones you should be using most often. Note that these links work only on github, not on VSCode marketplace:- declarations
- flow control
- functions
- iterables
- objects and classes
- returning values
- types
- promises
- ES6 modules
- testing
- console
- timers
- DOM
- Node.js
- miscellaneous
Declarations
v⇥ var statement
var ${1:name}va⇥ var assignment
var ${1:name} = ${2:value}l⇥ let statement
let ${1:name}la⇥ let assignment awaited
let ${1:name} = await ${2:value}ly⇥ let yielded assignment
let ${1:name} = yield ${2:value}c⇥ const statement
const ${1:name}cd⇥ const from destructuring
const { ${1:name} } = ${2:value}ca⇥ const assignment awaited
const ${1:name} = await ${2:value}cd⇥ const from destructuring awaited
const { ${1:name} } = await ${2:value}cf⇥ const arrow function assignment
const ${1:name} = (${2:arguments}) => {\n\treturn ${0}\n}cy⇥ const yielded assignment
const ${1:name} = yield ${2:value}Flow Control
i⇥ if statement
if (${1:condition}) {
  ${0}
}
te⇥ ternary statement
${1:cond} ? ${2:true} : ${3: false}ta⇥ ternary statement
const ${0} = ${1:cond} ? ${2:true} : ${3: false}el⇥ else statement
else {
  ${0}
}
ife⇥ else statement
if (${1:condition}) {
  ${0}
} else {}ei⇥ else if statement
else if (${1:condition}) {
  ${0}
}
fl⇥ for loop (ES6)
for (let ${1:i} = 0, ${2:len} = ${3:iterable}.length ${1:i} < ${2:len}; ${1:i}++) {
  ${0}
}
fi⇥ for in loop (ES6)
for (let ${1:key} in ${2:source}) {
  if (${2:source}.hasOwnProperty(${1:key})) {
    ${0}
  }
}
fo⇥ for of loop (ES6)
for (const ${1:key} of ${2:source}) {
  ${0}
}
wl⇥ while loop
while (${1:condition}) {
  ${0}
}
wid⇥ while iteration decrementing
let ${1:array}Index = ${1:array}.length
while (${1:array}Index--) {
  ${0}
}
tc⇥ try/catch
try {
 ${0}
} catch (${1:err}) {}tf⇥ try/finally
try {
 ${0}
} finally {}tcf⇥ try/catch/finally
try {
  ${0}
} catch (${1:err}) {
} finally {}Functions
fan⇥ anonymous function
function (${1:arguments}) {${0}}fn⇥ named function
function ${1:name}(${2:arguments}) {
  ${0}
}
asf⇥ async function
async function (${1:arguments}) {
  ${0}
}
aa⇥ async arrow function with
async (${1:arguments}) => {
  ${0}
}
iife⇥ immediately-invoked function expression (IIFE)
;(function (${1:arguments}) {
  ${0}
})(${2})
aiife⇥ async immediately-invoked function expression
;(async (${1:arguments}) => {
  ${0}
})(${2})
fa⇥ function apply
${1:fn}.apply(${2:this}, ${3:arguments})fc⇥ function call
${1:fn}.call(${2:this}, ${3:arguments})fb⇥ function bind
${1:fn}.bind(${2:this}, ${3:arguments})af⇥ arrow function (ES6)
(${1:arguments}) => ${2:statement}fd⇥ arrow function with destructuring
({${1:arguments}}) => ${2:statement}fdr⇥ arrow function with destructuring returning destructured
({${1:arguments}}) => ${1:arguments}f⇥ arrow function with body (ES6)
(${1:arguments}) => {
  ${0}
}
fr⇥ arrow function with return (ES6)
(${1:arguments}) => {
  return ${0}
}
gf⇥ generator function (ES6)
function* (${1:arguments}) {
  ${0}
}
gfn⇥ named generator function (ES6)
function* ${1:name}(${1:arguments}) {
  ${0}
}
Iterables
fe⇥ forEach loop
${1:iterable}.forEach((${2:item}) => {
  ${0}
})
map⇥ map function
${1:iterable}.map((${2:item}) => {
  ${0}
})
reduce⇥ reduce function
${1:iterable}.reduce((${2:previous}, ${3:current}) => {
  ${0}
}${4:, initial})
filter⇥ filter function
${1:iterable}.filter((${2:item}) => {
  ${0}
})
find⇥ ES6 find function
${1:iterable}.find((${2:item}) => {
  ${0}
})
every⇥ every function
${1:iterable}.every((${2:item}) => {
  ${0}
})
some⇥ some function
${1:iterable}.some((${2:item}) => {
  ${0}
})
Objects and classes
cs⇥ class (ES6)
class ${1:name} {
  constructor(${2:arguments}) {
    ${0}
  }
}
csx⇥ extend a class (ES6)
class ${1:name} extends ${2:base} {
  constructor(${2:arguments}) {
    super(${2:arguments})
    ${0}
  }
}
m⇥ method (ES6 syntax)
${1:method} (${2:arguments}) {
  ${0}
}
get⇥ getter (ES6 syntax)
get ${1:property} () {
  ${0}
}
set⇥ setter (ES6 syntax)
set ${1:property} (${2:value}) {
  ${0}
}
gs⇥ getter and setter (ES6 syntax)
get ${1:property} () {
  ${0}
}
set ${1:property} (${2:value}) {}proto⇥ prototype method
${1:Class}.prototype.${2:methodName} = function (${3:arguments}) {
  ${0}
}
ok Object.keys
Object.keys(${1:obj})ov Object.values
Object.values(${1:obj})oe Object.entries
Object.entries(${1:obj})oc Object.create
Object.create(${1:obj})oa Object.assign
Object.assign(${1:dest}, ${2:source})og Object.getOwnPropertyDescriptor
Object.getOwnPropertyDescriptor(${1:dest}, '${2:prop}')od Object.defineProperty
Object.defineProperty(${1:dest}, '${2:prop}', {
  ${0}
})
Returning values
r⇥ return
return ${0}rt⇥ return this
return thisrn⇥ return null
return nullro⇥ return new object
return {
  ${0}
}
ra⇥ return new array
return [
  ${0}
]
rp⇥ return Promise (ES6)
return new Promise((resolve, reject) => {
  ${0}
})
tof⇥ typeof comparison
typeof ${1:source} === '${2:undefined}'tf⇥ this
this.iof⇥ instanceof comparison
${1:source} instanceof ${2:Object}ia⇥ isArray
Array.isArray(${1:source})Promises
pa⇥ Promise.all
Promise.all(${1:value})p⇥ new Promise (ES6)
new Promise((resolve, reject) => {
  ${0}
})
pt⇥ Promise.then
${1:promise}.then((${2:value}) => {
  ${0}
})
pc⇥ Promise.catch
${1:promise}.catch(error => {
  ${0}
})
ES6 modules
e⇥ module export
export ${1:member}ed⇥ module default export
export default ${1:member}edf⇥ module default export function
export default function ${1:name} (${2:arguments}) {\n\t${0}\n}ec⇥ module export const
export const ${1:member} = ${2:value}ef⇥ module export const
export function ${1:member} (${2:arguments}) {\n\t${0}\n}im⇥ module import
import ${1:*} from '${2:module}'ia⇥ module import as
import ${1:*} as ${2:name} from '${3:module}'id⇥ module import destructuring
import { $1 } from '${2:module}'BDD testing (Mocha, Jasmine, etc.)
desc⇥ describe
describe('${1:description}', function () {
  ${0}
})
it⇥ asynchronous "it"
it('${1:description}', async () => {
  ${0}
})
itd⇥ "it" with callback
it('${1:description}', (done) => {
  ${0}
})
its⇥ "it" synchronous
it('${1:description}', () => {
  ${0}
})
bf⇥ before test suite
before(function () {
  ${0}
})
bfe⇥ before each test
beforeEach(function () {
  ${0}
})
aft⇥ after test suite
after(function () {
  ${0}
})
afe⇥ after each test
afterEach(function () {
  ${0}
})
Timers
st⇥ setTimeout
setTimeout(() => {
  ${0}
}, ${1:delay})
si⇥ setInterval
setTimeout(() => {
  ${0}
}, ${1:delay})
sim⇥ setImmediate
setImmediate(() => {
  ${0}
})
DOM
ae⇥ addEventListener
${1:document}.addEventListener('${2:event}', ${3:ev} => {
  ${0}
})
rel⇥ removeEventListener
${1:document}.removeEventListener('${2:event}', ${3:listener})evc dom event cancel default and propagation
ev.preventDefault()
ev.stopPropagation()
return false
gi⇥ getElementById
${1:document}.getElementById('${2:id}')gc⇥ getElementsByClassName
Array.from(${1:document}.getElementsByClassName('${2:class}'))gt⇥ getElementsByTagName
Array.from(${1:document}.getElementsByTagName('${2:tag}'))qs⇥ querySelector
${1:document}.querySelector('${2:selector}')qsa⇥ querySelectorAll
Array.from(${1:document}.querySelectorAll('${2:selector}'))cdf⇥ createDocumentFragment
${1:document}.createDocumentFragment(${2:elem});cel⇥ createElement
${1:document}.createElement(${2:elem});heac⇥ appendChild
${1:document}.appendChild(${2:elem});herc⇥ removeChild
${1:document}.removeChild(${2:elem});hecla⇥ classList.add
${1:document}.classList.add('${2:class}');hect⇥ classList.toggle
${1:document}.classList.toggle('${2:class}');heclr⇥ classList.remove
${1:document}.classList.remove('${2:class}');hega⇥ getAttribute
${1:document}.getAttribute('${2:attr}');hesa⇥ setAttribute
${1:document}.setAttribute('${2:attr}', ${3:value});hera⇥ removeAttribute
${1:document}.removeAttribute('${2:attr}');Node.js
cb⇥ Node.js style callback
function (err, ${1:value}) {
  if (err) throw err
  t${0}
}
rq⇥ require a module
require('${1:module}')cr⇥ require and assign a module
const ${1:module} = require('${1:module}')em⇥ export member
exports.${1:name} = ${2:value}me⇥ module.exports
module.exports = ${1:name}on⇥ attach an event handler
${1:emitter}.on('${2:event}', (${3:arguments}) => {
  ${0}
})
Miscellaneous
uss⇥ use strict
'use strict'js⇥ JSON Stringify
JSON.stringify($0)jp⇥ JSON Parse
JSON.parse($0)a⇥ await
await ${0}apa⇥ Promise.all
await Promise.all(${1:value})apm⇥ Promise.all map
await Promise.all(${1:array}.map((async ${2:value}) => {\n\t${0}\n}))ast⇥ Promise sleep
await new Promise((r) => setTimeout(r, ${0}))Console
cl⇥ console.log
console.log(${0})cv⇥ console.log
console.log('${0}:', ${0})ce⇥ console.error
console.error(${0})cw⇥ console.warn
console.warn(${0})cod⇥ console.dir
console.dir(${0})React snippets
Are only enabled injsx or tsx files. If you write your jsx in js files, you need to copy the react.json files manually and add it to your custom snippets.
Why do we include them here?
If you’re not writing react, including them should not really bother you because they are not short as the regular JS snippets. Also IMHO react is the leading solution for FE apps deserves to be included by default, because any JS dev will have to write some react eventually over the course of his/her careeer. By having them in a single package we can easily make sure -there aren’t any conflicts in the trigger prefixes.Supported languages (file extensions)
- JavaScript (.js)
- TypeScript (.ts)
- JavaScript React (.jsx)
- TypeScript React (.tsx)
jjsx elementdpdestructuring of propsdsdestructuring of propsjcjsx self-closed elementjmjsx elements mapjmrjsx elements map with returnrfcfunctional component. Prefer for 99% of new react componentrfcefunctional component with emotion css importrccclass component skeletonrccpclass component skeleton with prop types after the classrcjcclass component skeleton without import and default export linesrcfcclass component skeleton that contains all the lifecycle methodsrfcpstateless component with prop types skeletonrptempty propTypes declarationconclass default constructor with propsconcclass default constructor with props and contextestempty state objectcwmcomponentWillMount methodcdmcomponentDidMount methodcwrcomponentWillReceiveProps methodcgdcomponentGetDerivedStateFromProps methodscushouldComponentUpdate methodcwupcomponentWillUpdate methodcdupcomponentDidUpdate methodcwuncomponentWillUnmount methodrenrender methodsstthis.setState with object as parameterssfthis.setState with function as parametertpthis.propststhis.stateususeStateueuseEffectuecuseEffect with a cleanup functionuruseRefcccreateContextucuseContextumeuseMemo——-—————————————————————-uquseQuery to be used with graphql-codegenuqcuseQuery that loads up data for current component, to be used with graphql-codegenumuseMutation to be used with graphql-codegenuqguseQuery with raw gqlumguseMutation with raw gql
There are also snippets to be triggered with a text selection(trigger via insert snippet command):
jsx element wrap selectionpt so it's easy to group it all together and explore all the available options. On top of that each prop type snippets has one equivalent when we need to declare that this property is also required. For example pta creates the PropTypes.array and ptar creates the PropTypes.array.isRequired
TriggerContentptaPropTypes.array,ptarPropTypes.array.isRequired,ptbPropTypes.bool,ptbrPropTypes.bool.isRequired,ptfPropTypes.func,ptfrPropTypes.func.isRequired,ptnPropTypes.number,ptnrPropTypes.number.isRequired,ptoPropTypes.object.,ptorPropTypes.object.isRequired,ptsPropTypes.string,ptsrPropTypes.string.isRequired,ptndPropTypes.node,ptndrPropTypes.node.isRequired,ptelPropTypes.element,ptelrPropTypes.element.isRequired,ptiPropTypes.instanceOf(ClassName),ptirPropTypes.instanceOf(ClassName).isRequired,ptePropTypes.oneOf(['News', 'Photos']),pterPropTypes.oneOf(['News', 'Photos']).isRequired,ptetPropTypes.oneOfType([PropTypes.string, PropTypes.number]),ptetrPropTypes.oneOfType([PropTypes.string, PropTypes.number]).isRequired,ptaoPropTypes.arrayOf(PropTypes.number),ptaorPropTypes.arrayOf(PropTypes.number).isRequired,ptooPropTypes.objectOf(PropTypes.number),ptoorPropTypes.objectOf(PropTypes.number).isRequired,ptshPropTypes.shape({color: PropTypes.string, fontSize: PropTypes.number}),ptshrPropTypes.shape({color: PropTypes.string, fontSize: PropTypes.number}).isRequired,

C/C++ for Visual Studio Code
Repository | Issues | Documentation | Code Samples | Offline Installers
The C/C++ extension adds language support for C/C++ to Visual Studio Code, including features such as IntelliSense and debugging.Overview and tutorials
C/C++ extension tutorials per compiler and platform * Microsoft C++ compiler (MSVC) on Windows * GCC and Mingw-w64 on Windows * GCC on Windows Subsystem for Linux (WSL) * GCC on Linux * Clang on macOSQuick links
- Editing features (IntelliSense)
- IntelliSense configuration
- Enhanced colorization
- Debugging
- Debug configuration
- Enable logging for IntelliSense or debugging
Questions and feedback
FAQs Check out the FAQs before filing a question. Provide feedback File questions, issues, or feature requests for the extension. Known issues If someone has already filed an issue that encompasses your feedback, please leave a 👍 or 👎 reaction on the issue to upvote or downvote it to help us prioritize the issue. Quick survey Let us know what you think of the extension by taking the quick survey.Offline installation
The extension has platform-specific binary dependencies, therefore installation via the Marketplace requires an Internet connection in order to download additional dependencies. If you are working on a computer that does not have access to the Internet or is behind a strict firewall, you may need to use our platform-specific packages and install them by running VS Code’s"Install from VSIX..." command. These "offline' packages are available at: https://github.com/Microsoft/vscode-cpptools/releases.
PackagePlatformcpptools-linux.vsixLinux 64-bitcpptools-linux-armhf.vsixLinux ARM 32-bitcpptools-linux-aarch64.vsixLinux ARM 64-bitcpptools-osx.vsixmacOScpptools-win32.vsixWindows 64-bit & 32-bitcpptools-win-arm64.vsixWindows ARM64cpptools-linux32.vsixLinux 32-bit (available up to version 0.27.0)
Contribution
Contributions are always welcome. Please see our contributing guide for more details.Microsoft Open Source Code of Conduct
This project has adopted the Microsoft Open Source Code of Conduct. For more information see the Code of Conduct FAQ or contact opencode@microsoft.com with any additional questions or comments.Data and telemetry
This extension collects usage data and sends it to Microsoft to help improve our products and services. Collection of telemetry is controlled via the same setting provided by Visual Studio Code:"telemetry.enableTelemetry". Read our privacy statement to learn more.

NEXT
Visual Studio IntelliCode
The Visual Studio IntelliCode extension provides AI-assisted development features for Python, TypeScript/JavaScript and Java developers in Visual Studio Code, with insights based on understanding your code context combined with machine learning. You’ll need Visual Studio Code October 2018 Release 1.29.1 or later to use this extension. For each supported language, please refer to the “Getting Started” section below to understand any other pre-requisites you’ll need to install and configure to get IntelliCode completions. For C#, C++, TypeScript/JavaScript, and XAML support in the Visual Studio IDE, check out the IntelliCode extension on the Visual Studio Marketplace.About IntelliCode
This extension provides AI-assisted IntelliSense by showing recommended completion items for your code context at the top of the completions list. The example below shows this in action for Python code.
Getting Started
Install the Visual Studio IntelliCode extension by clicking the install link on this page, or install from the Extensions tab in Visual Studio Code. Then follow the language-specific instructions below.For TypeScript/JavaScript users:
That’s it — just open a TypeScript or JavaScript file, and start editing.For Python users:
- Set up the Python extension by following the steps in the Python tutorial
- Start editing Python files, you should get a prompt to enable the Microsoft Python Language Server, which itself is a preview release.
- Reload Visual Studio Code after enabling the language server
- After the language server finishes initializing, you should now see recommended completions
For Java users:
- Set up the Java extension for Visual Studio Code by following the steps in the Java Tutorial
- Make sure that you have a minimum of Java 8 Update 151 installed
- Reload Visual Studio Code after enabling the Java extension
- After the Java language server finishes initializing, you should now see recommended completions
Comments
Post a Comment
Share your thoughts!