The Penultimate Web Developer’s Cheat Sheet
I am literally just going to combine a fair number of my Cheat Sheets in no particular order.

HTML:
<!-- Document Summary -->
<!DOCTYPE html> <!-- Tells the browser that HTML5 version of HTML to be recognized by the browser -->
<html lang="en"></html> <!-- The HTML lang attribute is used to identify the language of text content on the web. This information helps search engines return language specific results, -->
<head></head> <!-- Contains Information specific to the page like title, styles and scripts -->
<title></title> <!-- Title for the page that shows up in the browser title bar -->
<body></body> <!-- Content that the user will see -->
<!-- Document Information -->
<base/> <!-- Usefull for specifying relative links in a document -->
<style></style> <!-- Contains styles for the html document -->
<meta/> <!-- Contains additional information about the page, author, page description and other hidden page info -->
<script></script> <!-- Contains all scripts internal or external -->
<link/> <!-- Used to create relationships with external pages and stylesheets -->
<!-- Document Structure -->
<h1></h1> ... <h6></h6> <!-- All six levels of heading with 1 being the most promiment and 6 being the least prominent -->
<p></p> <!-- Used to organize paragraph text -->
<div></div> <!-- A generic container used to denote a page section -->
<span></span> <!-- Inline section or block container used for creating inline style elements -->
<br/> <!-- Creates a line-break -->
<hr> <!-- Creates a sectional break into HTML -->
<!-- Text Formatting -->
<strong></strong> and <b></b> <!-- Makes text contained in the tag as bold -->
<em></em> and <i></i> <!-- Alternative way to make the text contained in the tag as italic -->
<strike></strike> <!-- Creates a strike through the text element -->
<pre></pre> <!-- Preformatted monospace text block with some spacing intact -->
<blockquote></blockquote> <!-- Contains long paragraphs of quotations often cited -->
<abbr></abbr> <!-- Contains abbreviations while also making the full form avaialable -->
<address></address> <!-- Used to display contact information -->
<code></code> <!-- Used to display inline code snippets -->
<q></q> <!-- Defines a short inline quotation -->
<sub></sub> <!-- Defines subscripted text -->
<sup></sup> <!-- Defines superscripted text -->
<kbd></kbd> <!-- Specifies text as keyboard input -->
<small></small> <!-- Specifies small text -->
<!-- Links Formatting -->
<a href="url"></a> <!-- Used to link to external or internal pages of a wbesite -->
<a href="mailto:email@example.com"></a> <!-- Used to link to an email address -->
<a href="name"></a> <!-- Used to link to a document element -->
<a href="#name"></a> <!-- Used to link to specific div element -->
<a href="tel://####-####-##"></a> <!-- Used to display phone numbers and make them clickable -->
<!-- Image Formatting -->
<img src="url" alt="text"> <!-- Used to display images in a webpage where src="url" contains the link to the image source and alt="" contains an alternative text to display when the image is not displayed -->
<!-- List Formatting -->
<ol></ol> <!-- Used to create ordered lists with numbers in the items -->
<ul></ul> <!-- Used to display unordered lists with numbers in the items -->
<li></li> <!-- Contains list items inside ordered and unordered lists -->
<dl></dl> <!-- Contains list item definitions -->
<dt></dt> <!-- Definition of single term inline with body content -->
<dd></dd> <!-- The descrpition of the defined term -->
<!-- Forms Formatting and Attributes -->
<form action="url"></form> <!-- Form element creates a form and action="" specifies where the data is to be sent to when the visitor submits the form -->
<!-- Supported attributes -->
method="somefunction()" <!-- Contains the type of request (GET, POST... etc) which dictates how to send the data of the form -->
enctype="" <!-- Dictates how the data is to be encoded when the data is sent to the web server. -->
autocomplete="" <!-- Specifies if the autocomplete functionality is enabled or not -->
novalidate <!-- Dictates if the form will be validated or not -->
accept-charset="" <!-- Identifies the character encoding upon form submission -->
target="" <!-- Tell where to display the information upon form submission. Possible values: '_blank', '_self', '_parent', '_top' -->
<fieldset disabled="disabled"></fieldset> <!-- Identifies the group of all fields in the form -->
<label for=""></label> <!-- A simple field label telling the user what to type in the field -->
<legend></legend> <!-- The form legend acts as a caption for the fieldset element -->
<input type="text/email/number/color/date"> <!-- Input is the input field where the user can input various types of data -->
<!-- Supported attributes -->
name="" <!-- Describes the name of the form -->
width="" <!-- Specifies the width of an input field -->
value="" <!-- Describes the value of the input information field -->
size="" <!-- Specifies the input element width in characters -->
maxlength="" <!-- Specifies the maximum input character numbers -->
required="" <!-- Specifies if the input field is required to fill in before submitting the form -->
step="" <!-- Identifies the legal number intervals of the input field -->
<textarea name="" id="" cols="30" rows="10"> <!-- Specifies a large input text field for longer messages -->
</textarea>
<select name=""></select> <!-- Describes a dropdown box for users to select from variety of choices -->
<!-- Supported attributes -->
name="" <!-- The name for a dropdown combination box -->
size="" <!-- Specifies the number of available options -->
multiple <!-- Allows for multiple option selections -->
required <!-- Requires that a value is selected before submitting the form -->
autofocus <!-- Specifies that the dropdown automatically comes to focus once the page loads -->
<optgroup></optgroup> <!-- Specifies the entire grouping of available options -->
<option value=""></option> <!-- Defines one of the avaialble option from the dropdown list -->
<button></button> <!-- A clickable button to submit the form -->
<!-- Tables Formatting -->
<table></table> <!-- Defines and contains all table related content -->
<caption></caption> <!-- A description of what table is and what it contains -->
<thead></thead> <!-- The table headers contain the type of information defined in each column underneath -->
<tbody></tbody> <!-- Contains the tables data or information -->
<tfoot></tfoot> <!-- Defines table footer -->
<tr></tr> <!-- Contains the information to be included in a table row -->
<th></th> <!-- Contains the information to be included in a single table header -->
<td></td> <!-- Contains actual information in a table cell -->
<colgroup></colgroup> <!-- Groups a single or multiple columns for formatting purposes -->
<col> <!-- Defines a single column of information inside a table -->
<!-- Objects and iFrames -->
<object data=""></object> <!-- Describes and embed file type including audio, video, PDF's, images -->
<!-- Supported attributes -->
type="" <!-- Describes the type of media embedded -->
height="" <!-- Describes the height of the object in pixels -->
width="" <!-- Describes the width of the object in pixels -->
usemap="" <!-- This is the name of the client-side image map in the object -->
<iframe src="" frameborder="0"></iframe> <!-- Contains an inline frame that allows to embed external information -->
<embed src="" type=""> <!-- Acts as a container for external application or plug-in -->
src="" <!-- The source of the external file you're embedding -->
width="" <!-- Describes the width of the iframe in pixels -->
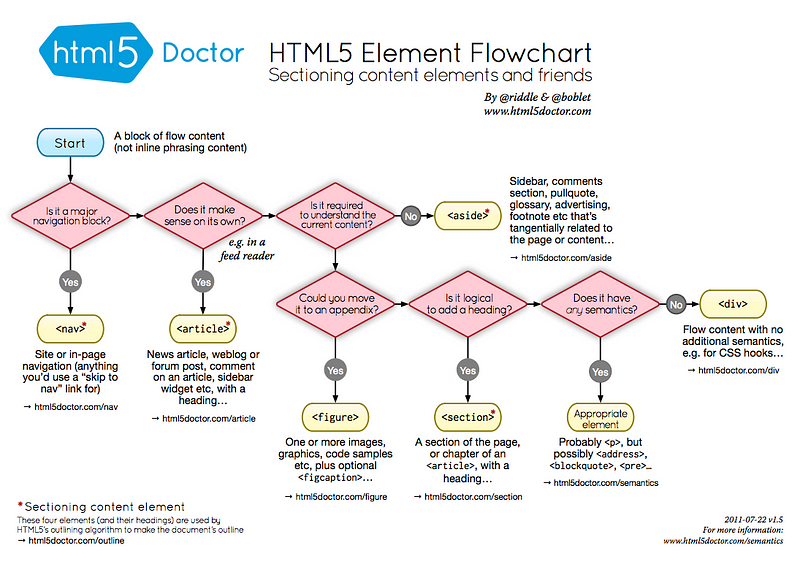
<!-- HTML5 New Tags -->
<header></header> <!-- Defines the header block for a document or a section -->
<footer></footer> <!-- Defines the footer block for a document or a section -->
<main></main> <!-- Describes the main content of a document -->
<article></article> <!-- Identifies an article inside a document -->
<aside></aside> <!-- Specifies content contained in a document sidebar -->
<section></section> <!-- Defines a section of a document -->
<details></details> <!-- Describes additonal information that user can view or hide -->
<dialog></dialog> <!-- A dialog box or a window -->
<figure></figure> <!-- An independent content block featuring images, diagrams or illustrations -->
<figcaption></figcaption> <!-- Caption that describe a figure -->
<mark></mark> <!-- Displays a portion of highlighted text with in a page content -->
<nav></nav> <!-- Navigation links for the user in a document -->
<menuitem></menuitem> <!-- The specific menu item that a user can raise from a pop up menu -->
<meter></meter> <!-- Describes the scalar measurement with in a known array -->
<progress></progress> <!-- Displays the progress of a task usually a progress bar -->
<rp></rp> <!-- Describes text within the browsers that do not support ruby notations -->
<rt></rt> <!-- Displays east asian typography character details -->
<ruby></ruby> <!-- Describes annotations for east asian typography -->
<summary></summary> <!-- Contains a visible heading for details element -->
<bdi></bdi> <!-- Helps you format parts of text in a different direction than other text -->
<time></time> <!-- Identifies the time and date -->
<wbr> <!-- A line break within the content -->
<!-- Some other useful tags -->
<canvas></canvas> <!-- Allows to draw 2D shapes on the web page with the help of javascript -->
<keygen> <!-- Represents a control for generating a public-private key pair -->
<map></map> <!-- Specifies an image map -->
<!-- Collective Character Obejcts -->
" " Quotation Marks - "
& & Ampersand - &
< < Less than sign - <
> > Greater than sign - >
  Non-breaking space
© © Copyright Symbol - ©
@ Ü @ symbol - @
• ö Small bullet - .
™ û Trademark Symbol - ™


GIT:
Git is a distributed version control and source code management system.
It does this through a series of snapshots of your project, and it works with those snapshots to provide you with functionality to version and manage your source code.
Version control is a system that records changes to a file(s), over time.
- Centralized version control focuses on synchronizing, tracking, and backing up files.
- Distributed version control focuses on sharing changes. Every change has a unique id.
- Distributed systems have no defined structure. You could easily have a SVN style, centralized system, with git.
- Can work offline.
- Collaborating with others is easy!
- Branching is easy!
- Branching is fast!
- Merging is easy!
- Git is fast.
- Git is flexible.
A set of files, directories, historical records, commits, and heads. Imagine it as a source code data structure, with the attribute that each source code "element" gives you access to its revision history, among other things.
A git repository is comprised of the .git directory & working tree.
The .git directory contains all the configurations, logs, branches, HEAD, and more. Detailed List.
This is basically the directories and files in your repository. It is often referred to as your working directory.
The Index is the staging area in git. It's basically a layer that separates your working tree from the Git repository. This gives developers more power over what gets sent to the Git repository.
A git commit is a snapshot of a set of changes, or manipulations to your Working Tree. For example, if you added 5 files, and removed 2 others, these changes will be contained in a commit (or snapshot). This commit can then be pushed to other repositories, or not!
A branch is essentially a pointer to the last commit you made. As you go on committing, this pointer will automatically update to point to the latest commit.
A tag is a mark on specific point in history. Typically people use this functionality to mark release points (v1.0, and so on).
HEAD is a pointer that points to the current branch. A repository only has 1 active HEAD. head is a pointer that points to any commit. A repository can have any number of heads.
- Modified - Changes have been made to a file but file has not been committed to Git Database yet
- Staged - Marks a modified file to go into your next commit snapshot
- Committed - Files have been committed to the Git Database
Create an empty Git repository. The Git repository's settings, stored information, and more is stored in a directory (a folder) named ".git".
$ git init
To configure settings. Whether it be for the repository, the system itself,
or global configurations ( global config file is ~/.gitconfig
).
# Print & Set Some Basic Config Variables (Global)
$ git config --global user.email "MyEmail@Zoho.com"
$ git config --global user.name "My Name"
To give you quick access to an extremely detailed guide of each command. Or to just give you a quick reminder of some semantics.
# Quickly check available commands
$ git help
# Check all available commands
$ git help -a
# Command specific help - user manual
# git help <command_here>
$ git help add
$ git help commit
$ git help init
# or git <command_here> --help
$ git add --help
$ git commit --help
$ git init --help
To intentionally untrack file(s) & folder(s) from git. Typically meant for private & temp files which would otherwise be shared in the repository.
$ echo "temp/" >> .gitignore
$ echo "private_key" >> .gitignore
To show differences between the index file (basically your working copy/repo) and the current HEAD commit.
# Will display the branch, untracked files, changes and other differences
$ git status
# To learn other "tid bits" about git status
$ git help status
To add files to the staging area/index. If you do not git add
new files to
the staging area/index, they will not be included in commits!
# add a file in your current working directory
$ git add HelloWorld.java
# add a file in a nested dir
$ git add /path/to/file/HelloWorld.c
# Regular Expression support!
$ git add ./*.java
# You can also add everything in your working directory to the staging area.
$ git add -A
This only adds a file to the staging area/index, it doesn't commit it to the working directory/repo.
Manage your branches. You can view, edit, create, delete branches using this command.
# list existing branches & remotes
$ git branch -a
# create a new branch
$ git branch myNewBranch
# delete a branch
$ git branch -d myBranch
# rename a branch
# git branch -m <oldname> <newname>
$ git branch -m myBranchName myNewBranchName
# edit a branch's description
$ git branch myBranchName --edit-description
Manage your tags
# List tags
$ git tag
# Create a annotated tag
# The -m specifies a tagging message, which is stored with the tag.
# If you don’t specify a message for an annotated tag,
# Git launches your editor so you can type it in.
$ git tag -a v2.0 -m 'my version 2.0'
# Show info about tag
# That shows the tagger information, the date the commit was tagged,
# and the annotation message before showing the commit information.
$ git show v2.0
# Push a single tag to remote
$ git push origin v2.0
# Push a lot of tags to remote
$ git push origin --tags
Updates all files in the working tree to match the version in the index, or specified tree.
# Checkout a repo - defaults to master branch
$ git checkout
# Checkout a specified branch
$ git checkout branchName
# Create a new branch & switch to it
# equivalent to "git branch <name>; git checkout <name>"
$ git checkout -b newBranch
Clones, or copies, an existing repository into a new directory. It also adds remote-tracking branches for each branch in the cloned repo, which allows you to push to a remote branch.
# Clone learnxinyminutes-docs
$ git clone https://github.com/adambard/learnxinyminutes-docs.git
# shallow clone - faster cloning that pulls only latest snapshot
$ git clone --depth 1 https://github.com/adambard/learnxinyminutes-docs.git
# clone only a specific branch
$ git clone -b master-cn https://github.com/adambard/learnxinyminutes-docs.git --single-branch
Stores the current contents of the index in a new "commit." This commit contains the changes made and a message created by the user.
# commit with a message
$ git commit -m "Added multiplyNumbers() function to HelloWorld.c"
# signed commit with a message (user.signingkey must have been set
# with your GPG key e.g. git config --global user.signingkey 5173AAD5)
$ git commit -S -m "signed commit message"
# automatically stage modified or deleted files, except new files, and then commit
$ git commit -a -m "Modified foo.php and removed bar.php"
# change last commit (this deletes previous commit with a fresh commit)
$ git commit --amend -m "Correct message"
Shows differences between a file in the working directory, index and commits.
# Show difference between your working dir and the index
$ git diff
# Show differences between the index and the most recent commit.
$ git diff --cached
# Show differences between your working dir and the most recent commit
$ git diff HEAD
Allows you to quickly search a repository.
Optional Configurations:
# Thanks to Travis Jeffery for these
# Set line numbers to be shown in grep search results
$ git config --global grep.lineNumber true
# Make search results more readable, including grouping
$ git config --global alias.g "grep --break --heading --line-number"
# Search for "variableName" in all java files
$ git grep 'variableName' -- '*.java'
# Search for a line that contains "arrayListName" and, "add" or "remove"
$ git grep -e 'arrayListName' --and \( -e add -e remove \)
Google is your friend; for more examples Git Grep Ninja
Display commits to the repository.
# Show all commits
$ git log
# Show only commit message & ref
$ git log --oneline
# Show merge commits only
$ git log --merges
# Show all commits represented by an ASCII graph
$ git log --graph
"Merge" in changes from external commits into the current branch.
# Merge the specified branch into the current.
$ git merge branchName
# Always generate a merge commit when merging
$ git merge --no-ff branchName
Rename or move a file
# Renaming a file
$ git mv HelloWorld.c HelloNewWorld.c
# Moving a file
$ git mv HelloWorld.c ./new/path/HelloWorld.c
# Force rename or move
# "existingFile" already exists in the directory, will be overwritten
$ git mv -f myFile existingFile
Pulls from a repository and merges it with another branch.
# Update your local repo, by merging in new changes
# from the remote "origin" and "master" branch.
# git pull <remote> <branch>
$ git pull origin master
# By default, git pull will update your current branch
# by merging in new changes from its remote-tracking branch
$ git pull
# Merge in changes from remote branch and rebase
# branch commits onto your local repo, like: "git fetch <remote> <branch>, git
# rebase <remote>/<branch>"
$ git pull origin master --rebase
Push and merge changes from a branch to a remote & branch.
# Push and merge changes from a local repo to a
# remote named "origin" and "master" branch.
# git push <remote> <branch>
$ git push origin master
# By default, git push will push and merge changes from
# the current branch to its remote-tracking branch
$ git push
# To link up current local branch with a remote branch, add -u flag:
$ git push -u origin master
# Now, anytime you want to push from that same local branch, use shortcut:
$ git push
Stashing takes the dirty state of your working directory and saves it on a stack of unfinished changes that you can reapply at any time.
Let's say you've been doing some work in your git repo, but you want to pull
from the remote. Since you have dirty (uncommitted) changes to some files, you
are not able to run git pull
. Instead, you can run git stash
to save your
changes onto a stack!
$ git stash
Saved working directory and index state \
"WIP on master: 049d078 added the index file"
HEAD is now at 049d078 added the index file
(To restore them type "git stash apply")
Now you can pull!
git pull
...changes apply...
Now check that everything is OK
$ git status
# On branch master
nothing to commit, working directory clean
You can see what "hunks" you've stashed so far using git stash list
.
Since the "hunks" are stored in a Last-In-First-Out stack, our most recent
change will be at top.
$ git stash list
stash@{0}: WIP on master: 049d078 added the index file
stash@{1}: WIP on master: c264051 Revert "added file_size"
stash@{2}: WIP on master: 21d80a5 added number to log
Now let's apply our dirty changes back by popping them off the stack.
$ git stash pop
# On branch master
# Changes not staged for commit:
# (use "git add <file>..." to update what will be committed)
#
# modified: index.html
# modified: lib/simplegit.rb
#
git stash apply
does the same thing
Now you're ready to get back to work on your stuff!
Take all changes that were committed on one branch, and replay them onto another branch. Do not rebase commits that you have pushed to a public repo.
# Rebase experimentBranch onto master
# git rebase <basebranch> <topicbranch>
$ git rebase master experimentBranch
Reset the current HEAD to the specified state. This allows you to undo merges, pulls, commits, adds, and more. It's a great command but also dangerous if you don't know what you are doing.
# Reset the staging area, to match the latest commit (leaves dir unchanged)
$ git reset
# Reset the staging area, to match the latest commit, and overwrite working dir
$ git reset --hard
# Moves the current branch tip to the specified commit (leaves dir unchanged)
# all changes still exist in the directory.
$ git reset 31f2bb1
# Moves the current branch tip backward to the specified commit
# and makes the working dir match (deletes uncommitted changes and all commits
# after the specified commit).
$ git reset --hard 31f2bb1
Reflog will list most of the git commands you have done for a given time period, default 90 days.
This give you the chance to reverse any git commands that have gone wrong (for instance, if a rebase has broken your application).
You can do this:
git reflog
to list all of the git commands for the rebase
38b323f HEAD@{0}: rebase -i (finish): returning to refs/heads/feature/add_git_reflog
38b323f HEAD@{1}: rebase -i (pick): Clarify inc/dec operators
4fff859 HEAD@{2}: rebase -i (pick): Update java.html.markdown
34ed963 HEAD@{3}: rebase -i (pick): [yaml/en] Add more resources (#1666)
ed8ddf2 HEAD@{4}: rebase -i (pick): pythonstatcomp spanish translation (#1748)
2e6c386 HEAD@{5}: rebase -i (start): checkout 02fb96d
- Select where to reset to, in our case its
2e6c386
, orHEAD@{5}
- 'git reset --hard HEAD@{5}' this will reset your repo to that head
- You can start the rebase again or leave it alone.
Revert can be used to undo a commit. It should not be confused with reset which restores the state of a project to a previous point. Revert will add a new commit which is the inverse of the specified commit, thus reverting it.
# Revert a specified commit
$ git revert <commit>
The opposite of git add, git rm removes files from the current working tree.
# remove HelloWorld.c
$ git rm HelloWorld.c
# Remove a file from a nested dir
$ git rm /pather/to/the/file/HelloWorld.c

CSS:
Web pages are built with HTML, which specifies the content of a page. CSS (Cascading Style Sheets) is a separate language which specifies a page's appearance.
CSS code is made of static rules. Each rule takes one or more selectors and gives specific values to a number of visual properties. Those properties are then applied to the page elements indicated by the selectors.
This guide has been written with CSS 2 in mind, which is extended by the new features of CSS 3.
NOTE: Because CSS produces visual results, in order to learn it, you need to try everything in a CSS playground like dabblet. The main focus of this article is on the syntax and some general tips.
/* comments appear inside slash-asterisk, just like this line!
there are no "one-line comments"; this is the only comment style */
/* ####################
## SELECTORS
#################### */
/* the selector is used to target an element on a page. */
selector { property: value; /* more properties...*/ }
/*
Here is an example element:
<div class='class1 class2' id='anID' attr='value' otherAttr='en-us foo bar' />
*/
/* You can target it using one of its CSS classes */
.class1 { }
/* or both classes! */
.class1.class2 { }
/* or its name */
div { }
/* or its id */
#anID { }
/* or using the fact that it has an attribute! */
[attr] { font-size:smaller; }
/* or that the attribute has a specific value */
[attr='value'] { font-size:smaller; }
/* starts with a value (CSS 3) */
[attr^='val'] { font-size:smaller; }
/* or ends with a value (CSS 3) */
[attr$='ue'] { font-size:smaller; }
/* or contains a value in a space-separated list */
[otherAttr~='foo'] { }
[otherAttr~='bar'] { }
/* or contains a value in a dash-separated list, e.g., "-" (U+002D) */
[otherAttr|='en'] { font-size:smaller; }
/* You can combine different selectors to create a more focused selector. Don't
put spaces between them. */
div.some-class[attr$='ue'] { }
/* You can select an element which is a child of another element */
div.some-parent > .class-name { }
/* or a descendant of another element. Children are the direct descendants of
their parent element, only one level down the tree. Descendants can be any
level down the tree. */
div.some-parent .class-name { }
/* Warning: the same selector without a space has another meaning.
Can you guess what? */
div.some-parent.class-name { }
/* You may also select an element based on its adjacent sibling */
.i-am-just-before + .this-element { }
/* or any sibling preceding it */
.i-am-any-element-before ~ .this-element { }
/* There are some selectors called pseudo classes that can be used to select an
element only when it is in a particular state */
/* for example, when the cursor hovers over an element */
selector:hover { }
/* or a link has been visited */
selector:visited { }
/* or hasn't been visited */
selected:link { }
/* or an element is in focus */
selected:focus { }
/* any element that is the first child of its parent */
selector:first-child {}
/* any element that is the last child of its parent */
selector:last-child {}
/* Just like pseudo classes, pseudo elements allow you to style certain parts of
a document */
/* matches a virtual first child of the selected element */
selector::before {}
/* matches a virtual last child of the selected element */
selector::after {}
/* At appropriate places, an asterisk may be used as a wildcard to select every
element */
* { } /* all elements */
.parent * { } /* all descendants */
.parent > * { } /* all children */
/* Group any number of selectors to define styles that affect all selectors
in the group */
selector1, selector2 { }
/* ####################
## PROPERTIES
#################### */
selector {
/* Units of length can be absolute or relative. */
/* Relative units */
width: 50%; /* percentage of parent element width */
font-size: 2em; /* multiples of element's original font-size */
font-size: 2rem; /* or the root element's font-size */
font-size: 2vw; /* multiples of 1% of the viewport's width (CSS 3) */
font-size: 2vh; /* or its height */
font-size: 2vmin; /* whichever of a vh or a vw is smaller */
font-size: 2vmax; /* or greater */
/* Absolute units */
width: 200px; /* pixels */
font-size: 20pt; /* points */
width: 5cm; /* centimeters */
min-width: 50mm; /* millimeters */
max-width: 5in; /* inches */
/* Colors */
color: #F6E; /* short hex format */
color: #FF66EE; /* long hex format */
color: tomato; /* a named color */
color: rgb(255, 255, 255); /* as rgb values */
color: rgb(10%, 20%, 50%); /* as rgb percentages */
color: rgba(255, 0, 0, 0.3); /* as rgba values (CSS 3) Note: 0 <= a <= 1 */
color: transparent; /* equivalent to setting the alpha to 0 */
color: hsl(0, 100%, 50%); /* as hsl percentages (CSS 3) */
color: hsla(0, 100%, 50%, 0.3); /* as hsl percentages with alpha */
/* Borders */
border-width:5px;
border-style:solid;
border-color:red; /* similar to how background-color is set */
border: 5px solid red; /* this is a short hand approach for the same */
border-radius:20px; /* this is a CSS3 property */
/* Images as backgrounds of elements */
background-image: url(/img-path/img.jpg); /* quotes inside url() optional */
/* Fonts */
font-family: Arial;
/* if the font family name has a space, it must be quoted */
font-family: "Courier New";
/* if the first one is not found, the browser uses the next, and so on */
font-family: "Courier New", Trebuchet, Arial, sans-serif;
}
Save a CSS stylesheet with the extension .css
.
<!-- You need to include the css file in your page's <head>. This is the
recommended method. Refer to http://stackoverflow.com/questions/8284365 -->
<link rel='stylesheet' type='text/css' href='path/to/style.css'>
<!-- You can also include some CSS inline in your markup. -->
<style>
a { color: purple; }
</style>
<!-- Or directly set CSS properties on the element. -->
<div style="border: 1px solid red;">
</div>
An element may be targeted by multiple selectors and may have a property set on it in more than once. In these cases, one of the rules takes precedence over others. Rules with a more specific selector take precedence over a less specific one, and a rule occurring later in the stylesheet overwrites a previous one (which also means that if two different linked stylesheets contain rules for an element and if the rules are of the same specificity, then order of linking would take precedence and the sheet linked latest would govern styling) .
This process is called cascading, hence the name Cascading Style Sheets.
Given the following CSS:
/* A */
p.class1[attr='value']
/* B */
p.class1 { }
/* C */
p.class2 { }
/* D */
p { }
/* E */
p { property: value !important; }
and the following markup:
<p style='/*F*/ property:value;' class='class1 class2' attr='value'>
The precedence of style is as follows. Remember, the precedence is for each property, not for the entire block.
E
has the highest precedence because of the keyword!important
. It is recommended that you avoid its usage.F
is next, because it is an inline style.A
is next, because it is more "specific" than anything else. It has 3 specifiers: The name of the elementp
, its classclass1
, an attributeattr='value'
.C
is next, even though it has the same specificity asB
. This is because it appears afterB
.B
is next.D
is the last one.
CSS Media Queries are a feature in CSS 3 which allows you to specify when certain CSS rules should be applied, such as when printed, or when on a screen with certain dimensions or pixel density. They do not add to the selector's specificity.
/* A rule that will be used on all devices */
h1 {
font-size: 2em;
color: white;
background-color: black;
}
/* change the h1 to use less ink on a printer */
@media print {
h1 {
color: black;
background-color: white;
}
}
/* make the font bigger when shown on a screen at least 480px wide */
@media screen and (min-width: 480px) {
h1 {
font-size: 3em;
font-weight: normal;
}
}
Media queries can include these features:
width
, height
, device-width
, device-height
, orientation
, aspect-ratio
, device-aspect-ratio
, color
, color-index
, monochrome
, resolution
, scan
, grid
. Most of these features can be prefixed with min-
or max-
.
The resolution
feature is not supported by older devices, instead use device-pixel-ratio
.
Many smartphones and tablets will attempt to render the page as if it were on a desktop unless you provide a viewport
meta-tag.
<head>
<meta name="viewport" content="width=device-width; initial-scale=1.0">
</head>
Most of the features in CSS 2 (and many in CSS 3) are available across all browsers and devices. But it's always good practice to check before using a new feature.
- CanIUse (Detailed compatibility info)
- Dabblet (CSS playground)
- Mozilla Developer Network's CSS documentation (Tutorials and reference)
- Codrops' CSS Reference (Reference)
- DevTips' CSS Basics (Tutorials)


Bootstrap:
title | layout | prism_languages | weight | category | description | |||
---|---|---|---|---|---|---|---|---|
Bootstrap |
2017/sheet |
|
-1 |
CSS |
.container .row .col-md-6, @screen-sm-min, .form-control, grids, .modal-content, tooltips, and other Bootstrap CSS examples.
|
768 992 1200
' ' ' ' ' ' ' ' '
<---------^------------^------------------^--------->
xs sm md lg
(phone) (tablet) (laptop) (desktop)
Min:
@media (min-width: @screen-sm-min) // >= 768px (small tablet)
@media (min-width: @screen-md-min) // >= 992px (medium laptop)
@media (min-width: @screen-lg-min) // >= 1200px (large desktop)
Max:
@media (max-width: @screen-xs-max) { // < 768px (xsmall phone)
@media (max-width: @screen-sm-max) { // < 992px (small tablet)
@media (max-width: @screen-md-max) { // < 1200px (medium laptop)
.container
.container-fluid
.col-xs-1
.col-sm-1
.col-md-1
.col-lg-1
.col-md-offset-1
Mixins:
@include make-xs-column(12);
@include make-sm-column(6);
@include make-md-column(3);
@include make-lg-column(3);
@include make-sm-column-offset(1);
@include make-sm-column-push(1);
@include make-sm-column-pull(1);
.pull-left
.pull-right
.hidden-{xs,sm,md,lg}
.visible-{xs,sm,md,lg}
.visible-{xs,sm,md,lg,print}-{block,inline,inline-block}
.center-block /* margin: auto */
.clearfix
.text-{center,left,right,justify,nowrap}
.text-{lowercase,uppercase,capitalize}
.show
.hidden
<a data-toggle='modal' data-target='#new'>
#new.modal.fade(role='dialog')
.modal-dialog // .modal-lg, .modal-sm
.modal-content
.modal-header
%h4.modal-title hello
%button.close{type: 'button', data: { dismiss: 'modal' }}
%span{'aria-hidden' => true}!= "×"
%span.sr-only Close
.modal-body
...
.modal-footer
...
%button.btn{data: { |
toggle: 'modal', |
target: '#chooseTheme', |
remote: '/path/to/remote'}
Change Theme
.modal.fade#chooseTheme
.modal-dialog.modal-xl
.modal-content
.modal-header
%h4.modal-title Choose a theme
.modal-body
.spinner-panel.-lg
%i
<span
data-toggle='tooltip'
title='tooltip'
data-placement='left|top|bottom|right'>
$(function () {
$('[data-toogle~="tooltip"]').tooltip()
})
.input-group
input.form-control(type='text')
.input-group-addon years

Bash:
Bash is a name of the unix shell, which was also distributed as the shell for the GNU operating system and as the default shell on most Linux distros. Nearly all examples below can be a part of a shell script or executed directly in the shell.
#!/usr/bin/env bash
# First line of the script is the shebang which tells the system how to execute
# the script: https://en.wikipedia.org/wiki/Shebang_(Unix)
# As you already figured, comments start with #. Shebang is also a comment.
# Simple hello world example:
echo Hello world! # => Hello world!
# Each command starts on a new line, or after a semicolon:
echo 'This is the first line'; echo 'This is the second line'
# => This is the first line
# => This is the second line
# Declaring a variable looks like this:
Variable="Some string"
# But not like this:
Variable = "Some string" # => returns error "Variable: command not found"
# Bash will decide that Variable is a command it must execute and give an error
# because it can't be found.
# Nor like this:
Variable= 'Some string' # => returns error: "Some string: command not found"
# Bash will decide that 'Some string' is a command it must execute and give an
# error because it can't be found. (In this case the 'Variable=' part is seen
# as a variable assignment valid only for the scope of the 'Some string'
# command.)
# Using the variable:
echo $Variable # => Some string
echo "$Variable" # => Some string
echo '$Variable' # => $Variable
# When you use the variable itself — assign it, export it, or else — you write
# its name without $. If you want to use the variable's value, you should use $.
# Note that ' (single quote) won't expand the variables!
# Parameter expansion ${ }:
echo ${Variable} # => Some string
# This is a simple usage of parameter expansion
# Parameter Expansion gets a value from a variable.
# It "expands" or prints the value
# During the expansion time the value or parameter can be modified
# Below are other modifications that add onto this expansion
# String substitution in variables
echo ${Variable/Some/A} # => A string
# This will substitute the first occurrence of "Some" with "A"
# Substring from a variable
Length=7
echo ${Variable:0:Length} # => Some st
# This will return only the first 7 characters of the value
echo ${Variable: -5} # => tring
# This will return the last 5 characters (note the space before -5)
# String length
echo ${#Variable} # => 11
# Indirect expansion
OtherVariable="Variable"
echo ${!OtherVariable} # => Some String
# This will expand the value of OtherVariable
# Default value for variable
echo ${Foo:-"DefaultValueIfFooIsMissingOrEmpty"}
# => DefaultValueIfFooIsMissingOrEmpty
# This works for null (Foo=) and empty string (Foo=""); zero (Foo=0) returns 0.
# Note that it only returns default value and doesn't change variable value.
# Declare an array with 6 elements
array0=(one two three four five six)
# Print first element
echo $array0 # => "one"
# Print first element
echo ${array0[0]} # => "one"
# Print all elements
echo ${array0[@]} # => "one two three four five six"
# Print number of elements
echo ${#array0[@]} # => "6"
# Print number of characters in third element
echo ${#array0[2]} # => "5"
# Print 2 elements starting from forth
echo ${array0[@]:3:2} # => "four five"
# Print all elements. Each of them on new line.
for i in "${array0[@]}"; do
echo "$i"
done
# Brace Expansion { }
# Used to generate arbitrary strings
echo {1..10} # => 1 2 3 4 5 6 7 8 9 10
echo {a..z} # => a b c d e f g h i j k l m n o p q r s t u v w x y z
# This will output the range from the start value to the end value
# Built-in variables:
# There are some useful built-in variables, like
echo "Last program's return value: $?"
echo "Script's PID: $$"
echo "Number of arguments passed to script: $#"
echo "All arguments passed to script: $@"
echo "Script's arguments separated into different variables: $1 $2..."
# Now that we know how to echo and use variables,
# let's learn some of the other basics of bash!
# Our current directory is available through the command `pwd`.
# `pwd` stands for "print working directory".
# We can also use the built-in variable `$PWD`.
# Observe that the following are equivalent:
echo "I'm in $(pwd)" # execs `pwd` and interpolates output
echo "I'm in $PWD" # interpolates the variable
# If you get too much output in your terminal, or from a script, the command
# `clear` clears your screen
clear
# Ctrl-L also works for clearing output
# Reading a value from input:
echo "What's your name?"
read Name # Note that we didn't need to declare a new variable
echo Hello, $Name!
# We have the usual if structure:
# use `man test` for more info about conditionals
if [ $Name != $USER ]
then
echo "Your name isn't your username"
else
echo "Your name is your username"
fi
# True if the value of $Name is not equal to the current user's login username
# NOTE: if $Name is empty, bash sees the above condition as:
if [ != $USER ]
# which is invalid syntax
# so the "safe" way to use potentially empty variables in bash is:
if [ "$Name" != $USER ] ...
# which, when $Name is empty, is seen by bash as:
if [ "" != $USER ] ...
# which works as expected
# There is also conditional execution
echo "Always executed" || echo "Only executed if first command fails"
# => Always executed
echo "Always executed" && echo "Only executed if first command does NOT fail"
# => Always executed
# => Only executed if first command does NOT fail
# To use && and || with if statements, you need multiple pairs of square brackets:
if [ "$Name" == "Steve" ] && [ "$Age" -eq 15 ]
then
echo "This will run if $Name is Steve AND $Age is 15."
fi
if [ "$Name" == "Daniya" ] || [ "$Name" == "Zach" ]
then
echo "This will run if $Name is Daniya OR Zach."
fi
# There is also the `=~` operator, which tests a string against a Regex pattern:
Email=me@example.com
if [[ "$Email" =~ [a-z]+@[a-z]{2,}\.(com|net|org) ]]
then
echo "Valid email!"
fi
# Note that =~ only works within double [[ ]] square brackets,
# which are subtly different from single [ ].
# See https://www.gnu.org/software/bash/manual/bashref.html#Conditional-Constructs for more on this.
# Redefine command `ping` as alias to send only 5 packets
alias ping='ping -c 5'
# Escape the alias and use command with this name instead
\ping 192.168.1.1
# Print all aliases
alias -p
# Expressions are denoted with the following format:
echo $(( 10 + 5 )) # => 15
# Unlike other programming languages, bash is a shell so it works in the context
# of a current directory. You can list files and directories in the current
# directory with the ls command:
ls # Lists the files and subdirectories contained in the current directory
# This command has options that control its execution:
ls -l # Lists every file and directory on a separate line
ls -t # Sorts the directory contents by last-modified date (descending)
ls -R # Recursively `ls` this directory and all of its subdirectories
# Results of the previous command can be passed to the next command as input.
# The `grep` command filters the input with provided patterns.
# That's how we can list .txt files in the current directory:
ls -l | grep "\.txt"
# Use `cat` to print files to stdout:
cat file.txt
# We can also read the file using `cat`:
Contents=$(cat file.txt)
# "\n" prints a new line character
# "-e" to interpret the newline escape characters as escape characters
echo -e "START OF FILE\n$Contents\nEND OF FILE"
# => START OF FILE
# => [contents of file.txt]
# => END OF FILE
# Use `cp` to copy files or directories from one place to another.
# `cp` creates NEW versions of the sources,
# so editing the copy won't affect the original (and vice versa).
# Note that it will overwrite the destination if it already exists.
cp srcFile.txt clone.txt
cp -r srcDirectory/ dst/ # recursively copy
# Look into `scp` or `sftp` if you plan on exchanging files between computers.
# `scp` behaves very similarly to `cp`.
# `sftp` is more interactive.
# Use `mv` to move files or directories from one place to another.
# `mv` is similar to `cp`, but it deletes the source.
# `mv` is also useful for renaming files!
mv s0urc3.txt dst.txt # sorry, l33t hackers...
# Since bash works in the context of a current directory, you might want to
# run your command in some other directory. We have cd for changing location:
cd ~ # change to home directory
cd # also goes to home directory
cd .. # go up one directory
# (^^say, from /home/username/Downloads to /home/username)
cd /home/username/Documents # change to specified directory
cd ~/Documents/.. # still in home directory..isn't it??
cd - # change to last directory
# => /home/username/Documents
# Use subshells to work across directories
(echo "First, I'm here: $PWD") && (cd someDir; echo "Then, I'm here: $PWD")
pwd # still in first directory
# Use `mkdir` to create new directories.
mkdir myNewDir
# The `-p` flag causes new intermediate directories to be created as necessary.
mkdir -p myNewDir/with/intermediate/directories
# if the intermediate directories didn't already exist, running the above
# command without the `-p` flag would return an error
# You can redirect command input and output (stdin, stdout, and stderr).
# Read from stdin until ^EOF$ and overwrite hello.py with the lines
# between "EOF":
cat > hello.py << EOF
#!/usr/bin/env python
from __future__ import print_function
import sys
print("#stdout", file=sys.stdout)
print("#stderr", file=sys.stderr)
for line in sys.stdin:
print(line, file=sys.stdout)
EOF
# Variables will be expanded if the first "EOF" is not quoted
# Run the hello.py Python script with various stdin, stdout, and
# stderr redirections:
python hello.py < "input.in" # pass input.in as input to the script
python hello.py > "output.out" # redirect output from the script to output.out
python hello.py 2> "error.err" # redirect error output to error.err
python hello.py > "output-and-error.log" 2>&1
# redirect both output and errors to output-and-error.log
python hello.py > /dev/null 2>&1
# redirect all output and errors to the black hole, /dev/null, i.e., no output
# The output error will overwrite the file if it exists,
# if you want to append instead, use ">>":
python hello.py >> "output.out" 2>> "error.err"
# Overwrite output.out, append to error.err, and count lines:
info bash 'Basic Shell Features' 'Redirections' > output.out 2>> error.err
wc -l output.out error.err
# Run a command and print its file descriptor (e.g. /dev/fd/123)
# see: man fd
echo <(echo "#helloworld")
# Overwrite output.out with "#helloworld":
cat > output.out <(echo "#helloworld")
echo "#helloworld" > output.out
echo "#helloworld" | cat > output.out
echo "#helloworld" | tee output.out >/dev/null
# Cleanup temporary files verbosely (add '-i' for interactive)
# WARNING: `rm` commands cannot be undone
rm -v output.out error.err output-and-error.log
rm -r tempDir/ # recursively delete
# You can install the `trash-cli` Python package to have `trash`
# which puts files in the system trash and doesn't delete them directly
# see https://pypi.org/project/trash-cli/ if you want to be careful
# Commands can be substituted within other commands using $( ):
# The following command displays the number of files and directories in the
# current directory.
echo "There are $(ls | wc -l) items here."
# The same can be done using backticks `` but they can't be nested -
# the preferred way is to use $( ).
echo "There are `ls | wc -l` items here."
# Bash uses a `case` statement that works similarly to switch in Java and C++:
case "$Variable" in
# List patterns for the conditions you want to meet
0) echo "There is a zero.";;
1) echo "There is a one.";;
*) echo "It is not null.";; # match everything
esac
# `for` loops iterate for as many arguments given:
# The contents of $Variable is printed three times.
for Variable in {1..3}
do
echo "$Variable"
done
# => 1
# => 2
# => 3
# Or write it the "traditional for loop" way:
for ((a=1; a <= 3; a++))
do
echo $a
done
# => 1
# => 2
# => 3
# They can also be used to act on files..
# This will run the command `cat` on file1 and file2
for Variable in file1 file2
do
cat "$Variable"
done
# ..or the output from a command
# This will `cat` the output from `ls`.
for Output in $(ls)
do
cat "$Output"
done
# Bash can also accept patterns, like this to `cat`
# all the Markdown files in current directory
for Output in ./*.markdown
do
cat "$Output"
done
# while loop:
while [ true ]
do
echo "loop body here..."
break
done
# => loop body here...
# You can also define functions
# Definition:
function foo ()
{
echo "Arguments work just like script arguments: $@"
echo "And: $1 $2..."
echo "This is a function"
return 0
}
# Call the function `foo` with two arguments, arg1 and arg2:
foo arg1 arg2
# => Arguments work just like script arguments: arg1 arg2
# => And: arg1 arg2...
# => This is a function
# or simply
bar ()
{
echo "Another way to declare functions!"
return 0
}
# Call the function `bar` with no arguments:
bar # => Another way to declare functions!
# Calling your function
foo "My name is" $Name
# There are a lot of useful commands you should learn:
# prints last 10 lines of file.txt
tail -n 10 file.txt
# prints first 10 lines of file.txt
head -n 10 file.txt
# sort file.txt's lines
sort file.txt
# report or omit repeated lines, with -d it reports them
uniq -d file.txt
# prints only the first column before the ',' character
cut -d ',' -f 1 file.txt
# replaces every occurrence of 'okay' with 'great' in file.txt
# (regex compatible)
sed -i 's/okay/great/g' file.txt
# be aware that this -i flag means that file.txt will be changed
# -i or --in-place erase the input file (use --in-place=.backup to keep a back-up)
# print to stdout all lines of file.txt which match some regex
# The example prints lines which begin with "foo" and end in "bar"
grep "^foo.*bar$" file.txt
# pass the option "-c" to instead print the number of lines matching the regex
grep -c "^foo.*bar$" file.txt
# Other useful options are:
grep -r "^foo.*bar$" someDir/ # recursively `grep`
grep -n "^foo.*bar$" file.txt # give line numbers
grep -rI "^foo.*bar$" someDir/ # recursively `grep`, but ignore binary files
# perform the same initial search, but filter out the lines containing "baz"
grep "^foo.*bar$" file.txt | grep -v "baz"
# if you literally want to search for the string,
# and not the regex, use `fgrep` (or `grep -F`)
fgrep "foobar" file.txt
# The `trap` command allows you to execute a command whenever your script
# receives a signal. Here, `trap` will execute `rm` if it receives any of the
# three listed signals.
trap "rm $TEMP_FILE; exit" SIGHUP SIGINT SIGTERM
# `sudo` is used to perform commands as the superuser
# usually it will ask interactively the password of superuser
NAME1=$(whoami)
NAME2=$(sudo whoami)
echo "Was $NAME1, then became more powerful $NAME2"
# Read Bash shell built-ins documentation with the bash `help` built-in:
help
help help
help for
help return
help source
help .
# Read Bash manpage documentation with `man`
apropos bash
man 1 bash
man bash
# Read info documentation with `info` (`?` for help)
apropos info | grep '^info.*('
man info
info info
info 5 info
# Read bash info documentation:
info bash
info bash 'Bash Features'
info bash 6
info --apropos bash
Continued:
{: .-three-column}
{: .-intro}
This is a quick reference to getting started with Bash scripting.
- Learn bash in y minutes (learnxinyminutes.com)
- Bash Guide (mywiki.wooledge.org)
#!/usr/bin/env bash
NAME="John"
echo "Hello $NAME!"
NAME="John"
echo $NAME
echo "$NAME"
echo "${NAME}!"
NAME="John"
echo "Hi $NAME" #=> Hi John
echo 'Hi $NAME' #=> Hi $NAME
echo "I'm in $(pwd)"
echo "I'm in `pwd`"
# Same
git commit && git push
git commit || echo "Commit failed"
{: id='functions-example'}
get_name() {
echo "John"
}
echo "You are $(get_name)"
See: Functions
{: id='conditionals-example'}
if [[ -z "$string" ]]; then
echo "String is empty"
elif [[ -n "$string" ]]; then
echo "String is not empty"
fi
See: Conditionals
set -euo pipefail
IFS=$'\n\t'
See: Unofficial bash strict mode
echo {A,B}.js
Expression | Description |
---|---|
{A,B} |
Same as A B |
{A,B}.js |
Same as A.js B.js |
{1..5} |
Same as 1 2 3 4 5 |
See: Brace expansion
{: .-three-column}
name="John"
echo ${name}
echo ${name/J/j} #=> "john" (substitution)
echo ${name:0:2} #=> "Jo" (slicing)
echo ${name::2} #=> "Jo" (slicing)
echo ${name::-1} #=> "Joh" (slicing)
echo ${name:(-1)} #=> "n" (slicing from right)
echo ${name:(-2):1} #=> "h" (slicing from right)
echo ${food:-Cake} #=> $food or "Cake"
length=2
echo ${name:0:length} #=> "Jo"
See: Parameter expansion
STR="/path/to/foo.cpp"
echo ${STR%.cpp} # /path/to/foo
echo ${STR%.cpp}.o # /path/to/foo.o
echo ${STR%/*} # /path/to
echo ${STR##*.} # cpp (extension)
echo ${STR##*/} # foo.cpp (basepath)
echo ${STR#*/} # path/to/foo.cpp
echo ${STR##*/} # foo.cpp
echo ${STR/foo/bar} # /path/to/bar.cpp
STR="Hello world"
echo ${STR:6:5} # "world"
echo ${STR: -5:5} # "world"
SRC="/path/to/foo.cpp"
BASE=${SRC##*/} #=> "foo.cpp" (basepath)
DIR=${SRC%$BASE} #=> "/path/to/" (dirpath)
Code | Description |
---|---|
${FOO%suffix} |
Remove suffix |
${FOO#prefix} |
Remove prefix |
--- | --- |
${FOO%%suffix} |
Remove long suffix |
${FOO##prefix} |
Remove long prefix |
--- | --- |
${FOO/from/to} |
Replace first match |
${FOO//from/to} |
Replace all |
--- | --- |
${FOO/%from/to} |
Replace suffix |
${FOO/#from/to} |
Replace prefix |
# Single line comment
: '
This is a
multi line
comment
'
Expression | Description |
---|---|
${FOO:0:3} |
Substring (position, length) |
${FOO:(-3):3} |
Substring from the right |
Expression | Description |
---|---|
${#FOO} |
Length of $FOO |
STR="HELLO WORLD!"
echo ${STR,} #=> "hELLO WORLD!" (lowercase 1st letter)
echo ${STR,,} #=> "hello world!" (all lowercase)
STR="hello world!"
echo ${STR^} #=> "Hello world!" (uppercase 1st letter)
echo ${STR^^} #=> "HELLO WORLD!" (all uppercase)
Expression | Description |
---|---|
${FOO:-val} |
$FOO , or val if unset (or null) |
${FOO:=val} |
Set $FOO to val if unset (or null) |
${FOO:+val} |
val if $FOO is set (and not null) |
${FOO:?message} |
Show error message and exit if $FOO is unset (or null) |
Omitting the :
removes the (non)nullity checks, e.g. ${FOO-val}
expands to val
if unset otherwise $FOO
.
{: .-three-column}
for i in /etc/rc.*; do
echo $i
done
for ((i = 0 ; i < 100 ; i++)); do
echo $i
done
for i in {1..5}; do
echo "Welcome $i"
done
for i in {5..50..5}; do
echo "Welcome $i"
done
cat file.txt | while read line; do
echo $line
done
while true; do
···
done
{: .-three-column}
myfunc() {
echo "hello $1"
}
# Same as above (alternate syntax)
function myfunc() {
echo "hello $1"
}
myfunc "John"
myfunc() {
local myresult='some value'
echo $myresult
}
result="$(myfunc)"
myfunc() {
return 1
}
if myfunc; then
echo "success"
else
echo "failure"
fi
Expression | Description |
---|---|
$# |
Number of arguments |
$* |
All postional arguments (as a single word) |
$@ |
All postitional arguments (as separate strings) |
$1 |
First argument |
$_ |
Last argument of the previous command |
Note: $@
and $*
must be quoted in order to perform as described.
Otherwise, they do exactly the same thing (arguments as separate strings).
See Special parameters.
{: .-three-column}
Note that [[
is actually a command/program that returns either 0
(true) or 1
(false). Any program that obeys the same logic (like all base utils, such as grep(1)
or ping(1)
) can be used as condition, see examples.
Condition | Description |
---|---|
[[ -z STRING ]] |
Empty string |
[[ -n STRING ]] |
Not empty string |
[[ STRING == STRING ]] |
Equal |
[[ STRING != STRING ]] |
Not Equal |
--- | --- |
[[ NUM -eq NUM ]] |
Equal |
[[ NUM -ne NUM ]] |
Not equal |
[[ NUM -lt NUM ]] |
Less than |
[[ NUM -le NUM ]] |
Less than or equal |
[[ NUM -gt NUM ]] |
Greater than |
[[ NUM -ge NUM ]] |
Greater than or equal |
--- | --- |
[[ STRING =~ STRING ]] |
Regexp |
--- | --- |
(( NUM < NUM )) |
Numeric conditions |
Condition | Description |
---|---|
[[ -o noclobber ]] |
If OPTIONNAME is enabled |
--- | --- |
[[ ! EXPR ]] |
Not |
[[ X && Y ]] |
And |
`[[ X |
Condition | Description |
---|---|
[[ -e FILE ]] |
Exists |
[[ -r FILE ]] |
Readable |
[[ -h FILE ]] |
Symlink |
[[ -d FILE ]] |
Directory |
[[ -w FILE ]] |
Writable |
[[ -s FILE ]] |
Size is > 0 bytes |
[[ -f FILE ]] |
File |
[[ -x FILE ]] |
Executable |
--- | --- |
[[ FILE1 -nt FILE2 ]] |
1 is more recent than 2 |
[[ FILE1 -ot FILE2 ]] |
2 is more recent than 1 |
[[ FILE1 -ef FILE2 ]] |
Same files |
# String
if [[ -z "$string" ]]; then
echo "String is empty"
elif [[ -n "$string" ]]; then
echo "String is not empty"
else
echo "This never happens"
fi
# Combinations
if [[ X && Y ]]; then
...
fi
# Equal
if [[ "$A" == "$B" ]]
# Regex
if [[ "A" =~ . ]]
if (( $a < $b )); then
echo "$a is smaller than $b"
fi
if [[ -e "file.txt" ]]; then
echo "file exists"
fi
Fruits=('Apple' 'Banana' 'Orange')
Fruits[0]="Apple"
Fruits[1]="Banana"
Fruits[2]="Orange"
echo ${Fruits[0]} # Element #0
echo ${Fruits[-1]} # Last element
echo ${Fruits[@]} # All elements, space-separated
echo ${#Fruits[@]} # Number of elements
echo ${#Fruits} # String length of the 1st element
echo ${#Fruits[3]} # String length of the Nth element
echo ${Fruits[@]:3:2} # Range (from position 3, length 2)
echo ${!Fruits[@]} # Keys of all elements, space-separated
Fruits=("${Fruits[@]}" "Watermelon") # Push
Fruits+=('Watermelon') # Also Push
Fruits=( ${Fruits[@]/Ap*/} ) # Remove by regex match
unset Fruits[2] # Remove one item
Fruits=("${Fruits[@]}") # Duplicate
Fruits=("${Fruits[@]}" "${Veggies[@]}") # Concatenate
lines=(`cat "logfile"`) # Read from file
for i in "${arrayName[@]}"; do
echo $i
done
{: .-three-column}
declare -A sounds
sounds[dog]="bark"
sounds[cow]="moo"
sounds[bird]="tweet"
sounds[wolf]="howl"
Declares sound
as a Dictionary object (aka associative array).
echo ${sounds[dog]} # Dog's sound
echo ${sounds[@]} # All values
echo ${!sounds[@]} # All keys
echo ${#sounds[@]} # Number of elements
unset sounds[dog] # Delete dog
for val in "${sounds[@]}"; do
echo $val
done
for key in "${!sounds[@]}"; do
echo $key
done
set -o noclobber # Avoid overlay files (echo "hi" > foo)
set -o errexit # Used to exit upon error, avoiding cascading errors
set -o pipefail # Unveils hidden failures
set -o nounset # Exposes unset variables
shopt -s nullglob # Non-matching globs are removed ('*.foo' => '')
shopt -s failglob # Non-matching globs throw errors
shopt -s nocaseglob # Case insensitive globs
shopt -s dotglob # Wildcards match dotfiles ("*.sh" => ".foo.sh")
shopt -s globstar # Allow ** for recursive matches ('lib/**/*.rb' => 'lib/a/b/c.rb')
Set GLOBIGNORE
as a colon-separated list of patterns to be removed from glob
matches.
Command | Description |
---|---|
history |
Show history |
shopt -s histverify |
Don't execute expanded result immediately |
Expression | Description |
---|---|
!$ |
Expand last parameter of most recent command |
!* |
Expand all parameters of most recent command |
!-n |
Expand n th most recent command |
!n |
Expand n th command in history |
!<command> |
Expand most recent invocation of command <command> |
Code | Description |
---|---|
!! |
Execute last command again |
!!:s/<FROM>/<TO>/ |
Replace first occurrence of <FROM> to <TO> in most recent command |
!!:gs/<FROM>/<TO>/ |
Replace all occurrences of <FROM> to <TO> in most recent command |
!$:t |
Expand only basename from last parameter of most recent command |
!$:h |
Expand only directory from last parameter of most recent command |
!!
and !$
can be replaced with any valid expansion.
Code | Description |
---|---|
!!:n |
Expand only n th token from most recent command (command is 0 ; first argument is 1 ) |
!^ |
Expand first argument from most recent command |
!$ |
Expand last token from most recent command |
!!:n-m |
Expand range of tokens from most recent command |
!!:n-$ |
Expand n th token to last from most recent command |
!!
can be replaced with any valid expansion i.e. !cat
, !-2
, !42
, etc.
$((a + 200)) # Add 200 to $a
$(($RANDOM%200)) # Random number 0..199
(cd somedir; echo "I'm now in $PWD")
pwd # still in first directory
python hello.py > output.txt # stdout to (file)
python hello.py >> output.txt # stdout to (file), append
python hello.py 2> error.log # stderr to (file)
python hello.py 2>&1 # stderr to stdout
python hello.py 2>/dev/null # stderr to (null)
python hello.py &>/dev/null # stdout and stderr to (null)
python hello.py < foo.txt # feed foo.txt to stdin for python
command -V cd
#=> "cd is a function/alias/whatever"
trap 'echo Error at about $LINENO' ERR
or
traperr() {
echo "ERROR: ${BASH_SOURCE[1]} at about ${BASH_LINENO[0]}"
}
set -o errtrace
trap traperr ERR
case "$1" in
start | up)
vagrant up
;;
*)
echo "Usage: $0 {start|stop|ssh}"
;;
esac
source "${0%/*}/../share/foo.sh"
printf "Hello %s, I'm %s" Sven Olga
#=> "Hello Sven, I'm Olga
printf "1 + 1 = %d" 2
#=> "1 + 1 = 2"
printf "This is how you print a float: %f" 2
#=> "This is how you print a float: 2.000000"
DIR="${0%/*}"
while [[ "$1" =~ ^- && ! "$1" == "--" ]]; do case $1 in
-V | --version )
echo $version
exit
;;
-s | --string )
shift; string=$1
;;
-f | --flag )
flag=1
;;
esac; shift; done
if [[ "$1" == '--' ]]; then shift; fi
cat <<END
hello world
END
echo -n "Proceed? [y/n]: "
read ans
echo $ans
read -n 1 ans # Just one character
Expression | Description |
---|---|
$? |
Exit status of last task |
$! |
PID of last background task |
$$ |
PID of shell |
$0 |
Filename of the shell script |
See Special parameters.
pwd # /home/user/foo
cd bar/
pwd # /home/user/foo/bar
cd -
pwd # /home/user/foo
if ping -c 1 google.com; then
echo "It appears you have a working internet connection"
fi
if grep -q 'foo' ~/.bash_history; then
echo "You appear to have typed 'foo' in the past"
fi
{: .-one-column}
- Bash-hackers wiki (bash-hackers.org)
- Shell vars (bash-hackers.org)
- Learn bash in y minutes (learnxinyminutes.com)
- Bash Guide (mywiki.wooledge.org)
- ShellCheck (shellcheck.net)


Python:
- Python is an interpreted, high-level and general-purpose, dynamically typed programming language
- It is also Object oriented, modular oriented and a scripting language.
- In Python, everything is considered as an Object.
- A python file has an extension of .py
- Python follows Indentation to separate code blocks instead of flower brackets({}).
- We can run a python file by the following command in cmd(Windows) or shell(mac/linux).
-
python <filename.py>
By default, the python doesn’t require any imports to run a python file.
Create and execute a program
- Open up a terminal/cmd
- Create the program: nano/cat > nameProgram.py
- Write the program and save it
- python nameProgram.py
Basic Datatypes
![Data TypeDescriptionintInteger values [0, 1, -2, 3]floatFloating point values [0.1, 4.532, -5.092]charCharacters [a, b, @, !, `]strStrings [abc, AbC, A@B, sd!, `asa]boolBoolean Values [True, False]charCharacters [a, b, @, !, `]complexComplex numbers [2+3j, 4–1j]](https://cdn-images-1.medium.com/max/800/1*g1SbmDwyQP_-e4jDRkhrpg.png)
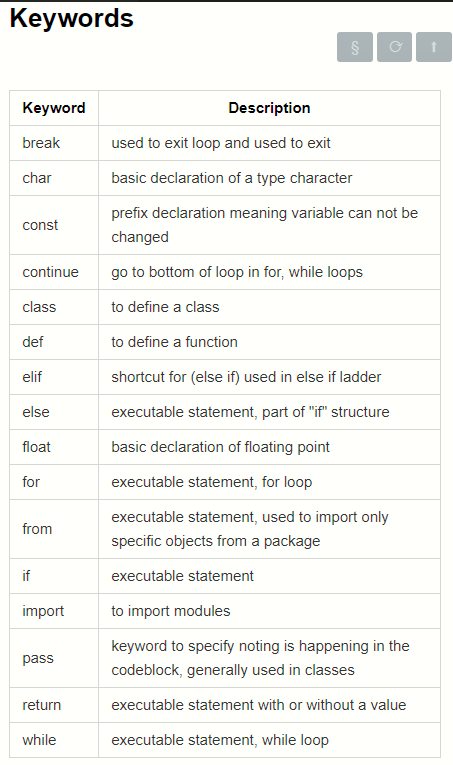
Keywords

Operators
![OperatorDescription( )grouping parenthesis, function call, tuple declaration[ ]array indexing, also declaring lists etc.!relational not, complement, ! a yields true or false~bitwise not, ones complement, ~a-unary minus, — a+unary plus, + a*multiply, a * b/divide, a / b%modulo, a % b+add, a + b-subtract, a — b<<shift left, left operand is shifted left by right operand bits>>shift right, left operand is shifted right by right operand bits<less than, result is true or false, a %lt; b<=less than or](https://cdn-images-1.medium.com/max/800/1*WhZHWsF544F3Jou4TOdlvQ.png)
![OperatorDescription( )grouping parenthesis, function call, tuple declaration[ ]array indexing, also declaring lists etc.!relational not, complement, ! a yields true or false~bitwise not, ones complement, ~a-unary minus, — a+unary plus, + a*multiply, a * b/divide, a / b%modulo, a % b+add, a + b-subtract, a — b<<shift left, left operand is shifted left by right operand bits>>shift right, left operand is shifted right by right operand bits<less than, result is true or false, a %lt; b<=less than or](https://cdn-images-1.medium.com/max/800/1*G4pUq67UDWJSZsULGe7j2g.png)
Basic Data Structures
List
- List is a collection which is ordered and changeable. Allows duplicate members.
- Lists are created using square brackets:
thislist = ["apple", "banana", "cherry"]
- List items are ordered, changeable, and allow duplicate values.
-
List items are indexed, the first item has index
[0]
, the second item has index[1]
etc. - The list is changeable, meaning that we can change, add, and remove items in a list after it has been created.
-
To determine how many items a list has, use the
len()
function. - A list can contain different data types:
list1 = ["abc", 34, True, 40, "male"]
- It is also possible to use the list() constructor when creating a new list
thislist = list(("apple", "banana", "cherry")) # note the double round-brackets
Tuple
- Tuple is a collection which is ordered and unchangeable. Allows duplicate members.
- A tuple is a collection which is ordered and unchangeable.
- Tuples are written with round brackets.
thistuple = ("apple", "banana", "cherry")
- Tuple items are ordered, unchangeable, and allow duplicate values.
-
Tuple items are indexed, the first item has index
[0]
, the second item has index[1]
etc. - When we say that tuples are ordered, it means that the items have a defined order, and that order will not change.
- Tuples are unchangeable, meaning that we cannot change, add or remove items after the tuple has been created.
- Since tuple are indexed, tuples can have items with the same value:
- Tuples allow duplicate values:
thistuple = ("apple", "banana", "cherry", "apple", "cherry")
-
To determine how many items a tuple has, use the
len()
function:
thistuple = ("apple", "banana", "cherry")
print(len(thistuple))
- To create a tuple with only one item, you have to add a comma after the item, otherwise Python will not recognize it as a tuple.
thistuple = ("apple",)
print(type(thistuple))
#NOT a tuple
thistuple = ("apple")
print(type(thistuple))
- It is also possible to use the tuple() constructor to make a tuple.
thistuple = tuple(("apple", "banana", "cherry")) # note the double round-brackets
print(thistuple)
Set
- Set is a collection which is unordered and unindexed. No duplicate members.
- A set is a collection which is both unordered and unindexed.
thisset = {"apple", "banana", "cherry"}
- Set items are unordered, unchangeable, and do not allow duplicate values.
- Unordered means that the items in a set do not have a defined order.
- Set items can appear in a different order every time you use them, and cannot be referred to by index or key.
- Sets are unchangeable, meaning that we cannot change the items after the set has been created.
- Duplicate values will be ignored.
-
To determine how many items a set has, use the
len()
method.
thisset = {"apple", "banana", "cherry"}
print(len(thisset))
- Set items can be of any data type:
set1 = {"apple", "banana", "cherry"}
set2 = {1, 5, 7, 9, 3}
set3 = {True, False, False}
set4 = {"abc", 34, True, 40, "male"}
-
It is also possible to use the
set()
constructor to make a set.
thisset = set(("apple", "banana", "cherry")) # note the double round-brackets
Dictionary
- Dictionary is a collection which is unordered and changeable. No duplicate members.
- Dictionaries are used to store data values in key:value pairs.
- Dictionaries are written with curly brackets, and have keys and values:
thisdict = {
"brand": "Ford",
"model": "Mustang",
"year": 1964
}
- Dictionary items are presented in key:value pairs, and can be referred to by using the key name.
thisdict = {
"brand": "Ford",
"model": "Mustang",
"year": 1964
}
print(thisdict["brand"])
- Dictionaries are changeable, meaning that we can change, add or remove items after the dictionary has been created.
- Dictionaries cannot have two items with the same key.
- Duplicate values will overwrite existing values.
-
To determine how many items a dictionary has, use the
len()
function.
print(len(thisdict))
- The values in dictionary items can be of any data type
thisdict = {
"brand": "Ford",
"electric": False,
"year": 1964,
"colors": ["red", "white", "blue"]
}
Conditional branching
if condition:
pass
elif condition2:
pass
else:
pass
Loops
Python has two primitive loop commands:
- while loops
- for loops
While loop
-
With the
while
loop we can execute a set of statements as long as a condition is true. - Example: Print i as long as i is less than 6
i = 1
while i < 6:
print(i)
i += 1
- The while loop requires relevant variables to be ready, in this example we need to define an indexing variable, i, which we set to 1.
-
With the
break
statement we can stop the loop even if the while condition is true - With the continue statement we can stop the current iteration, and continue with the next.
- With the else statement we can run a block of code once when the condition no longer is true.
For loop
- A for loop is used for iterating over a sequence (that is either a list, a tuple, a dictionary, a set, or a string).
- This is less like the for keyword in other programming languages, and works more like an iterator method as found in other object-orientated programming languages.
- With the for loop we can execute a set of statements, once for each item in a list, tuple, set etc.
fruits = ["apple", "banana", "cherry"]
for x in fruits:
print(x)
- The for loop does not require an indexing variable to set beforehand.
- To loop through a set of code a specified number of times, we can use the range() function.
- The range() function returns a sequence of numbers, starting from 0 by default, and increments by 1 (by default), and ends at a specified number.
- The range() function defaults to increment the sequence by 1, however it is possible to specify the increment value by adding a third parameter: range(2, 30, 3).
-
The else keyword in a for loop specifies a block of code to be
executed when the loop is finished.
A nested loop is a loop inside a loop. - The “inner loop” will be executed one time for each iteration of the “outer loop”:
adj = ["red", "big", "tasty"]
fruits = ["apple", "banana", "cherry"]
for x in adj:
for y in fruits:
print(x, y)
- for loops cannot be empty, but if you for some reason have a for loop with no content, put in the pass statement to avoid getting an error.
for x in [0, 1, 2]:
pass
Function definition
def function_name():
return
Function call
function_name()
- We need not to specify the return type of the function.
-
Functions by default return
None
- We can return any datatype.
# Single line comments start with a number symbol.
""" Multiline strings can be written
using three "s, and are often used
as documentation.
"""
####################################################
## 1. Primitive Datatypes and Operators
####################################################
# You have numbers
3 # => 3
# Math is what you would expect
1 + 1 # => 2
8 - 1 # => 7
10 * 2 # => 20
35 / 5 # => 7.0
# Integer division rounds down for both positive and negative numbers.
5 // 3 # => 1
-5 // 3 # => -2
5.0 // 3.0 # => 1.0 # works on floats too
-5.0 // 3.0 # => -2.0
# The result of division is always a float
10.0 / 3 # => 3.3333333333333335
# Modulo operation
7 % 3 # => 1
# i % j have the same sign as j, unlike C
-7 % 3 # => 2
# Exponentiation (x**y, x to the yth power)
2**3 # => 8
# Enforce precedence with parentheses
1 + 3 * 2 # => 7
(1 + 3) * 2 # => 8
# Boolean values are primitives (Note: the capitalization)
True # => True
False # => False
# negate with not
not True # => False
not False # => True
# Boolean Operators
# Note "and" and "or" are case-sensitive
True and False # => False
False or True # => True
# True and False are actually 1 and 0 but with different keywords
True + True # => 2
True * 8 # => 8
False - 5 # => -5
# Comparison operators look at the numerical value of True and False
0 == False # => True
1 == True # => True
2 == True # => False
-5 != False # => True
# Using boolean logical operators on ints casts them to booleans for evaluation, but their non-cast value is returned
# Don't mix up with bool(ints) and bitwise and/or (&,|)
bool(0) # => False
bool(4) # => True
bool(-6) # => True
0 and 2 # => 0
-5 or 0 # => -5
# Equality is ==
1 == 1 # => True
2 == 1 # => False
# Inequality is !=
1 != 1 # => False
2 != 1 # => True
# More comparisons
1 < 10 # => True
1 > 10 # => False
2 <= 2 # => True
2 >= 2 # => True
# Seeing whether a value is in a range
1 < 2 and 2 < 3 # => True
2 < 3 and 3 < 2 # => False
# Chaining makes this look nicer
1 < 2 < 3 # => True
2 < 3 < 2 # => False
# (is vs. ==) is checks if two variables refer to the same object, but == checks
# if the objects pointed to have the same values.
a = [1, 2, 3, 4] # Point a at a new list, [1, 2, 3, 4]
b = a # Point b at what a is pointing to
b is a # => True, a and b refer to the same object
b == a # => True, a's and b's objects are equal
b = [1, 2, 3, 4] # Point b at a new list, [1, 2, 3, 4]
b is a # => False, a and b do not refer to the same object
b == a # => True, a's and b's objects are equal
# Strings are created with " or '
"This is a string."
'This is also a string.'
# Strings can be added too
"Hello " + "world!" # => "Hello world!"
# String literals (but not variables) can be concatenated without using '+'
"Hello " "world!" # => "Hello world!"
# A string can be treated like a list of characters
"Hello world!"[0] # => 'H'
# You can find the length of a string
len("This is a string") # => 16
# You can also format using f-strings or formatted string literals (in Python 3.6+)
name = "Reiko"
f"She said her name is {name}." # => "She said her name is Reiko"
# You can basically put any Python expression inside the braces and it will be output in the string.
f"{name} is {len(name)} characters long." # => "Reiko is 5 characters long."
# None is an object
None # => None
# Don't use the equality "==" symbol to compare objects to None
# Use "is" instead. This checks for equality of object identity.
"etc" is None # => False
None is None # => True
# None, 0, and empty strings/lists/dicts/tuples all evaluate to False.
# All other values are True
bool(0) # => False
bool("") # => False
bool([]) # => False
bool({}) # => False
bool(()) # => False
####################################################
## 2. Variables and Collections
####################################################
# Python has a print function
print("I'm Python. Nice to meet you!") # => I'm Python. Nice to meet you!
# By default the print function also prints out a newline at the end.
# Use the optional argument end to change the end string.
print("Hello, World", end="!") # => Hello, World!
# Simple way to get input data from console
input_string_var = input("Enter some data: ") # Returns the data as a string
# There are no declarations, only assignments.
# Convention is to use lower_case_with_underscores
some_var = 5
some_var # => 5
# Accessing a previously unassigned variable is an exception.
# See Control Flow to learn more about exception handling.
some_unknown_var # Raises a NameError
# if can be used as an expression
# Equivalent of C's '?:' ternary operator
"yay!" if 0 > 1 else "nay!" # => "nay!"
# Lists store sequences
li = []
# You can start with a prefilled list
other_li = [4, 5, 6]
# Add stuff to the end of a list with append
li.append(1) # li is now [1]
li.append(2) # li is now [1, 2]
li.append(4) # li is now [1, 2, 4]
li.append(3) # li is now [1, 2, 4, 3]
# Remove from the end with pop
li.pop() # => 3 and li is now [1, 2, 4]
# Let's put it back
li.append(3) # li is now [1, 2, 4, 3] again.
# Access a list like you would any array
li[0] # => 1
# Look at the last element
li[-1] # => 3
# Looking out of bounds is an IndexError
li[4] # Raises an IndexError
# You can look at ranges with slice syntax.
# The start index is included, the end index is not
# (It's a closed/open range for you mathy types.)
li[1:3] # Return list from index 1 to 3 => [2, 4]
li[2:] # Return list starting from index 2 => [4, 3]
li[:3] # Return list from beginning until index 3 => [1, 2, 4]
li[::2] # Return list selecting every second entry => [1, 4]
li[::-1] # Return list in reverse order => [3, 4, 2, 1]
# Use any combination of these to make advanced slices
# li[start:end:step]
# Make a one layer deep copy using slices
li2 = li[:] # => li2 = [1, 2, 4, 3] but (li2 is li) will result in false.
# Remove arbitrary elements from a list with "del"
del li[2] # li is now [1, 2, 3]
# Remove first occurrence of a value
li.remove(2) # li is now [1, 3]
li.remove(2) # Raises a ValueError as 2 is not in the list
# Insert an element at a specific index
li.insert(1, 2) # li is now [1, 2, 3] again
# Get the index of the first item found matching the argument
li.index(2) # => 1
li.index(4) # Raises a ValueError as 4 is not in the list
# You can add lists
# Note: values for li and for other_li are not modified.
li + other_li # => [1, 2, 3, 4, 5, 6]
# Concatenate lists with "extend()"
li.extend(other_li) # Now li is [1, 2, 3, 4, 5, 6]
# Check for existence in a list with "in"
1 in li # => True
# Examine the length with "len()"
len(li) # => 6
# Tuples are like lists but are immutable.
tup = (1, 2, 3)
tup[0] # => 1
tup[0] = 3 # Raises a TypeError
# Note that a tuple of length one has to have a comma after the last element but
# tuples of other lengths, even zero, do not.
type((1)) # => <class 'int'>
type((1,)) # => <class 'tuple'>
type(()) # => <class 'tuple'>
# You can do most of the list operations on tuples too
len(tup) # => 3
tup + (4, 5, 6) # => (1, 2, 3, 4, 5, 6)
tup[:2] # => (1, 2)
2 in tup # => True
# You can unpack tuples (or lists) into variables
a, b, c = (1, 2, 3) # a is now 1, b is now 2 and c is now 3
# You can also do extended unpacking
a, *b, c = (1, 2, 3, 4) # a is now 1, b is now [2, 3] and c is now 4
# Tuples are created by default if you leave out the parentheses
d, e, f = 4, 5, 6 # tuple 4, 5, 6 is unpacked into variables d, e and f
# respectively such that d = 4, e = 5 and f = 6
# Now look how easy it is to swap two values
e, d = d, e # d is now 5 and e is now 4
# Dictionaries store mappings from keys to values
empty_dict = {}
# Here is a prefilled dictionary
filled_dict = {"one": 1, "two": 2, "three": 3}
# Note keys for dictionaries have to be immutable types. This is to ensure that
# the key can be converted to a constant hash value for quick look-ups.
# Immutable types include ints, floats, strings, tuples.
invalid_dict = {[1,2,3]: "123"} # => Raises a TypeError: unhashable type: 'list'
valid_dict = {(1,2,3):[1,2,3]} # Values can be of any type, however.
# Look up values with []
filled_dict["one"] # => 1
# Get all keys as an iterable with "keys()". We need to wrap the call in list()
# to turn it into a list. We'll talk about those later. Note - for Python
# versions <3.7, dictionary key ordering is not guaranteed. Your results might
# not match the example below exactly. However, as of Python 3.7, dictionary
# items maintain the order at which they are inserted into the dictionary.
list(filled_dict.keys()) # => ["three", "two", "one"] in Python <3.7
list(filled_dict.keys()) # => ["one", "two", "three"] in Python 3.7+
# Get all values as an iterable with "values()". Once again we need to wrap it
# in list() to get it out of the iterable. Note - Same as above regarding key
# ordering.
list(filled_dict.values()) # => [3, 2, 1] in Python <3.7
list(filled_dict.values()) # => [1, 2, 3] in Python 3.7+
# Check for existence of keys in a dictionary with "in"
"one" in filled_dict # => True
1 in filled_dict # => False
# Looking up a non-existing key is a KeyError
filled_dict["four"] # KeyError
# Use "get()" method to avoid the KeyError
filled_dict.get("one") # => 1
filled_dict.get("four") # => None
# The get method supports a default argument when the value is missing
filled_dict.get("one", 4) # => 1
filled_dict.get("four", 4) # => 4
# "setdefault()" inserts into a dictionary only if the given key isn't present
filled_dict.setdefault("five", 5) # filled_dict["five"] is set to 5
filled_dict.setdefault("five", 6) # filled_dict["five"] is still 5
# Adding to a dictionary
filled_dict.update({"four":4}) # => {"one": 1, "two": 2, "three": 3, "four": 4}
filled_dict["four"] = 4 # another way to add to dict
# Remove keys from a dictionary with del
del filled_dict["one"] # Removes the key "one" from filled dict
# From Python 3.5 you can also use the additional unpacking options
{'a': 1, **{'b': 2}} # => {'a': 1, 'b': 2}
{'a': 1, **{'a': 2}} # => {'a': 2}
# Sets store ... well sets
empty_set = set()
# Initialize a set with a bunch of values. Yeah, it looks a bit like a dict. Sorry.
some_set = {1, 1, 2, 2, 3, 4} # some_set is now {1, 2, 3, 4}
# Similar to keys of a dictionary, elements of a set have to be immutable.
invalid_set = {[1], 1} # => Raises a TypeError: unhashable type: 'list'
valid_set = {(1,), 1}
# Add one more item to the set
filled_set = some_set
filled_set.add(5) # filled_set is now {1, 2, 3, 4, 5}
# Sets do not have duplicate elements
filled_set.add(5) # it remains as before {1, 2, 3, 4, 5}
# Do set intersection with &
other_set = {3, 4, 5, 6}
filled_set & other_set # => {3, 4, 5}
# Do set union with |
filled_set | other_set # => {1, 2, 3, 4, 5, 6}
# Do set difference with -
{1, 2, 3, 4} - {2, 3, 5} # => {1, 4}
# Do set symmetric difference with ^
{1, 2, 3, 4} ^ {2, 3, 5} # => {1, 4, 5}
# Check if set on the left is a superset of set on the right
{1, 2} >= {1, 2, 3} # => False
# Check if set on the left is a subset of set on the right
{1, 2} <= {1, 2, 3} # => True
# Check for existence in a set with in
2 in filled_set # => True
10 in filled_set # => False
# Make a one layer deep copy
filled_set = some_set.copy() # filled_set is {1, 2, 3, 4, 5}
filled_set is some_set # => False
####################################################
## 3. Control Flow and Iterables
####################################################
# Let's just make a variable
some_var = 5
# Here is an if statement. Indentation is significant in Python!
# Convention is to use four spaces, not tabs.
# This prints "some_var is smaller than 10"
if some_var > 10:
print("some_var is totally bigger than 10.")
elif some_var < 10: # This elif clause is optional.
print("some_var is smaller than 10.")
else: # This is optional too.
print("some_var is indeed 10.")
"""
For loops iterate over lists
prints:
dog is a mammal
cat is a mammal
mouse is a mammal
"""
for animal in ["dog", "cat", "mouse"]:
# You can use format() to interpolate formatted strings
print("{} is a mammal".format(animal))
"""
"range(number)" returns an iterable of numbers
from zero to the given number
prints:
0
1
2
3
"""
for i in range(4):
print(i)
"""
"range(lower, upper)" returns an iterable of numbers
from the lower number to the upper number
prints:
4
5
6
7
"""
for i in range(4, 8):
print(i)
"""
"range(lower, upper, step)" returns an iterable of numbers
from the lower number to the upper number, while incrementing
by step. If step is not indicated, the default value is 1.
prints:
4
6
"""
for i in range(4, 8, 2):
print(i)
"""
To loop over a list, and retrieve both the index and the value of each item in the list
prints:
0 dog
1 cat
2 mouse
"""
animals = ["dog", "cat", "mouse"]
for i, value in enumerate(animals):
print(i, value)
"""
While loops go until a condition is no longer met.
prints:
0
1
2
3
"""
x = 0
while x < 4:
print(x)
x += 1 # Shorthand for x = x + 1
# Handle exceptions with a try/except block
try:
# Use "raise" to raise an error
raise IndexError("This is an index error")
except IndexError as e:
pass # Pass is just a no-op. Usually you would do recovery here.
except (TypeError, NameError):
pass # Multiple exceptions can be handled together, if required.
else: # Optional clause to the try/except block. Must follow all except blocks
print("All good!") # Runs only if the code in try raises no exceptions
finally: # Execute under all circumstances
print("We can clean up resources here")
# Instead of try/finally to cleanup resources you can use a with statement
with open("myfile.txt") as f:
for line in f:
print(line)
# Writing to a file
contents = {"aa": 12, "bb": 21}
with open("myfile1.txt", "w+") as file:
file.write(str(contents)) # writes a string to a file
with open("myfile2.txt", "w+") as file:
file.write(json.dumps(contents)) # writes an object to a file
# Reading from a file
with open('myfile1.txt', "r+") as file:
contents = file.read() # reads a string from a file
print(contents)
# print: {"aa": 12, "bb": 21}
with open('myfile2.txt', "r+") as file:
contents = json.load(file) # reads a json object from a file
print(contents)
# print: {"aa": 12, "bb": 21}
# Python offers a fundamental abstraction called the Iterable.
# An iterable is an object that can be treated as a sequence.
# The object returned by the range function, is an iterable.
filled_dict = {"one": 1, "two": 2, "three": 3}
our_iterable = filled_dict.keys()
print(our_iterable) # => dict_keys(['one', 'two', 'three']). This is an object that implements our Iterable interface.
# We can loop over it.
for i in our_iterable:
print(i) # Prints one, two, three
# However we cannot address elements by index.
our_iterable[1] # Raises a TypeError
# An iterable is an object that knows how to create an iterator.
our_iterator = iter(our_iterable)
# Our iterator is an object that can remember the state as we traverse through it.
# We get the next object with "next()".
next(our_iterator) # => "one"
# It maintains state as we iterate.
next(our_iterator) # => "two"
next(our_iterator) # => "three"
# After the iterator has returned all of its data, it raises a StopIteration exception
next(our_iterator) # Raises StopIteration
# We can also loop over it, in fact, "for" does this implicitly!
our_iterator = iter(our_iterable)
for i in our_iterator:
print(i) # Prints one, two, three
# You can grab all the elements of an iterable or iterator by calling list() on it.
list(our_iterable) # => Returns ["one", "two", "three"]
list(our_iterator) # => Returns [] because state is saved
####################################################
## 4. Functions
####################################################
# Use "def" to create new functions
def add(x, y):
print("x is {} and y is {}".format(x, y))
return x + y # Return values with a return statement
# Calling functions with parameters
add(5, 6) # => prints out "x is 5 and y is 6" and returns 11
# Another way to call functions is with keyword arguments
add(y=6, x=5) # Keyword arguments can arrive in any order.
# You can define functions that take a variable number of
# positional arguments
def varargs(*args):
return args
varargs(1, 2, 3) # => (1, 2, 3)
# You can define functions that take a variable number of
# keyword arguments, as well
def keyword_args(**kwargs):
return kwargs
# Let's call it to see what happens
keyword_args(big="foot", loch="ness") # => {"big": "foot", "loch": "ness"}
# You can do both at once, if you like
def all_the_args(*args, **kwargs):
print(args)
print(kwargs)
"""
all_the_args(1, 2, a=3, b=4) prints:
(1, 2)
{"a": 3, "b": 4}
"""
# When calling functions, you can do the opposite of args/kwargs!
# Use * to expand tuples and use ** to expand kwargs.
args = (1, 2, 3, 4)
kwargs = {"a": 3, "b": 4}
all_the_args(*args) # equivalent to all_the_args(1, 2, 3, 4)
all_the_args(**kwargs) # equivalent to all_the_args(a=3, b=4)
all_the_args(*args, **kwargs) # equivalent to all_the_args(1, 2, 3, 4, a=3, b=4)
# Returning multiple values (with tuple assignments)
def swap(x, y):
return y, x # Return multiple values as a tuple without the parenthesis.
# (Note: parenthesis have been excluded but can be included)
x = 1
y = 2
x, y = swap(x, y) # => x = 2, y = 1
# (x, y) = swap(x,y) # Again parenthesis have been excluded but can be included.
# Function Scope
x = 5
def set_x(num):
# Local var x not the same as global variable x
x = num # => 43
print(x) # => 43
def set_global_x(num):
global x
print(x) # => 5
x = num # global var x is now set to 6
print(x) # => 6
set_x(43)
set_global_x(6)
# Python has first class functions
def create_adder(x):
def adder(y):
return x + y
return adder
add_10 = create_adder(10)
add_10(3) # => 13
# There are also anonymous functions
(lambda x: x > 2)(3) # => True
(lambda x, y: x ** 2 + y ** 2)(2, 1) # => 5
# There are built-in higher order functions
list(map(add_10, [1, 2, 3])) # => [11, 12, 13]
list(map(max, [1, 2, 3], [4, 2, 1])) # => [4, 2, 3]
list(filter(lambda x: x > 5, [3, 4, 5, 6, 7])) # => [6, 7]
# We can use list comprehensions for nice maps and filters
# List comprehension stores the output as a list which can itself be a nested list
[add_10(i) for i in [1, 2, 3]] # => [11, 12, 13]
[x for x in [3, 4, 5, 6, 7] if x > 5] # => [6, 7]
# You can construct set and dict comprehensions as well.
{x for x in 'abcddeef' if x not in 'abc'} # => {'d', 'e', 'f'}
{x: x**2 for x in range(5)} # => {0: 0, 1: 1, 2: 4, 3: 9, 4: 16}
####################################################
## 5. Modules
####################################################
# You can import modules
import math
print(math.sqrt(16)) # => 4.0
# You can get specific functions from a module
from math import ceil, floor
print(ceil(3.7)) # => 4.0
print(floor(3.7)) # => 3.0
# You can import all functions from a module.
# Warning: this is not recommended
from math import *
# You can shorten module names
import math as m
math.sqrt(16) == m.sqrt(16) # => True
# Python modules are just ordinary Python files. You
# can write your own, and import them. The name of the
# module is the same as the name of the file.
# You can find out which functions and attributes
# are defined in a module.
import math
dir(math)
# If you have a Python script named math.py in the same
# folder as your current script, the file math.py will
# be loaded instead of the built-in Python module.
# This happens because the local folder has priority
# over Python's built-in libraries.
####################################################
## 6. Classes
####################################################
# We use the "class" statement to create a class
class Human:
# A class attribute. It is shared by all instances of this class
species = "H. sapiens"
# Basic initializer, this is called when this class is instantiated.
# Note that the double leading and trailing underscores denote objects
# or attributes that are used by Python but that live in user-controlled
# namespaces. Methods(or objects or attributes) like: __init__, __str__,
# __repr__ etc. are called special methods (or sometimes called dunder methods)
# You should not invent such names on your own.
def __init__(self, name):
# Assign the argument to the instance's name attribute
self.name = name
# Initialize property
self._age = 0
# An instance method. All methods take "self" as the first argument
def say(self, msg):
print("{name}: {message}".format(name=self.name, message=msg))
# Another instance method
def sing(self):
return 'yo... yo... microphone check... one two... one two...'
# A class method is shared among all instances
# They are called with the calling class as the first argument
@classmethod
def get_species(cls):
return cls.species
# A static method is called without a class or instance reference
@staticmethod
def grunt():
return "*grunt*"
# A property is just like a getter.
# It turns the method age() into a read-only attribute of the same name.
# There's no need to write trivial getters and setters in Python, though.
@property
def age(self):
return self._age
# This allows the property to be set
@age.setter
def age(self, age):
self._age = age
# This allows the property to be deleted
@age.deleter
def age(self):
del self._age
# When a Python interpreter reads a source file it executes all its code.
# This __name__ check makes sure this code block is only executed when this
# module is the main program.
if __name__ == '__main__':
# Instantiate a class
i = Human(name="Ian")
i.say("hi") # "Ian: hi"
j = Human("Joel")
j.say("hello") # "Joel: hello"
# i and j are instances of type Human, or in other words: they are Human objects
# Call our class method
i.say(i.get_species()) # "Ian: H. sapiens"
# Change the shared attribute
Human.species = "H. neanderthalensis"
i.say(i.get_species()) # => "Ian: H. neanderthalensis"
j.say(j.get_species()) # => "Joel: H. neanderthalensis"
# Call the static method
print(Human.grunt()) # => "*grunt*"
# Static methods can be called by instances too
print(i.grunt()) # => "*grunt*"
# Update the property for this instance
i.age = 42
# Get the property
i.say(i.age) # => "Ian: 42"
j.say(j.age) # => "Joel: 0"
# Delete the property
del i.age
# i.age # => this would raise an AttributeError
####################################################
## 6.1 Inheritance
####################################################
# Inheritance allows new child classes to be defined that inherit methods and
# variables from their parent class.
# Using the Human class defined above as the base or parent class, we can
# define a child class, Superhero, which inherits the class variables like
# "species", "name", and "age", as well as methods, like "sing" and "grunt"
# from the Human class, but can also have its own unique properties.
# To take advantage of modularization by file you could place the classes above in their own files,
# say, human.py
# To import functions from other files use the following format
# from "filename-without-extension" import "function-or-class"
from human import Human
# Specify the parent class(es) as parameters to the class definition
class Superhero(Human):
# If the child class should inherit all of the parent's definitions without
# any modifications, you can just use the "pass" keyword (and nothing else)
# but in this case it is commented out to allow for a unique child class:
# pass
# Child classes can override their parents' attributes
species = 'Superhuman'
# Children automatically inherit their parent class's constructor including
# its arguments, but can also define additional arguments or definitions
# and override its methods such as the class constructor.
# This constructor inherits the "name" argument from the "Human" class and
# adds the "superpower" and "movie" arguments:
def __init__(self, name, movie=False,
superpowers=["super strength", "bulletproofing"]):
# add additional class attributes:
self.fictional = True
self.movie = movie
# be aware of mutable default values, since defaults are shared
self.superpowers = superpowers
# The "super" function lets you access the parent class's methods
# that are overridden by the child, in this case, the __init__ method.
# This calls the parent class constructor:
super().__init__(name)
# override the sing method
def sing(self):
return 'Dun, dun, DUN!'
# add an additional instance method
def boast(self):
for power in self.superpowers:
print("I wield the power of {pow}!".format(pow=power))
if __name__ == '__main__':
sup = Superhero(name="Tick")
# Instance type checks
if isinstance(sup, Human):
print('I am human')
if type(sup) is Superhero:
print('I am a superhero')
# Get the Method Resolution search Order used by both getattr() and super()
# This attribute is dynamic and can be updated
print(Superhero.__mro__) # => (<class '__main__.Superhero'>,
# => <class 'human.Human'>, <class 'object'>)
# Calls parent method but uses its own class attribute
print(sup.get_species()) # => Superhuman
# Calls overridden method
print(sup.sing()) # => Dun, dun, DUN!
# Calls method from Human
sup.say('Spoon') # => Tick: Spoon
# Call method that exists only in Superhero
sup.boast() # => I wield the power of super strength!
# => I wield the power of bulletproofing!
# Inherited class attribute
sup.age = 31
print(sup.age) # => 31
# Attribute that only exists within Superhero
print('Am I Oscar eligible? ' + str(sup.movie))
####################################################
## 6.2 Multiple Inheritance
####################################################
# Another class definition
# bat.py
class Bat:
species = 'Baty'
def __init__(self, can_fly=True):
self.fly = can_fly
# This class also has a say method
def say(self, msg):
msg = '... ... ...'
return msg
# And its own method as well
def sonar(self):
return '))) ... ((('
if __name__ == '__main__':
b = Bat()
print(b.say('hello'))
print(b.fly)
# And yet another class definition that inherits from Superhero and Bat
# superhero.py
from superhero import Superhero
from bat import Bat
# Define Batman as a child that inherits from both Superhero and Bat
class Batman(Superhero, Bat):
def __init__(self, *args, **kwargs):
# Typically to inherit attributes you have to call super:
# super(Batman, self).__init__(*args, **kwargs)
# However we are dealing with multiple inheritance here, and super()
# only works with the next base class in the MRO list.
# So instead we explicitly call __init__ for all ancestors.
# The use of *args and **kwargs allows for a clean way to pass arguments,
# with each parent "peeling a layer of the onion".
Superhero.__init__(self, 'anonymous', movie=True,
superpowers=['Wealthy'], *args, **kwargs)
Bat.__init__(self, *args, can_fly=False, **kwargs)
# override the value for the name attribute
self.name = 'Sad Affleck'
def sing(self):
return 'nan nan nan nan nan batman!'
if __name__ == '__main__':
sup = Batman()
# Get the Method Resolution search Order used by both getattr() and super().
# This attribute is dynamic and can be updated
print(Batman.__mro__) # => (<class '__main__.Batman'>,
# => <class 'superhero.Superhero'>,
# => <class 'human.Human'>,
# => <class 'bat.Bat'>, <class 'object'>)
# Calls parent method but uses its own class attribute
print(sup.get_species()) # => Superhuman
# Calls overridden method
print(sup.sing()) # => nan nan nan nan nan batman!
# Calls method from Human, because inheritance order matters
sup.say('I agree') # => Sad Affleck: I agree
# Call method that exists only in 2nd ancestor
print(sup.sonar()) # => ))) ... (((
# Inherited class attribute
sup.age = 100
print(sup.age) # => 100
# Inherited attribute from 2nd ancestor whose default value was overridden.
print('Can I fly? ' + str(sup.fly)) # => Can I fly? False
####################################################
## 7. Advanced
####################################################
# Generators help you make lazy code.
def double_numbers(iterable):
for i in iterable:
yield i + i
# Generators are memory-efficient because they only load the data needed to
# process the next value in the iterable. This allows them to perform
# operations on otherwise prohibitively large value ranges.
# NOTE: `range` replaces `xrange` in Python 3.
for i in double_numbers(range(1, 900000000)): # `range` is a generator.
print(i)
if i >= 30:
break
# Just as you can create a list comprehension, you can create generator
# comprehensions as well.
values = (-x for x in [1,2,3,4,5])
for x in values:
print(x) # prints -1 -2 -3 -4 -5 to console/terminal
# You can also cast a generator comprehension directly to a list.
values = (-x for x in [1,2,3,4,5])
gen_to_list = list(values)
print(gen_to_list) # => [-1, -2, -3, -4, -5]
# Decorators
# In this example `beg` wraps `say`. If say_please is True then it
# will change the returned message.
from functools import wraps
def beg(target_function):
@wraps(target_function)
def wrapper(*args, **kwargs):
msg, say_please = target_function(*args, **kwargs)
if say_please:
return "{} {}".format(msg, "Please! I am poor :(")
return msg
return wrapper
@beg
def say(say_please=False):
msg = "Can you buy me a beer?"
return msg, say_please
print(say()) # Can you buy me a beer?
print(say(say_please=True)) # Can you buy me a beer? Please! I am poor :(
- Automate the Boring Stuff with Python
- Ideas for Python Projects
- The Official Docs
- Hitchhiker's Guide to Python
- Python Course
- First Steps With Python
- A curated list of awesome Python frameworks, libraries and software
- 30 Python Language Features and Tricks You May Not Know About
- Official Style Guide for Python
- Python 3 Computer Science Circles
- Dive Into Python 3
- A Crash Course in Python for Scientists
- Python Tutorial for Intermediates
- Build a Desktop App with Python


JavaScript:
JavaScript was created by Netscape's Brendan Eich in 1995. It was originally intended as a simpler scripting language for websites, complementing the use of Java for more complex web applications, but its tight integration with Web pages and built-in support in browsers has caused it to become far more common than Java in web frontends.
JavaScript isn't just limited to web browsers, though: Node.js, a project that provides a standalone runtime for Google Chrome's V8 JavaScript engine, is becoming more and more popular.
JavaScript has a C-like syntax, so if you've used languages like C or Java, a lot of the basic syntax will already be familiar. Despite this, and despite the similarity in name, JavaScript's object model is significantly different to Java's.
// Single-line comments start with two slashes.
/* Multiline comments start with slash-star,
and end with star-slash */
// Statements can be terminated by ;
doStuff();
// ... but they don't have to be, as semicolons are automatically inserted
// wherever there's a newline, except in certain cases.
doStuff()
// Because those cases can cause unexpected results, we'll keep on using
// semicolons in this guide.
///////////////////////////////////
// 1. Numbers, Strings and Operators
// JavaScript has one number type (which is a 64-bit IEEE 754 double).
// Doubles have a 52-bit mantissa, which is enough to store integers
// up to about 9✕10¹⁵ precisely.
3; // = 3
1.5; // = 1.5
// Some basic arithmetic works as you'd expect.
1 + 1; // = 2
0.1 + 0.2; // = 0.30000000000000004
8 - 1; // = 7
10 * 2; // = 20
35 / 5; // = 7
// Including uneven division.
5 / 2; // = 2.5
// And modulo division.
10 % 2; // = 0
30 % 4; // = 2
18.5 % 7; // = 4.5
// Bitwise operations also work; when you perform a bitwise operation your float
// is converted to a signed int *up to* 32 bits.
1 << 2; // = 4
// Precedence is enforced with parentheses.
(1 + 3) * 2; // = 8
// There are three special not-a-real-number values:
Infinity; // result of e.g. 1/0
-Infinity; // result of e.g. -1/0
NaN; // result of e.g. 0/0, stands for 'Not a Number'
// There's also a boolean type.
true;
false;
// Strings are created with ' or ".
'abc';
"Hello, world";
// Negation uses the ! symbol
!true; // = false
!false; // = true
// Equality is ===
1 === 1; // = true
2 === 1; // = false
// Inequality is !==
1 !== 1; // = false
2 !== 1; // = true
// More comparisons
1 < 10; // = true
1 > 10; // = false
2 <= 2; // = true
2 >= 2; // = true
// Strings are concatenated with +
"Hello " + "world!"; // = "Hello world!"
// ... which works with more than just strings
"1, 2, " + 3; // = "1, 2, 3"
"Hello " + ["world", "!"]; // = "Hello world,!"
// and are compared with < and >
"a" < "b"; // = true
// Type coercion is performed for comparisons with double equals...
"5" == 5; // = true
null == undefined; // = true
// ...unless you use ===
"5" === 5; // = false
null === undefined; // = false
// ...which can result in some weird behaviour...
13 + !0; // 14
"13" + !0; // '13true'
// You can access characters in a string with `charAt`
"This is a string".charAt(0); // = 'T'
// ...or use `substring` to get larger pieces.
"Hello world".substring(0, 5); // = "Hello"
// `length` is a property, so don't use ().
"Hello".length; // = 5
// There's also `null` and `undefined`.
null; // used to indicate a deliberate non-value
undefined; // used to indicate a value is not currently present (although
// `undefined` is actually a value itself)
// false, null, undefined, NaN, 0 and "" are falsy; everything else is truthy.
// Note that 0 is falsy and "0" is truthy, even though 0 == "0".
///////////////////////////////////
// 2. Variables, Arrays and Objects
// Variables are declared with the `var` keyword. JavaScript is dynamically
// typed, so you don't need to specify type. Assignment uses a single `=`
// character.
var someVar = 5;
// If you leave the var keyword off, you won't get an error...
someOtherVar = 10;
// ...but your variable will be created in the global scope, not in the scope
// you defined it in.
// Variables declared without being assigned to are set to undefined.
var someThirdVar; // = undefined
// If you want to declare a couple of variables, then you could use a comma
// separator
var someFourthVar = 2, someFifthVar = 4;
// There's shorthand for performing math operations on variables:
someVar += 5; // equivalent to someVar = someVar + 5; someVar is 10 now
someVar *= 10; // now someVar is 100
// and an even-shorter-hand for adding or subtracting 1
someVar++; // now someVar is 101
someVar--; // back to 100
// Arrays are ordered lists of values, of any type.
var myArray = ["Hello", 45, true];
// Their members can be accessed using the square-brackets subscript syntax.
// Array indices start at zero.
myArray[1]; // = 45
// Arrays are mutable and of variable length.
myArray.push("World");
myArray.length; // = 4
// Add/Modify at specific index
myArray[3] = "Hello";
// Add and remove element from front or back end of an array
myArray.unshift(3); // Add as the first element
someVar = myArray.shift(); // Remove first element and return it
myArray.push(3); // Add as the last element
someVar = myArray.pop(); // Remove last element and return it
// Join all elements of an array with semicolon
var myArray0 = [32,false,"js",12,56,90];
myArray0.join(";"); // = "32;false;js;12;56;90"
// Get subarray of elements from index 1 (include) to 4 (exclude)
myArray0.slice(1,4); // = [false,"js",12]
// Remove 4 elements starting from index 2, and insert there strings
// "hi","wr" and "ld"; return removed subarray
myArray0.splice(2,4,"hi","wr","ld"); // = ["js",12,56,90]
// myArray0 === [32,false,"hi","wr","ld"]
// JavaScript's objects are equivalent to "dictionaries" or "maps" in other
// languages: an unordered collection of key-value pairs.
var myObj = {key1: "Hello", key2: "World"};
// Keys are strings, but quotes aren't required if they're a valid
// JavaScript identifier. Values can be any type.
var myObj = {myKey: "myValue", "my other key": 4};
// Object attributes can also be accessed using the subscript syntax,
myObj["my other key"]; // = 4
// ... or using the dot syntax, provided the key is a valid identifier.
myObj.myKey; // = "myValue"
// Objects are mutable; values can be changed and new keys added.
myObj.myThirdKey = true;
// If you try to access a value that's not yet set, you'll get undefined.
myObj.myFourthKey; // = undefined
///////////////////////////////////
// 3. Logic and Control Structures
// The `if` structure works as you'd expect.
var count = 1;
if (count == 3){
// evaluated if count is 3
} else if (count == 4){
// evaluated if count is 4
} else {
// evaluated if it's not either 3 or 4
}
// As does `while`.
while (true){
// An infinite loop!
}
// Do-while loops are like while loops, except they always run at least once.
var input;
do {
input = getInput();
} while (!isValid(input));
// The `for` loop is the same as C and Java:
// initialization; continue condition; iteration.
for (var i = 0; i < 5; i++){
// will run 5 times
}
// Breaking out of labeled loops is similar to Java
outer:
for (var i = 0; i < 10; i++) {
for (var j = 0; j < 10; j++) {
if (i == 5 && j ==5) {
break outer;
// breaks out of outer loop instead of only the inner one
}
}
}
// The for/in statement allows iteration over properties of an object.
var description = "";
var person = {fname:"Paul", lname:"Ken", age:18};
for (var x in person){
description += person[x] + " ";
} // description = 'Paul Ken 18 '
// The for/of statement allows iteration over iterable objects (including the built-in String,
// Array, e.g. the Array-like arguments or NodeList objects, TypedArray, Map and Set,
// and user-defined iterables).
var myPets = "";
var pets = ["cat", "dog", "hamster", "hedgehog"];
for (var pet of pets){
myPets += pet + " ";
} // myPets = 'cat dog hamster hedgehog '
// && is logical and, || is logical or
if (house.size == "big" && house.colour == "blue"){
house.contains = "bear";
}
if (colour == "red" || colour == "blue"){
// colour is either red or blue
}
// && and || "short circuit", which is useful for setting default values.
var name = otherName || "default";
// The `switch` statement checks for equality with `===`.
// Use 'break' after each case
// or the cases after the correct one will be executed too.
grade = 'B';
switch (grade) {
case 'A':
console.log("Great job");
break;
case 'B':
console.log("OK job");
break;
case 'C':
console.log("You can do better");
break;
default:
console.log("Oy vey");
break;
}
///////////////////////////////////
// 4. Functions, Scope and Closures
// JavaScript functions are declared with the `function` keyword.
function myFunction(thing){
return thing.toUpperCase();
}
myFunction("foo"); // = "FOO"
// Note that the value to be returned must start on the same line as the
// `return` keyword, otherwise you'll always return `undefined` due to
// automatic semicolon insertion. Watch out for this when using Allman style.
function myFunction(){
return // <- semicolon automatically inserted here
{thisIsAn: 'object literal'};
}
myFunction(); // = undefined
// JavaScript functions are first class objects, so they can be reassigned to
// different variable names and passed to other functions as arguments - for
// example, when supplying an event handler:
function myFunction(){
// this code will be called in 5 seconds' time
}
setTimeout(myFunction, 5000);
// Note: setTimeout isn't part of the JS language, but is provided by browsers
// and Node.js.
// Another function provided by browsers is setInterval
function myFunction(){
// this code will be called every 5 seconds
}
setInterval(myFunction, 5000);
// Function objects don't even have to be declared with a name - you can write
// an anonymous function definition directly into the arguments of another.
setTimeout(function(){
// this code will be called in 5 seconds' time
}, 5000);
// JavaScript has function scope; functions get their own scope but other blocks
// do not.
if (true){
var i = 5;
}
i; // = 5 - not undefined as you'd expect in a block-scoped language
// This has led to a common pattern of "immediately-executing anonymous
// functions", which prevent temporary variables from leaking into the global
// scope.
(function(){
var temporary = 5;
// We can access the global scope by assigning to the "global object", which
// in a web browser is always `window`. The global object may have a
// different name in non-browser environments such as Node.js.
window.permanent = 10;
})();
temporary; // raises ReferenceError
permanent; // = 10
// One of JavaScript's most powerful features is closures. If a function is
// defined inside another function, the inner function has access to all the
// outer function's variables, even after the outer function exits.
function sayHelloInFiveSeconds(name){
var prompt = "Hello, " + name + "!";
// Inner functions are put in the local scope by default, as if they were
// declared with `var`.
function inner(){
alert(prompt);
}
setTimeout(inner, 5000);
// setTimeout is asynchronous, so the sayHelloInFiveSeconds function will
// exit immediately, and setTimeout will call inner afterwards. However,
// because inner is "closed over" sayHelloInFiveSeconds, inner still has
// access to the `prompt` variable when it is finally called.
}
sayHelloInFiveSeconds("Adam"); // will open a popup with "Hello, Adam!" in 5s
///////////////////////////////////
// 5. More about Objects; Constructors and Prototypes
// Objects can contain functions.
var myObj = {
myFunc: function(){
return "Hello world!";
}
};
myObj.myFunc(); // = "Hello world!"
// When functions attached to an object are called, they can access the object
// they're attached to using the `this` keyword.
myObj = {
myString: "Hello world!",
myFunc: function(){
return this.myString;
}
};
myObj.myFunc(); // = "Hello world!"
// What this is set to has to do with how the function is called, not where
// it's defined. So, our function doesn't work if it isn't called in the
// context of the object.
var myFunc = myObj.myFunc;
myFunc(); // = undefined
// Inversely, a function can be assigned to the object and gain access to it
// through `this`, even if it wasn't attached when it was defined.
var myOtherFunc = function(){
return this.myString.toUpperCase();
};
myObj.myOtherFunc = myOtherFunc;
myObj.myOtherFunc(); // = "HELLO WORLD!"
// We can also specify a context for a function to execute in when we invoke it
// using `call` or `apply`.
var anotherFunc = function(s){
return this.myString + s;
};
anotherFunc.call(myObj, " And Hello Moon!"); // = "Hello World! And Hello Moon!"
// The `apply` function is nearly identical, but takes an array for an argument
// list.
anotherFunc.apply(myObj, [" And Hello Sun!"]); // = "Hello World! And Hello Sun!"
// This is useful when working with a function that accepts a sequence of
// arguments and you want to pass an array.
Math.min(42, 6, 27); // = 6
Math.min([42, 6, 27]); // = NaN (uh-oh!)
Math.min.apply(Math, [42, 6, 27]); // = 6
// But, `call` and `apply` are only temporary. When we want it to stick, we can
// use `bind`.
var boundFunc = anotherFunc.bind(myObj);
boundFunc(" And Hello Saturn!"); // = "Hello World! And Hello Saturn!"
// `bind` can also be used to partially apply (curry) a function.
var product = function(a, b){ return a * b; };
var doubler = product.bind(this, 2);
doubler(8); // = 16
// When you call a function with the `new` keyword, a new object is created, and
// made available to the function via the `this` keyword. Functions designed to be
// called like that are called constructors.
var MyConstructor = function(){
this.myNumber = 5;
};
myNewObj = new MyConstructor(); // = {myNumber: 5}
myNewObj.myNumber; // = 5
// Unlike most other popular object-oriented languages, JavaScript has no
// concept of 'instances' created from 'class' blueprints; instead, JavaScript
// combines instantiation and inheritance into a single concept: a 'prototype'.
// Every JavaScript object has a 'prototype'. When you go to access a property
// on an object that doesn't exist on the actual object, the interpreter will
// look at its prototype.
// Some JS implementations let you access an object's prototype on the magic
// property `__proto__`. While this is useful for explaining prototypes it's not
// part of the standard; we'll get to standard ways of using prototypes later.
var myObj = {
myString: "Hello world!"
};
var myPrototype = {
meaningOfLife: 42,
myFunc: function(){
return this.myString.toLowerCase();
}
};
myObj.__proto__ = myPrototype;
myObj.meaningOfLife; // = 42
// This works for functions, too.
myObj.myFunc(); // = "hello world!"
// Of course, if your property isn't on your prototype, the prototype's
// prototype is searched, and so on.
myPrototype.__proto__ = {
myBoolean: true
};
myObj.myBoolean; // = true
// There's no copying involved here; each object stores a reference to its
// prototype. This means we can alter the prototype and our changes will be
// reflected everywhere.
myPrototype.meaningOfLife = 43;
myObj.meaningOfLife; // = 43
// The for/in statement allows iteration over properties of an object,
// walking up the prototype chain until it sees a null prototype.
for (var x in myObj){
console.log(myObj[x]);
}
///prints:
// Hello world!
// 43
// [Function: myFunc]
// true
// To only consider properties attached to the object itself
// and not its prototypes, use the `hasOwnProperty()` check.
for (var x in myObj){
if (myObj.hasOwnProperty(x)){
console.log(myObj[x]);
}
}
///prints:
// Hello world!
// We mentioned that `__proto__` was non-standard, and there's no standard way to
// change the prototype of an existing object. However, there are two ways to
// create a new object with a given prototype.
// The first is Object.create, which is a recent addition to JS, and therefore
// not available in all implementations yet.
var myObj = Object.create(myPrototype);
myObj.meaningOfLife; // = 43
// The second way, which works anywhere, has to do with constructors.
// Constructors have a property called prototype. This is *not* the prototype of
// the constructor function itself; instead, it's the prototype that new objects
// are given when they're created with that constructor and the new keyword.
MyConstructor.prototype = {
myNumber: 5,
getMyNumber: function(){
return this.myNumber;
}
};
var myNewObj2 = new MyConstructor();
myNewObj2.getMyNumber(); // = 5
myNewObj2.myNumber = 6;
myNewObj2.getMyNumber(); // = 6
// Built-in types like strings and numbers also have constructors that create
// equivalent wrapper objects.
var myNumber = 12;
var myNumberObj = new Number(12);
myNumber == myNumberObj; // = true
// Except, they aren't exactly equivalent.
typeof myNumber; // = 'number'
typeof myNumberObj; // = 'object'
myNumber === myNumberObj; // = false
if (0){
// This code won't execute, because 0 is falsy.
}
if (new Number(0)){
// This code will execute, because wrapped numbers are objects, and objects
// are always truthy.
}
// However, the wrapper objects and the regular builtins share a prototype, so
// you can actually add functionality to a string, for instance.
String.prototype.firstCharacter = function(){
return this.charAt(0);
};
"abc".firstCharacter(); // = "a"
// This fact is often used in "polyfilling", which is implementing newer
// features of JavaScript in an older subset of JavaScript, so that they can be
// used in older environments such as outdated browsers.
// For instance, we mentioned that Object.create isn't yet available in all
// implementations, but we can still use it with this polyfill:
if (Object.create === undefined){ // don't overwrite it if it exists
Object.create = function(proto){
// make a temporary constructor with the right prototype
var Constructor = function(){};
Constructor.prototype = proto;
// then use it to create a new, appropriately-prototyped object
return new Constructor();
};
}
// ES6 Additions
// The "let" keyword allows you to define variables in a lexical scope,
// as opposed to a block scope like the var keyword does.
let name = "Billy";
// Variables defined with let can be reassigned new values.
name = "William";
// The "const" keyword allows you to define a variable in a lexical scope
// like with let, but you cannot reassign the value once one has been assigned.
const pi = 3.14;
pi = 4.13; // You cannot do this.
// There is a new syntax for functions in ES6 known as "lambda syntax".
// This allows functions to be defined in a lexical scope like with variables
// defined by const and let.
const isEven = (number) => {
return number % 2 === 0;
};
isEven(7); // false
// The "equivalent" of this function in the traditional syntax would look like this:
function isEven(number) {
return number % 2 === 0;
};
// I put the word "equivalent" in double quotes because a function defined
// using the lambda syntax cannnot be called before the definition.
// The following is an example of invalid usage:
add(1, 8);
const add = (firstNumber, secondNumber) => {
return firstNumber + secondNumber;
};
The Mozilla Developer Network provides excellent documentation for JavaScript as it's used in browsers. Plus, it's a wiki, so as you learn more you can help others out by sharing your own knowledge.
MDN's A re-introduction to JavaScript covers much of the concepts covered here in more detail. This guide has quite deliberately only covered the JavaScript language itself; if you want to learn more about how to use JavaScript in web pages, start by learning about the Document Object Model.
Learn Javascript by Example and with Challenges is a variant of this reference with built-in challenges.
JavaScript Garden is an in-depth guide of all the counter-intuitive parts of the language.
JavaScript: The Definitive Guide is a classic guide and reference book.
Eloquent Javascript by Marijn Haverbeke is an excellent JS book/ebook with attached terminal
Javascript: The Right Way is a guide intended to introduce new developers to JavaScript and help experienced developers learn more about its best practices.
Javascript:Info is a modern javascript tutorial covering the basics (core language and working with a browser) as well as advanced topics with concise explanations.
In addition to direct contributors to this article, some content is adapted from Louie Dinh's Python tutorial on this site, and the JS Tutorial on the Mozilla Developer Network.
/* ******************************************************************************************* | |
* GLOBAL OBJECTS > OBJECT | |
* https://developer.mozilla.org/en-US/docs/Web/JavaScript/Reference/Global_Objects/Object | |
* ******************************************************************************************* */ | |
// Global object: properties | |
Object.length // length is a property of a function object, and indicates how many arguments the function expects, i.e. the number of formal parameters. This number does not include the rest parameter. Has a value of 1. | |
Object.prototype // Represents the Object prototype object and allows to add new properties and methods to all objects of type Object. | |
// Methods of the Object constructor | |
Object.assign(target, ...sources) // Copies the values of all enumerable own properties from one or more source objects to a target object. method is used to copy the values of all enumerable own properties from one or more source objects to a target object. It will return the target object | |
Object.create(MyObject) // Creates a new object with the specified prototype object and properties. The object which should be the prototype of the newly-created object. | |
Object.defineProperty(obj, prop, descriptor) // Adds the named property described by a given descriptor to an object. | |
Object.defineProperties(obj, props) // Adds the named properties described by the given descriptors to an object. | |
Object.entries(obj) // Returns an array containing all of the [key, value] pairs of a given object's own enumerable string properties. | |
Object.freeze(obj) // Freezes an object: other code can't delete or change any properties. | |
Object.getOwnPropertyDescriptor(obj, prop) // Returns a property descriptor for a named property on an object. | |
Object.getOwnPropertyDescriptors(obj) // Returns an object containing all own property descriptors for an object. | |
Object.getOwnPropertyNames(obj) // Returns an array containing the names of all of the given object's own enumerable and non-enumerable properties. | |
Object.getOwnPropertySymbols(obj) // Returns an array of all symbol properties found directly upon a given object. | |
Object.getPrototypeOf(obj) // Returns the prototype of the specified object. | |
Object.is(value1, value2); // Compares if two values are the same value. Equates all NaN values (which differs from both Abstract Equality Comparison and Strict Equality Comparison). | |
Object.isExtensible(obj) // Determines if extending of an object is allowed. | |
Object.isFrozen(obj) // Determines if an object was frozen. | |
Object.isSealed(obj) // Determines if an object is sealed. | |
Object.keys(obj) // Returns an array containing the names of all of the given object's own enumerable string properties. | |
Object.preventExtensions(obj) // Prevents any extensions of an object. | |
Object.seal(obj) // Prevents other code from deleting properties of an object. | |
Object.setPrototypeOf(obj, prototype) // Sets the prototype (i.e., the internal [[Prototype]] property). | |
Object.values(obj) // Returns an array containing the values that correspond to all of a given object's own enumerable string properties. | |
// Object instances and Object prototype object (Object.prototype.property or Object.prototype.method()) | |
// Properties | |
obj.constructor // Specifies the function that creates an object's prototype. | |
obj.__proto__ // Points to the object which was used as prototype when the object was instantiated. | |
// Methods | |
obj.hasOwnProperty(prop) // Returns a boolean indicating whether an object contains the specified property as a direct property of that object and not inherited through the prototype chain. | |
prototypeObj.isPrototypeOf(object) // Returns a boolean indicating whether the object this method is called upon is in the prototype chain of the specified object. | |
obj.propertyIsEnumerable(prop) // Returns a boolean indicating if the internal ECMAScript [[Enumerable]] attribute is set. | |
obj.toLocaleString() // Calls toString(). | |
obj.toString() // Returns a string representation of the object. | |
object.valueOf() // Returns the primitive value of the specified object. | |
/* ******************************************************************************************* | |
* GLOBAL OBJECTS > ARRAY | |
* https://developer.mozilla.org/en-US/docs/Web/JavaScript/Reference/Global_Objects/Array | |
* ******************************************************************************************* */ | |
// Global object: properties | |
Array.length // Reflects the number of elements in an array. | |
Array.prototype // Represents the prototype for the Array constructor and allows to add new properties and methods to all Array objects. | |
// Global object: methods | |
Array.from(arrayLike[, mapFn[, thisArg]]) // Creates a new Array instance from an array-like or iterable object. | |
Array.isArray(obj) // Returns true if a variable is an array, if not false. | |
Array.of(element0[, element1[, ...[, elementN]]]) // Creates a new Array instance with a variable number of arguments, regardless of number or type of the arguments. | |
// Instance: properties | |
arr.length // Reflects the number of elements in an array. | |
// Instance: mutator methods | |
arr.copyWithin(target, start, end) // Copies a sequence of array elements within the array. | |
arr.fill(value, start, end) // Fills all the elements of an array from a start index to an end index with a static value. | |
arr.pop() // Removes the last element from an array and returns that element. | |
arr.push([element1[, ...[, elementN]]]) // Adds one or more elements to the end of an array and returns the new length of the array. | |
arr.reverse() // Reverses the order of the elements of an array in place — the first becomes the last, and the last becomes the first. | |
arr.shift() // Removes the first element from an array and returns that element. | |
arr.sort() // Sorts the elements of an array in place and returns the array. | |
array.splice(start, deleteCount, item1, item2, ...) // Adds and/or removes elements from an array. | |
arr.unshift([element1[, ...[, elementN]]]) // Adds one or more elements to the front of an array and returns the new length of the array. | |
// Instance: accessor methods | |
arr.concat(value1[, value2[, ...[, valueN]]]) // Returns a new array comprised of this array joined with other array(s) and/or value(s). | |
arr.includes(searchElement, fromIndex) // Determines whether an array contains a certain element, returning true or false as appropriate. | |
arr.indexOf(searchElement[, fromIndex]) // Returns the first (least) index of an element within the array equal to the specified value, or -1 if none is found. | |
arr.join(separator) // Joins all elements of an array into a string. | |
arr.lastIndexOf(searchElement, fromIndex) // Returns the last (greatest) index of an element within the array equal to the specified value, or -1 if none is found. | |
arr.slice(begin, end) // Extracts a section of an array and returns a new array. | |
arr.toString() // Returns a string representing the array and its elements. Overrides the Object.prototype.toString() method. | |
arr.toLocaleString(locales, options) // Returns a localized string representing the array and its elements. Overrides the Object.prototype.toLocaleString() method. | |
// Instance: iteration methods | |
arr.entries() // Returns a new Array Iterator object that contains the key/value pairs for each index in the array. | |
arr.every(callback[, thisArg]) // Returns true if every element in this array satisfies the provided testing function. | |
arr.filter(callback[, thisArg]) // Creates a new array with all of the elements of this array for which the provided filtering function returns true. | |
arr.find(callback[, thisArg]) // Returns the found value in the array, if an element in the array satisfies the provided testing function or undefined if not found. | |
arr.findIndex(callback[, thisArg]) // Returns the found index in the array, if an element in the array satisfies the provided testing function or -1 if not found. | |
arr.forEach(callback[, thisArg]) // Calls a function for each element in the array. | |
arr.keys() // Returns a new Array Iterator that contains the keys for each index in the array. | |
arr.map(callback[, initialValue]) // Creates a new array with the results of calling a provided function on every element in this array. | |
arr.reduce(callback[, initialValue]) // Apply a function against an accumulator and each value of the array (from left-to-right) as to reduce it to a single value. | |
arr.reduceRight(callback[, initialValue]) // Apply a function against an accumulator and each value of the array (from right-to-left) as to reduce it to a single value. | |
arr.some(callback[, initialValue]) // Returns true if at least one element in this array satisfies the provided testing function. | |
arr.values() // Returns a new Array Iterator object that contains the values for each index in the array. |


TypeScript:
TypeScript is a language that aims at easing development of large scale applications written in JavaScript. TypeScript adds common concepts such as classes, modules, interfaces, generics and (optional) static typing to JavaScript. It is a superset of JavaScript: all JavaScript code is valid TypeScript code so it can be added seamlessly to any project. The TypeScript compiler emits JavaScript.
This article will focus only on TypeScript extra syntax, as opposed to JavaScript.
To test TypeScript's compiler, head to the Playground where you will be able to type code, have auto completion and directly see the emitted JavaScript.
// There are 3 basic types in TypeScript
let isDone: boolean = false;
let lines: number = 42;
let name: string = "Anders";
// But you can omit the type annotation if the variables are derived
// from explicit literals
let isDone = false;
let lines = 42;
let name = "Anders";
// When it's impossible to know, there is the "Any" type
let notSure: any = 4;
notSure = "maybe a string instead";
notSure = false; // okay, definitely a boolean
// Use const keyword for constants
const numLivesForCat = 9;
numLivesForCat = 1; // Error
// For collections, there are typed arrays and generic arrays
let list: number[] = [1, 2, 3];
// Alternatively, using the generic array type
let list: Array<number> = [1, 2, 3];
// For enumerations:
enum Color { Red, Green, Blue };
let c: Color = Color.Green;
// Lastly, "void" is used in the special case of a function returning nothing
function bigHorribleAlert(): void {
alert("I'm a little annoying box!");
}
// Functions are first class citizens, support the lambda "fat arrow" syntax and
// use type inference
// The following are equivalent, the same signature will be inferred by the
// compiler, and same JavaScript will be emitted
let f1 = function (i: number): number { return i * i; }
// Return type inferred
let f2 = function (i: number) { return i * i; }
// "Fat arrow" syntax
let f3 = (i: number): number => { return i * i; }
// "Fat arrow" syntax with return type inferred
let f4 = (i: number) => { return i * i; }
// "Fat arrow" syntax with return type inferred, braceless means no return
// keyword needed
let f5 = (i: number) => i * i;
// Interfaces are structural, anything that has the properties is compliant with
// the interface
interface Person {
name: string;
// Optional properties, marked with a "?"
age?: number;
// And of course functions
move(): void;
}
// Object that implements the "Person" interface
// Can be treated as a Person since it has the name and move properties
let p: Person = { name: "Bobby", move: () => { } };
// Objects that have the optional property:
let validPerson: Person = { name: "Bobby", age: 42, move: () => { } };
// Is not a person because age is not a number
let invalidPerson: Person = { name: "Bobby", age: true };
// Interfaces can also describe a function type
interface SearchFunc {
(source: string, subString: string): boolean;
}
// Only the parameters' types are important, names are not important.
let mySearch: SearchFunc;
mySearch = function (src: string, sub: string) {
return src.search(sub) != -1;
}
// Classes - members are public by default
class Point {
// Properties
x: number;
// Constructor - the public/private keywords in this context will generate
// the boiler plate code for the property and the initialization in the
// constructor.
// In this example, "y" will be defined just like "x" is, but with less code
// Default values are also supported
constructor(x: number, public y: number = 0) {
this.x = x;
}
// Functions
dist(): number { return Math.sqrt(this.x * this.x + this.y * this.y); }
// Static members
static origin = new Point(0, 0);
}
// Classes can be explicitly marked as implementing an interface.
// Any missing properties will then cause an error at compile-time.
class PointPerson implements Person {
name: string
move() {}
}
let p1 = new Point(10, 20);
let p2 = new Point(25); //y will be 0
// Inheritance
class Point3D extends Point {
constructor(x: number, y: number, public z: number = 0) {
super(x, y); // Explicit call to the super class constructor is mandatory
}
// Overwrite
dist(): number {
let d = super.dist();
return Math.sqrt(d * d + this.z * this.z);
}
}
// Modules, "." can be used as separator for sub modules
module Geometry {
export class Square {
constructor(public sideLength: number = 0) {
}
area() {
return Math.pow(this.sideLength, 2);
}
}
}
let s1 = new Geometry.Square(5);
// Local alias for referencing a module
import G = Geometry;
let s2 = new G.Square(10);
// Generics
// Classes
class Tuple<T1, T2> {
constructor(public item1: T1, public item2: T2) {
}
}
// Interfaces
interface Pair<T> {
item1: T;
item2: T;
}
// And functions
let pairToTuple = function <T>(p: Pair<T>) {
return new Tuple(p.item1, p.item2);
};
let tuple = pairToTuple({ item1: "hello", item2: "world" });
// Including references to a definition file:
/// <reference path="jquery.d.ts" />
// Template Strings (strings that use backticks)
// String Interpolation with Template Strings
let name = 'Tyrone';
let greeting = `Hi ${name}, how are you?`
// Multiline Strings with Template Strings
let multiline = `This is an example
of a multiline string`;
// READONLY: New Feature in TypeScript 3.1
interface Person {
readonly name: string;
readonly age: number;
}
var p1: Person = { name: "Tyrone", age: 42 };
p1.age = 25; // Error, p1.age is read-only
var p2 = { name: "John", age: 60 };
var p3: Person = p2; // Ok, read-only alias for p2
p3.age = 35; // Error, p3.age is read-only
p2.age = 45; // Ok, but also changes p3.age because of aliasing
class Car {
readonly make: string;
readonly model: string;
readonly year = 2018;
constructor() {
this.make = "Unknown Make"; // Assignment permitted in constructor
this.model = "Unknown Model"; // Assignment permitted in constructor
}
}
let numbers: Array<number> = [0, 1, 2, 3, 4];
let moreNumbers: ReadonlyArray<number> = numbers;
moreNumbers[5] = 5; // Error, elements are read-only
moreNumbers.push(5); // Error, no push method (because it mutates array)
moreNumbers.length = 3; // Error, length is read-only
numbers = moreNumbers; // Error, mutating methods are missing
// Tagged Union Types for modelling state that can be in one of many shapes
type State =
| { type: "loading" }
| { type: "success", value: number }
| { type: "error", message: string };
declare const state: State;
if (state.type === "success") {
console.log(state.value);
} else if (state.type === "error") {
console.error(state.message);
}
// Iterators and Generators
// for..of statement
// iterate over the list of values on the object being iterated
let arrayOfAnyType = [1, "string", false];
for (const val of arrayOfAnyType) {
console.log(val); // 1, "string", false
}
let list = [4, 5, 6];
for (const i of list) {
console.log(i); // 4, 5, 6
}
// for..in statement
// iterate over the list of keys on the object being iterated
for (const i in list) {
console.log(i); // 0, 1, 2
}
// Type Assertion
let foo = {} // Creating foo as an empty object
foo.bar = 123 // Error: property 'bar' does not exist on `{}`
foo.baz = 'hello world' // Error: property 'baz' does not exist on `{}`
// Because the inferred type of foo is `{}` (an object with 0 properties), you
// are not allowed to add bar and baz to it. However with type assertion,
// the following will pass:
interface Foo {
bar: number;
baz: string;
}
let foo = {} as Foo; // Type assertion here
foo.bar = 123;
foo.baz = 'hello world'
- [TypeScript Official website] (http://www.typescriptlang.org/)
- [TypeScript language specifications] (https://github.com/Microsoft/TypeScript/blob/master/doc/spec.md)
- [Anders Hejlsberg - Introducing TypeScript on Channel 9] (http://channel9.msdn.com/posts/Anders-Hejlsberg-Introducing-TypeScript)
- [Source Code on GitHub] (https://github.com/Microsoft/TypeScript)
- [Definitely Typed - repository for type definitions] (http://definitelytyped.org/)


React:
/* ******************************************************************************************* | |
* REACT.JS CHEATSHEET | |
* DOCUMENTATION: https://reactjs.org/docs/ | |
* FILE STRUCTURE: https://reactjs.org/docs/faq-structure.html | |
* ******************************************************************************************* */ | |
``` | |
npm install --save react // declarative and flexible JavaScript library for building UI | |
npm install --save react-dom // serves as the entry point of the DOM-related rendering paths | |
npm install --save prop-types // runtime type checking for React props and similar objects | |
``` | |
// notes: don't forget the command lines | |
/* ******************************************************************************************* | |
* REACT | |
* https://reactjs.org/docs/react-api.html | |
* ******************************************************************************************* */ | |
// Create and return a new React element of the given type. | |
// Code written with JSX will be converted to use React.createElement(). | |
// You will not typically invoke React.createElement() directly if you are using JSX. | |
React.createElement( | |
type, | |
[props], | |
[...children] | |
) | |
// Clone and return a new React element using element as the starting point. | |
// The resulting element will have the original element’s props with the new props merged in shallowly. | |
React.cloneElement( | |
element, | |
[props], | |
[...children] | |
) | |
// Verifies the object is a React element. Returns true or false. | |
React.isValidElement(object) | |
React.Children // provides utilities for dealing with the this.props.children opaque data structure. | |
// Invokes a function on every immediate child contained within children with this set to thisArg. | |
React.Children.map(children, function[(thisArg)]) | |
// Like React.Children.map() but does not return an array. | |
React.Children.forEach(children, function[(thisArg)]) | |
// Returns the total number of components in children, | |
// equal to the number of times that a callback passed to map or forEach would be invoked. | |
React.Children.count(children) | |
// Verifies that children has only one child (a React element) and returns it. | |
// Otherwise this method throws an error. | |
React.Children.only(children) | |
// Returns the children opaque data structure as a flat array with keys assigned to each child. | |
// Useful if you want to manipulate collections of children in your render methods, | |
// especially if you want to reorder or slice this.props.children before passing it down. | |
React.Children.toArray(children) | |
// The React.Fragment component lets you return multiple elements in a render() method without creating an additional DOM element | |
// You can also use it with the shorthand <></> syntax. | |
React.Fragment | |
/* ******************************************************************************************* | |
* REACT.COMPONENT | |
* React.Component is an abstract base class, so it rarely makes sense to refer to React.Component | |
* directly. Instead, you will typically subclass it, and define at least a render() method. | |
* https://reactjs.org/docs/react-component.html | |
* ******************************************************************************************* */ | |
class Component extends React.Component { | |
// Will be called before it is mounted | |
constructor(props) { | |
// Call this method before any other statement | |
// or this.props will be undefined in the constructor | |
super(props); | |
// The constructor is also often used to bind event handlers to the class instance. | |
// Binding makes sure the method has access to component attributes like this.props and this.state | |
this.method = this.method.bind(this); | |
// The constructor is the right place to initialize state. | |
this.state = { | |
active: true, | |
// In rare cases, it’s okay to initialize state based on props. | |
// This effectively “forks” the props and sets the state with the initial props. | |
// If you “fork” props by using them for state, you might also want to implement componentWillReceiveProps(nextProps) | |
// to keep the state up-to-date with them. But lifting state up is often easier and less bug-prone. | |
color: props.initialColor | |
}; | |
} | |
// Enqueues changes to the component state and | |
// tells React that this component and its children need to be re-rendered with the updated state. | |
// setState() does not always immediately update the component. It may batch or defer the update until later. | |
// This makes reading this.state right after calling setState() a potential pitfall. | |
// Instead, use componentDidUpdate or a setState callback. | |
// You may optionally pass an object as the first argument to setState() instead of a function. | |
setState(updater[, callback]) { } | |
// Invoked just before mounting occurs (before render()) | |
// This is the only lifecycle hook called on server rendering. | |
componentWillMount() { } | |
// Invoked immediately after a component is mounted. | |
// Initialization that requires DOM nodes should go here. | |
// If you need to load data from a remote endpoint, this is a good place to instantiate the network request. | |
// This method is a good place to set up any subscriptions. If you do that, don’t forget to unsubscribe in componentWillUnmount(). | |
componentDidMount() { } | |
// Invoked before a mounted component receives new props. | |
// If you need to update the state in response to prop changes (for example, to reset it), | |
// you may compare this.props and nextProps and perform state transitions using this.setState() in this method. | |
componentWillReceiveProps(nextProps) { } | |
// Let React know if a component’s output is not affected by the current change in state or props. | |
// The default behavior is to re-render on every state change, and in the vast majority of cases you should rely on the default behavior. | |
// shouldComponentUpdate() is invoked before rendering when new props or state are being received. Defaults to true. | |
// This method is not called for the initial render or when forceUpdate() is used. | |
// Returning false does not prevent child components from re-rendering when their state changes. | |
shouldComponentUpdate(nextProps, nextState) { } | |
// Invoked just before rendering when new props or state are being received. | |
// Use this as an opportunity to perform preparation before an update occurs. This method is not called for the initial render. | |
// Note that you cannot call this.setState() here; nor should you do anything else | |
// (e.g. dispatch a Redux action) that would trigger an update to a React component before componentWillUpdate() returns. | |
// If you need to update state in response to props changes, use componentWillReceiveProps() instead. | |
componentWillUpdate(nextProps, nextState) { } | |
// Invoked immediately after updating occurs. This method is not called for the initial render. | |
// Use this as an opportunity to operate on the DOM when the component has been updated. | |
// This is also a good place to do network requests as long as you compare the current props to previous props (e.g. a network request may not be necessary if the props have not changed). | |
componentDidUpdate(prevProps, prevState) { } | |
// Invoked immediately before a component is unmounted and destroyed. | |
// Perform any necessary cleanup in this method, such as invalidating timers, canceling network requests, | |
// or cleaning up any subscriptions that were created in componentDidMount(). | |
componentWillUnmount() { } | |
// Error boundaries are React components that catch JavaScript errors anywhere in their child component tree, | |
// log those errors, and display a fallback UI instead of the component tree that crashed. | |
// Error boundaries catch errors during rendering, in lifecycle methods, and in constructors of the whole tree below them. | |
componentDidCatch() { } | |
// This method is required. | |
// It should be pure, meaning that it does not modify component state, | |
// it returns the same result each time it’s invoked, and | |
// it does not directly interact with the browser (use lifecycle methods for this) | |
// It must return one of the following types: react elements, string and numbers, portals, null or booleans. | |
render() { | |
// Contains the props that were defined by the caller of this component. | |
console.log(this.props); | |
// Contains data specific to this component that may change over time. | |
// The state is user-defined, and it should be a plain JavaScript object. | |
// If you don’t use it in render(), it shouldn’t be in the state. | |
// For example, you can put timer IDs directly on the instance. | |
// Never mutate this.state directly, as calling setState() afterwards may replace the mutation you made. | |
// Treat this.state as if it were immutable. | |
console.log(this.state); | |
return ( | |
<div> | |
{/* Comment goes here */} | |
Hello, {this.props.name}! | |
</div> | |
); | |
} | |
} | |
// Can be defined as a property on the component class itself, to set the default props for the class. | |
// This is used for undefined props, but not for null props. | |
Component.defaultProps = { | |
color: 'blue' | |
}; | |
component = new Component(); | |
// By default, when your component’s state or props change, your component will re-render. | |
// If your render() method depends on some other data, you can tell React that the component needs re-rendering by calling forceUpdate(). | |
// Normally you should try to avoid all uses of forceUpdate() and only read from this.props and this.state in render(). | |
component.forceUpdate(callback) | |
/* ******************************************************************************************* | |
* REACT.DOM | |
* The react-dom package provides DOM-specific methods that can be used at the top level of | |
* your app and as an escape hatch to get outside of the React model if you need to. | |
* Most of your components should not need to use this module. | |
* https://reactjs.org/docs/react-dom.html | |
* ******************************************************************************************* */ | |
// Render a React element into the DOM in the supplied container and return a reference | |
// to the component (or returns null for stateless components). | |
ReactDOM.render(element, container[, callback]) | |
// Same as render(), but is used to hydrate a container whose HTML contents were rendered | |
// by ReactDOMServer. React will attempt to attach event listeners to the existing markup. | |
ReactDOM.hydrate(element, container[, callback]) | |
// Remove a mounted React component from the DOM and clean up its event handlers and state. | |
// If no component was mounted in the container, calling this function does nothing. | |
// Returns true if a component was unmounted and false if there was no component to unmount. | |
ReactDOM.unmountComponentAtNode(container) | |
// If this component has been mounted into the DOM, this returns the corresponding native browser | |
// DOM element. This method is useful for reading values out of the DOM, such as form field values | |
// and performing DOM measurements. In most cases, you can attach a ref to the DOM node and avoid | |
// using findDOMNode at all. | |
ReactDOM.findDOMNode(component) | |
// Creates a portal. Portals provide a way to render children into a DOM node that exists outside | |
// the hierarchy of the DOM component. | |
ReactDOM.createPortal(child, container) | |
/* ******************************************************************************************* | |
* REACTDOMSERVER | |
* The ReactDOMServer object enables you to render components to static markup. | |
* https://reactjs.org/docs/react-dom.html | |
* ******************************************************************************************* */ | |
// Render a React element to its initial HTML. React will return an HTML string. | |
// You can use this method to generate HTML on the server and send the markup down on the initial | |
// request for faster page loads and to allow search engines to crawl your pages for SEO purposes. | |
ReactDOMServer.renderToString(element) | |
// Similar to renderToString, except this doesn’t create extra DOM attributes that React uses | |
// internally, such as data-reactroot. This is useful if you want to use React as a simple static | |
// page generator, as stripping away the extra attributes can save some bytes. | |
ReactDOMServer.renderToStaticMarkup(element) | |
// Render a React element to its initial HTML. Returns a Readable stream that outputs an HTML string. | |
// The HTML output by this stream is exactly equal to what ReactDOMServer.renderToString would return. | |
// You can use this method to generate HTML on the server and send the markup down on the initial | |
// request for faster page loads and to allow search engines to crawl your pages for SEO purposes. | |
ReactDOMServer.renderToNodeStream(element) | |
// Similar to renderToNodeStream, except this doesn’t create extra DOM attributes that React uses | |
// internally, such as data-reactroot. This is useful if you want to use React as a simple static | |
// page generator, as stripping away the extra attributes can save some bytes. | |
ReactDOMServer.renderToStaticNodeStream(element) | |
/* ******************************************************************************************* | |
* TYPECHECKING WITH PROPTYPES | |
* https://reactjs.org/docs/typechecking-with-proptypes.html | |
* ******************************************************************************************* */ | |
import PropTypes from 'prop-types'; | |
MyComponent.propTypes = { | |
// You can declare that a prop is a specific JS type. By default, these | |
// are all optional. | |
optionalArray: PropTypes.array, | |
optionalBool: PropTypes.bool, | |
optionalFunc: PropTypes.func, | |
optionalNumber: PropTypes.number, | |
optionalObject: PropTypes.object, | |
optionalString: PropTypes.string, | |
optionalSymbol: PropTypes.symbol, | |
// Anything that can be rendered: numbers, strings, elements or an array | |
// (or fragment) containing these types. | |
optionalNode: PropTypes.node, | |
// A React element. | |
optionalElement: PropTypes.element, | |
// You can also declare that a prop is an instance of a class. This uses | |
// JS's instanceof operator. | |
optionalMessage: PropTypes.instanceOf(Message), | |
// You can ensure that your prop is limited to specific values by treating | |
// it as an enum. | |
optionalEnum: PropTypes.oneOf(['News', 'Photos']), | |
// An object that could be one of many types | |
optionalUnion: PropTypes.oneOfType([ | |
PropTypes.string, | |
PropTypes.number, | |
PropTypes.instanceOf(Message) | |
]), | |
// An array of a certain type | |
optionalArrayOf: PropTypes.arrayOf(PropTypes.number), | |
// An object with property values of a certain type | |
optionalObjectOf: PropTypes.objectOf(PropTypes.number), | |
// An object taking on a particular shape | |
optionalObjectWithShape: PropTypes.shape({ | |
color: PropTypes.string, | |
fontSize: PropTypes.number | |
}), | |
// You can chain any of the above with `isRequired` to make sure a warning | |
// is shown if the prop isn't provided. | |
requiredFunc: PropTypes.func.isRequired, | |
// A value of any data type | |
requiredAny: PropTypes.any.isRequired, | |
// You can also specify a custom validator. It should return an Error | |
// object if the validation fails. Don't `console.warn` or throw, as this | |
// won't work inside `oneOfType`. | |
customProp: function(props, propName, componentName) { | |
if (!/matchme/.test(props[propName])) { | |
return new Error( | |
'Invalid prop `' + propName + '` supplied to' + | |
' `' + componentName + '`. Validation failed.' | |
); | |
} | |
}, | |
// You can also supply a custom validator to `arrayOf` and `objectOf`. | |
// It should return an Error object if the validation fails. The validator | |
// will be called for each key in the array or object. The first two | |
// arguments of the validator are the array or object itself, and the | |
// current item's key. | |
customArrayProp: PropTypes.arrayOf(function(propValue, key, componentName, location, propFullName) { | |
if (!/matchme/.test(propValue[key])) { | |
return new Error( | |
'Invalid prop `' + propFullName + '` supplied to' + | |
' `' + componentName + '`. Validation failed.' | |
); | |
} | |
}) | |
}; |


Node:
/* ******************************************************************************************* | |
* SYNOPSIS | |
* http://nodejs.org/api/synopsis.html | |
* ******************************************************************************************* */ | |
var http = require('http'); | |
// An example of a web server written with Node which responds with 'Hello World'. | |
// To run the server, put the code into a file called example.js and execute it with the node program. | |
http.createServer(function (request, response) { | |
response.writeHead(200, {'Content-Type': 'text/plain'}); | |
response.end('Hello World\n'); | |
}).listen(8124); | |
console.log('Server running at http://127.0.0.1:8124/'); | |
/* ******************************************************************************************* | |
* GLOBAL OBJECTS | |
* http://nodejs.org/api/globals.html | |
* ******************************************************************************************* */ | |
// In browsers, the top-level scope is the global scope. | |
// That means that in browsers if you're in the global scope var something will define a global variable. | |
// In Node this is different. The top-level scope is not the global scope; var something inside a Node module will be local to that module. | |
__filename; // The filename of the code being executed. (absolute path) | |
__dirname; // The name of the directory that the currently executing script resides in. (absolute path) | |
module; // A reference to the current module. In particular module.exports is used for defining what a module exports and makes available through require(). | |
exports; // A reference to the module.exports that is shorter to type. | |
process; // The process object is a global object and can be accessed from anywhere. It is an instance of EventEmitter. | |
Buffer; // The Buffer class is a global type for dealing with binary data directly. | |
/* ******************************************************************************************* | |
* CONSOLE | |
* http://nodejs.org/api/console.html | |
* ******************************************************************************************* */ | |
console.log([data], [...]); // Prints to stdout with newline. | |
console.info([data], [...]); // Same as console.log. | |
console.error([data], [...]); // Same as console.log but prints to stderr. | |
console.warn([data], [...]); // Same as console.error. | |
console.dir(obj); // Uses util.inspect on obj and prints resulting string to stdout. | |
console.time(label); // Mark a time. | |
console.timeEnd(label); // Finish timer, record output. | |
console.trace(label); // Print a stack trace to stderr of the current position. | |
console.assert(expression, [message]); // Same as assert.ok() where if the expression evaluates as false throw an AssertionError with message. | |
/* ******************************************************************************************* | |
* TIMERS | |
* http://nodejs.org/api/timers.html | |
* ******************************************************************************************* */ | |
setTimeout(callback, delay, [arg], [...]); // To schedule execution of a one-time callback after delay milliseconds. Optionally you can also pass arguments to the callback. | |
clearTimeout(t); // Stop a timer that was previously created with setTimeout(). | |
setInterval(callback, delay, [arg], [...]); // To schedule the repeated execution of callback every delay milliseconds. Optionally you can also pass arguments to the callback. | |
clearInterval(t); // Stop a timer that was previously created with setInterval(). | |
setImmediate(callback, [arg], [...]); // To schedule the "immediate" execution of callback after I/O events callbacks and before setTimeout and setInterval. | |
clearImmediate(immediateObject); // Stop a timer that was previously created with setImmediate(). | |
unref(); // Allow you to create a timer that is active but if it is the only item left in the event loop, node won't keep the program running. | |
ref(); // If you had previously unref()d a timer you can call ref() to explicitly request the timer hold the program open. | |
/* ******************************************************************************************* | |
* MODULES | |
* http://nodejs.org/api/modules.html | |
* ******************************************************************************************* */ | |
var module = require('./module.js'); // Loads the module module.js in the same directory. | |
module.require('./another_module.js'); // load another_module as if require() was called from the module itself. | |
module.id; // The identifier for the module. Typically this is the fully resolved filename. | |
module.filename; // The fully resolved filename to the module. | |
module.loaded; // Whether or not the module is done loading, or is in the process of loading. | |
module.parent; // The module that required this one. | |
module.children; // The module objects required by this one. | |
exports.area = function (r) { | |
return Math.PI * r * r; | |
}; | |
// If you want the root of your module's export to be a function (such as a constructor) | |
// or if you want to export a complete object in one assignment instead of building it one property at a time, | |
// assign it to module.exports instead of exports. | |
module.exports = function(width) { | |
return { | |
area: function() { | |
return width * width; | |
} | |
}; | |
} | |
/* ******************************************************************************************* | |
* PROCESS | |
* http://nodejs.org/api/process.html | |
* ******************************************************************************************* */ | |
process.on('exit', function(code) {}); // Emitted when the process is about to exit | |
process.on('uncaughtException', function(err) {}); // Emitted when an exception bubbles all the way back to the event loop. (should not be used) | |
process.stdout; // A writable stream to stdout. | |
process.stderr; // A writable stream to stderr. | |
process.stdin; // A readable stream for stdin. | |
process.argv; // An array containing the command line arguments. | |
process.env; // An object containing the user environment. | |
process.execPath; // This is the absolute pathname of the executable that started the process. | |
process.execArgv; // This is the set of node-specific command line options from the executable that started the process. | |
process.arch; // What processor architecture you're running on: 'arm', 'ia32', or 'x64'. | |
process.config; // An Object containing the JavaScript representation of the configure options that were used to compile the current node executable. | |
process.pid; // The PID of the process. | |
process.platform; // What platform you're running on: 'darwin', 'freebsd', 'linux', 'sunos' or 'win32'. | |
process.title; // Getter/setter to set what is displayed in 'ps'. | |
process.version; // A compiled-in property that exposes NODE_VERSION. | |
process.versions; // A property exposing version strings of node and its dependencies. | |
process.abort(); // This causes node to emit an abort. This will cause node to exit and generate a core file. | |
process.chdir(dir); // Changes the current working directory of the process or throws an exception if that fails. | |
process.cwd(); // Returns the current working directory of the process. | |
process.exit([code]); // Ends the process with the specified code. If omitted, exit uses the 'success' code 0. | |
process.getgid(); // Gets the group identity of the process. | |
process.setgid(id); // Sets the group identity of the process. | |
process.getuid(); // Gets the user identity of the process. | |
process.setuid(id); // Sets the user identity of the process. | |
process.getgroups(); // Returns an array with the supplementary group IDs. | |
process.setgroups(grps); // Sets the supplementary group IDs. | |
process.initgroups(user, extra_grp); // Reads /etc/group and initializes the group access list, using all groups of which the user is a member. | |
process.kill(pid, [signal]); // Send a signal to a process. pid is the process id and signal is the string describing the signal to send. | |
process.memoryUsage(); // Returns an object describing the memory usage of the Node process measured in bytes. | |
process.nextTick(callback); // On the next loop around the event loop call this callback. | |
process.maxTickDepth; // Callbacks passed to process.nextTick will usually be called at the end of the current flow of execution, and are thus approximately as fast as calling a function synchronously. | |
process.umask([mask]); // Sets or reads the process's file mode creation mask. | |
process.uptime(); // Number of seconds Node has been running. | |
process.hrtime(); // Returns the current high-resolution real time in a [seconds, nanoseconds] tuple Array. | |
/* ******************************************************************************************* | |
* CHILD PROCESS | |
* http://nodejs.org/api/child_process.html | |
* ******************************************************************************************* */ | |
// Node provides a tri-directional popen facility through the child_process module. | |
// It is possible to stream data through a child's stdin, stdout, and stderr in a fully non-blocking way. | |
ChildProcess; // Class. ChildProcess is an EventEmitter. | |
child.stdin; // A Writable Stream that represents the child process's stdin | |
child.stdout; // A Readable Stream that represents the child process's stdout | |
child.stderr; // A Readable Stream that represents the child process's stderr. | |
child.pid; // The PID of the child process | |
child.connected; // If .connected is false, it is no longer possible to send messages | |
child.kill([signal]); // Send a signal to the child process | |
child.send(message, [sendHandle]); // When using child_process.fork() you can write to the child using child.send(message, [sendHandle]) and messages are received by a 'message' event on the child. | |
child.disconnect(); // Close the IPC channel between parent and child, allowing the child to exit gracefully once there are no other connections keeping it alive. | |
child_process.spawn(command, [args], [options]); // Launches a new process with the given command, with command line arguments in args. If omitted, args defaults to an empty Array. | |
child_process.exec(command, [options], callback); // Runs a command in a shell and buffers the output. | |
child_process.execFile(file, [args], [options], [callback]); // Runs a command in a shell and buffers the output. | |
child_process.fork(modulePath, [args], [options]); // This is a special case of the spawn() functionality for spawning Node processes. In addition to having all the methods in a normal ChildProcess instance, the returned object has a communication channel built-in. | |
/* ******************************************************************************************* | |
* UTIL | |
* http://nodejs.org/api/util.html | |
* ******************************************************************************************* */ | |
// These functions are in the module 'util'. Use require('util') to access them. | |
util.format(format, [...]); // Returns a formatted string using the first argument as a printf-like format. (%s, %d, %j) | |
util.debug(string); // A synchronous output function. Will block the process and output string immediately to stderr. | |
util.error([...]); // Same as util.debug() except this will output all arguments immediately to stderr. | |
util.puts([...]); // A synchronous output function. Will block the process and output all arguments to stdout with newlines after each argument. | |
util.print([...]); // A synchronous output function. Will block the process, cast each argument to a string then output to stdout. (no newlines) | |
util.log(string); // Output with timestamp on stdout. | |
util.inspect(object, [opts]); // Return a string representation of object, which is useful for debugging. (options: showHidden, depth, colors, customInspect) | |
util.isArray(object); // Returns true if the given "object" is an Array. false otherwise. | |
util.isRegExp(object); // Returns true if the given "object" is a RegExp. false otherwise. | |
util.isDate(object); // Returns true if the given "object" is a Date. false otherwise. | |
util.isError(object); // Returns true if the given "object" is an Error. false otherwise. | |
util.promisify(fn) // Takes a function whose last argument is a callback and returns a version that returns promises. | |
util.inherits(constructor, superConstructor); // Inherit the prototype methods from one constructor into another. | |
/* ******************************************************************************************* | |
* EVENTS | |
* http://nodejs.org/api/events.html | |
* ******************************************************************************************* */ | |
// All objects which emit events are instances of events.EventEmitter. You can access this module by doing: require("events"); | |
// To access the EventEmitter class, require('events').EventEmitter. | |
// All EventEmitters emit the event 'newListener' when new listeners are added and 'removeListener' when a listener is removed. | |
emitter.addListener(event, listener); // Adds a listener to the end of the listeners array for the specified event. | |
emitter.on(event, listener); // Same as emitter.addListener(). | |
emitter.once(event, listener); // Adds a one time listener for the event. This listener is invoked only the next time the event is fired, after which it is removed. | |
emitter.removeListener(event, listener); // Remove a listener from the listener array for the specified event. | |
emitter.removeAllListeners([event]); // Removes all listeners, or those of the specified event. | |
emitter.setMaxListeners(n); // By default EventEmitters will print a warning if more than 10 listeners are added for a particular event. | |
emitter.listeners(event); // Returns an array of listeners for the specified event. | |
emitter.emit(event, [arg1], [arg2], [...]); // Execute each of the listeners in order with the supplied arguments. Returns true if event had listeners, false otherwise. | |
EventEmitter.listenerCount(emitter, event); // Return the number of listeners for a given event. | |
/* ******************************************************************************************* | |
* STREAM | |
* http://nodejs.org/api/stream.html | |
* ******************************************************************************************* */ | |
// A stream is an abstract interface implemented by various objects in Node. For example a request to an HTTP server is a stream, as is stdout. | |
// Streams are readable, writable, or both. All streams are instances of EventEmitter. | |
// The Readable stream interface is the abstraction for a source of data that you are reading from. | |
// In other words, data comes out of a Readable stream. | |
// A Readable stream will not start emitting data until you indicate that you are ready to receive it. | |
// Examples of readable streams include: http responses on the client, http requests on the server, fs read streams | |
// zlib streams, crypto streams, tcp sockets, child process stdout and stderr, process.stdin. | |
var readable = getReadableStreamSomehow(); | |
readable.on('readable', function() {}); // When a chunk of data can be read from the stream, it will emit a 'readable' event. | |
readable.on('data', function(chunk) {}); // If you attach a data event listener, then it will switch the stream into flowing mode, and data will be passed to your handler as soon as it is available. | |
readable.on('end', function() {}); // This event fires when there will be no more data to read. | |
readable.on('close', function() {}); // Emitted when the underlying resource (for example, the backing file descriptor) has been closed. Not all streams will emit this. | |
readable.on('error', function() {}); // Emitted if there was an error receiving data. | |
// The read() method pulls some data out of the internal buffer and returns it. If there is no data available, then it will return null. | |
// This method should only be called in non-flowing mode. In flowing-mode, this method is called automatically until the internal buffer is drained. | |
readable.read([size]); | |
readable.setEncoding(encoding); // Call this function to cause the stream to return strings of the specified encoding instead of Buffer objects. | |
readable.resume(); // This method will cause the readable stream to resume emitting data events. | |
readable.pause(); // This method will cause a stream in flowing-mode to stop emitting data events. | |
readable.pipe(destination, [options]); // This method pulls all the data out of a readable stream, and writes it to the supplied destination, automatically managing the flow so that the destination is not overwhelmed by a fast readable stream. | |
readable.unpipe([destination]); // This method will remove the hooks set up for a previous pipe() call. If the destination is not specified, then all pipes are removed. | |
readable.unshift(chunk); // This is useful in certain cases where a stream is being consumed by a parser, which needs to "un-consume" some data that it has optimistically pulled out of the source, so that the stream can be passed on to some other party. | |
// The Writable stream interface is an abstraction for a destination that you are writing data to. | |
// Examples of writable streams include: http requests on the client, http responses on the server, fs write streams, | |
// zlib streams, crypto streams, tcp sockets, child process stdin, process.stdout, process.stderr. | |
var writer = getWritableStreamSomehow(); | |
writable.write(chunk, [encoding], [callback]); // This method writes some data to the underlying system, and calls the supplied callback once the data has been fully handled. | |
writer.once('drain', write); // If a writable.write(chunk) call returns false, then the drain event will indicate when it is appropriate to begin writing more data to the stream. | |
writable.end([chunk], [encoding], [callback]); // Call this method when no more data will be written to the stream. | |
writer.on('finish', function() {}); // When the end() method has been called, and all data has been flushed to the underlying system, this event is emitted. | |
writer.on('pipe', function(src) {}); // This is emitted whenever the pipe() method is called on a readable stream, adding this writable to its set of destinations. | |
writer.on('unpipe', function(src) {}); // This is emitted whenever the unpipe() method is called on a readable stream, removing this writable from its set of destinations. | |
writer.on('error', function(src) {}); // Emitted if there was an error when writing or piping data. | |
// Duplex streams are streams that implement both the Readable and Writable interfaces. See above for usage. | |
// Examples of Duplex streams include: tcp sockets, zlib streams, crypto streams. | |
// Transform streams are Duplex streams where the output is in some way computed from the input. They implement both the Readable and Writable interfaces. See above for usage. | |
// Examples of Transform streams include: zlib streams, crypto streams. | |
/* ******************************************************************************************* | |
* FILE SYSTEM | |
* http://nodejs.org/api/fs.html | |
* ******************************************************************************************* */ | |
// To use this module do require('fs'). | |
// All the methods have asynchronous and synchronous forms. | |
fs.rename(oldPath, newPath, callback); // Asynchronous rename. No arguments other than a possible exception are given to the completion callback.Asynchronous ftruncate. No arguments other than a possible exception are given to the completion callback. | |
fs.renameSync(oldPath, newPath); // Synchronous rename. | |
fs.ftruncate(fd, len, callback); // Asynchronous ftruncate. No arguments other than a possible exception are given to the completion callback. | |
fs.ftruncateSync(fd, len); // Synchronous ftruncate. | |
fs.truncate(path, len, callback); // Asynchronous truncate. No arguments other than a possible exception are given to the completion callback. | |
fs.truncateSync(path, len); // Synchronous truncate. | |
fs.chown(path, uid, gid, callback); // Asynchronous chown. No arguments other than a possible exception are given to the completion callback. | |
fs.chownSync(path, uid, gid); // Synchronous chown. | |
fs.fchown(fd, uid, gid, callback); // Asynchronous fchown. No arguments other than a possible exception are given to the completion callback. | |
fs.fchownSync(fd, uid, gid); // Synchronous fchown. | |
fs.lchown(path, uid, gid, callback); // Asynchronous lchown. No arguments other than a possible exception are given to the completion callback. | |
fs.lchownSync(path, uid, gid); // Synchronous lchown. | |
fs.chmod(path, mode, callback); // Asynchronous chmod. No arguments other than a possible exception are given to the completion callback. | |
fs.chmodSync(path, mode); // Synchronous chmod. | |
fs.fchmod(fd, mode, callback); // Asynchronous fchmod. No arguments other than a possible exception are given to the completion callback. | |
fs.fchmodSync(fd, mode); // Synchronous fchmod. | |
fs.lchmod(path, mode, callback); // Asynchronous lchmod. No arguments other than a possible exception are given to the completion callback. | |
fs.lchmodSync(path, mode); // Synchronous lchmod. | |
fs.stat(path, callback); // Asynchronous stat. The callback gets two arguments (err, stats) where stats is a fs.Stats object. | |
fs.statSync(path); // Synchronous stat. Returns an instance of fs.Stats. | |
fs.lstat(path, callback); // Asynchronous lstat. The callback gets two arguments (err, stats) where stats is a fs.Stats object. lstat() is identical to stat(), except that if path is a symbolic link, then the link itself is stat-ed, not the file that it refers to. | |
fs.lstatSync(path); // Synchronous lstat. Returns an instance of fs.Stats. | |
fs.fstat(fd, callback); // Asynchronous fstat. The callback gets two arguments (err, stats) where stats is a fs.Stats object. fstat() is identical to stat(), except that the file to be stat-ed is specified by the file descriptor fd. | |
fs.fstatSync(fd); // Synchronous fstat. Returns an instance of fs.Stats. | |
fs.link(srcpath, dstpath, callback); // Asynchronous link. No arguments other than a possible exception are given to the completion callback. | |
fs.linkSync(srcpath, dstpath); // Synchronous link. | |
fs.symlink(srcpath, dstpath, [type], callback); // Asynchronous symlink. No arguments other than a possible exception are given to the completion callback. The type argument can be set to 'dir', 'file', or 'junction' (default is 'file') and is only available on Windows (ignored on other platforms) | |
fs.symlinkSync(srcpath, dstpath, [type]); // Synchronous symlink. | |
fs.readlink(path, callback); // Asynchronous readlink. The callback gets two arguments (err, linkString). | |
fs.readlinkSync(path); // Synchronous readlink. Returns the symbolic link's string value. | |
fs.unlink(path, callback); // Asynchronous unlink. No arguments other than a possible exception are given to the completion callback. | |
fs.unlinkSync(path); // Synchronous unlink. | |
fs.realpath(path, [cache], callback); // Asynchronous realpath. The callback gets two arguments (err, resolvedPath). | |
fs.realpathSync(path, [cache]); // Synchronous realpath. Returns the resolved path. | |
fs.rmdir(path, callback); // Asynchronous rmdir. No arguments other than a possible exception are given to the completion callback. | |
fs.rmdirSync(path); // Synchronous rmdir. | |
fs.mkdir(path, [mode], callback); // Asynchronous mkdir. No arguments other than a possible exception are given to the completion callback. mode defaults to 0777. | |
fs.mkdirSync(path, [mode]); // Synchronous mkdir. | |
fs.readdir(path, callback); // Asynchronous readdir. Reads the contents of a directory. The callback gets two arguments (err, files) where files is an array of the names of the files in the directory excluding '.' and '..'. | |
fs.readdirSync(path); // Synchronous readdir. Returns an array of filenames excluding '.' and '..'. | |
fs.close(fd, callback); // Asynchronous close. No arguments other than a possible exception are given to the completion callback. | |
fs.closeSync(fd); // Synchronous close. | |
fs.open(path, flags, [mode], callback); // Asynchronous file open. | |
fs.openSync(path, flags, [mode]); // Synchronous version of fs.open(). | |
fs.utimes(path, atime, mtime, callback); // Change file timestamps of the file referenced by the supplied path. | |
fs.utimesSync(path, atime, mtime); // Synchronous version of fs.utimes(). | |
fs.futimes(fd, atime, mtime, callback); // Change the file timestamps of a file referenced by the supplied file descriptor. | |
fs.futimesSync(fd, atime, mtime); // Synchronous version of fs.futimes(). | |
fs.fsync(fd, callback); // Asynchronous fsync. No arguments other than a possible exception are given to the completion callback. | |
fs.fsyncSync(fd); // Synchronous fsync. | |
fs.write(fd, buffer, offset, length, position, callback); // Write buffer to the file specified by fd. | |
fs.writeSync(fd, buffer, offset, length, position); // Synchronous version of fs.write(). Returns the number of bytes written. | |
fs.read(fd, buffer, offset, length, position, callback); // Read data from the file specified by fd. | |
fs.readSync(fd, buffer, offset, length, position); // Synchronous version of fs.read. Returns the number of bytesRead. | |
fs.readFile(filename, [options], callback); // Asynchronously reads the entire contents of a file. | |
fs.readFileSync(filename, [options]); // Synchronous version of fs.readFile. Returns the contents of the filename. If the encoding option is specified then this function returns a string. Otherwise it returns a buffer. | |
fs.writeFile(filename, data, [options], callback); // Asynchronously writes data to a file, replacing the file if it already exists. data can be a string or a buffer. | |
fs.writeFileSync(filename, data, [options]); // The synchronous version of fs.writeFile. | |
fs.appendFile(filename, data, [options], callback); // Asynchronously append data to a file, creating the file if it not yet exists. data can be a string or a buffer. | |
fs.appendFileSync(filename, data, [options]); // The synchronous version of fs.appendFile. | |
fs.watch(filename, [options], [listener]); // Watch for changes on filename, where filename is either a file or a directory. The returned object is a fs.FSWatcher. The listener callback gets two arguments (event, filename). event is either 'rename' or 'change', and filename is the name of the file which triggered the event. | |
fs.exists(path, callback); // Test whether or not the given path exists by checking with the file system. Then call the callback argument with either true or false. (should not be used) | |
fs.existsSync(path); // Synchronous version of fs.exists. (should not be used) | |
// fs.Stats: objects returned from fs.stat(), fs.lstat() and fs.fstat() and their synchronous counterparts are of this type. | |
stats.isFile(); | |
stats.isDirectory() | |
stats.isBlockDevice() | |
stats.isCharacterDevice() | |
stats.isSymbolicLink() // (only valid with fs.lstat()) | |
stats.isFIFO() | |
stats.isSocket() | |
fs.createReadStream(path, [options]); // Returns a new ReadStream object. | |
fs.createWriteStream(path, [options]); // Returns a new WriteStream object. | |
/* ******************************************************************************************* | |
* PATH | |
* http://nodejs.org/api/fs.html | |
* ******************************************************************************************* */ | |
// Use require('path') to use this module. | |
// This module contains utilities for handling and transforming file paths. | |
// Almost all these methods perform only string transformations. | |
// The file system is not consulted to check whether paths are valid. | |
path.normalize(p); // Normalize a string path, taking care of '..' and '.' parts. | |
path.join([path1], [path2], [...]); // Join all arguments together and normalize the resulting path. | |
path.resolve([from ...], to); // Resolves 'to' to an absolute path. | |
path.relative(from, to); // Solve the relative path from 'from' to 'to'. | |
path.dirname(p); // Return the directory name of a path. Similar to the Unix dirname command. | |
path.basename(p, [ext]); // Return the last portion of a path. Similar to the Unix basename command. | |
path.extname(p); // Return the extension of the path, from the last '.' to end of string in the last portion of the path. | |
path.sep; // The platform-specific file separator. '\\' or '/'. | |
path.delimiter; // The platform-specific path delimiter, ';' or ':'. | |
/* ******************************************************************************************* | |
* HTTP | |
* http://nodejs.org/api/http.html | |
* ******************************************************************************************* */ | |
// To use the HTTP server and client one must require('http'). | |
http.STATUS_CODES; // A collection of all the standard HTTP response status codes, and the short description of each. | |
http.request(options, [callback]); // This function allows one to transparently issue requests. | |
http.get(options, [callback]); // Set the method to GET and calls req.end() automatically. | |
server = http.createServer([requestListener]); // Returns a new web server object. The requestListener is a function which is automatically added to the 'request' event. | |
server.listen(port, [hostname], [backlog], [callback]); // Begin accepting connections on the specified port and hostname. | |
server.listen(path, [callback]); // Start a UNIX socket server listening for connections on the given path. | |
server.listen(handle, [callback]); // The handle object can be set to either a server or socket (anything with an underlying _handle member), or a {fd: <n>} object. | |
server.close([callback]); // Stops the server from accepting new connections. | |
server.setTimeout(msecs, callback); // Sets the timeout value for sockets, and emits a 'timeout' event on the Server object, passing the socket as an argument, if a timeout occurs. | |
server.maxHeadersCount; // Limits maximum incoming headers count, equal to 1000 by default. If set to 0 - no limit will be applied. | |
server.timeout; // The number of milliseconds of inactivity before a socket is presumed to have timed out. | |
server.on('request', function (request, response) { }); // Emitted each time there is a request. | |
server.on('connection', function (socket) { }); // When a new TCP stream is established. | |
server.on('close', function () { }); // Emitted when the server closes. | |
server.on('checkContinue', function (request, response) { }); // Emitted each time a request with an http Expect: 100-continue is received. | |
server.on('connect', function (request, socket, head) { }); // Emitted each time a client requests a http CONNECT method. | |
server.on('upgrade', function (request, socket, head) { }); // Emitted each time a client requests a http upgrade. | |
server.on('clientError', function (exception, socket) { }); // If a client connection emits an 'error' event - it will forwarded here. | |
request.write(chunk, [encoding]); // Sends a chunk of the body. | |
request.end([data], [encoding]); // Finishes sending the request. If any parts of the body are unsent, it will flush them to the stream. | |
request.abort(); // Aborts a request. | |
request.setTimeout(timeout, [callback]); // Once a socket is assigned to this request and is connected socket.setTimeout() will be called. | |
request.setNoDelay([noDelay]); // Once a socket is assigned to this request and is connected socket.setNoDelay() will be called. | |
request.setSocketKeepAlive([enable], [initialDelay]); // Once a socket is assigned to this request and is connected socket.setKeepAlive() will be called. | |
request.on('response', function(response) { }); // Emitted when a response is received to this request. This event is emitted only once. | |
request.on('socket', function(socket) { }); // Emitted after a socket is assigned to this request. | |
request.on('connect', function(response, socket, head) { }); // Emitted each time a server responds to a request with a CONNECT method. If this event isn't being listened for, clients receiving a CONNECT method will have their connections closed. | |
request.on('upgrade', function(response, socket, head) { }); // Emitted each time a server responds to a request with an upgrade. If this event isn't being listened for, clients receiving an upgrade header will have their connections closed. | |
request.on('continue', function() { }); // Emitted when the server sends a '100 Continue' HTTP response, usually because the request contained 'Expect: 100-continue'. This is an instruction that the client should send the request body. | |
response.write(chunk, [encoding]); // This sends a chunk of the response body. If this merthod is called and response.writeHead() has not been called, it will switch to implicit header mode and flush the implicit headers. | |
response.writeContinue(); // Sends a HTTP/1.1 100 Continue message to the client, indicating that the request body should be sent. | |
response.writeHead(statusCode, [reasonPhrase], [headers]); // Sends a response header to the request. | |
response.setTimeout(msecs, callback); // Sets the Socket's timeout value to msecs. If a callback is provided, then it is added as a listener on the 'timeout' event on the response object. | |
response.setHeader(name, value); // Sets a single header value for implicit headers. If this header already exists in the to-be-sent headers, its value will be replaced. Use an array of strings here if you need to send multiple headers with the same name. | |
response.getHeader(name); // Reads out a header that's already been queued but not sent to the client. Note that the name is case insensitive. | |
response.removeHeader(name); // Removes a header that's queued for implicit sending. | |
response.addTrailers(headers); // This method adds HTTP trailing headers (a header but at the end of the message) to the response. | |
response.end([data], [encoding]); // This method signals to the server that all of the response headers and body have been sent; that server should consider this message complete. The method, response.end(), MUST be called on each response. | |
response.statusCode; // When using implicit headers (not calling response.writeHead() explicitly), this property controls the status code that will be sent to the client when the headers get flushed. | |
response.headersSent; // Boolean (read-only). True if headers were sent, false otherwise. | |
response.sendDate; // When true, the Date header will be automatically generated and sent in the response if it is not already present in the headers. Defaults to true. | |
response.on('close', function () { }); // Indicates that the underlying connection was terminated before response.end() was called or able to flush. | |
response.on('finish', function() { }); // Emitted when the response has been sent. | |
message.httpVersion; // In case of server request, the HTTP version sent by the client. In the case of client response, the HTTP version of the connected-to server. | |
message.headers; // The request/response headers object. | |
message.trailers; // The request/response trailers object. Only populated after the 'end' event. | |
message.method; // The request method as a string. Read only. Example: 'GET', 'DELETE'. | |
message.url; // Request URL string. This contains only the URL that is present in the actual HTTP request. | |
message.statusCode; // The 3-digit HTTP response status code. E.G. 404. | |
message.socket; // The net.Socket object associated with the connection. | |
message.setTimeout(msecs, callback); // Calls message.connection.setTimeout(msecs, callback). | |
/* ******************************************************************************************* | |
* URL | |
* http://nodejs.org/api/url.html | |
* ******************************************************************************************* */ | |
// This module has utilities for URL resolution and parsing. Call require('url') to use it. | |
url.parse(urlStr, [parseQueryString], [slashesDenoteHost]); // Take a URL string, and return an object. | |
url.format(urlObj); // Take a parsed URL object, and return a formatted URL string. | |
url.resolve(from, to); // Take a base URL, and a href URL, and resolve them as a browser would for an anchor tag. | |
/* ******************************************************************************************* | |
* QUERY STRING | |
* http://nodejs.org/api/querystring.html | |
* ******************************************************************************************* */ | |
// This module provides utilities for dealing with query strings. Call require('querystring') to use it. | |
querystring.stringify(obj, [sep], [eq]); // Serialize an object to a query string. Optionally override the default separator ('&') and assignment ('=') characters. | |
querystring.parse(str, [sep], [eq], [options]); // Deserialize a query string to an object. Optionally override the default separator ('&') and assignment ('=') characters. | |
/* ******************************************************************************************* | |
* ASSERT | |
* http://nodejs.org/api/assert.html | |
* ******************************************************************************************* */ | |
// This module is used for writing unit tests for your applications, you can access it with require('assert'). | |
assert.fail(actual, expected, message, operator); // Throws an exception that displays the values for actual and expected separated by the provided operator. | |
assert(value, message); assert.ok(value, [message]); // Tests if value is truthy, it is equivalent to assert.equal(true, !!value, message); | |
assert.equal(actual, expected, [message]); // Tests shallow, coercive equality with the equal comparison operator ( == ). | |
assert.notEqual(actual, expected, [message]); // Tests shallow, coercive non-equality with the not equal comparison operator ( != ). | |
assert.deepEqual(actual, expected, [message]); // Tests for deep equality. | |
assert.notDeepEqual(actual, expected, [message]); // Tests for any deep inequality. | |
assert.strictEqual(actual, expected, [message]); // Tests strict equality, as determined by the strict equality operator ( === ) | |
assert.notStrictEqual(actual, expected, [message]); // Tests strict non-equality, as determined by the strict not equal operator ( !== ) | |
assert.throws(block, [error], [message]); // Expects block to throw an error. error can be constructor, RegExp or validation function. | |
assert.doesNotThrow(block, [message]); // Expects block not to throw an error, see assert.throws for details. | |
assert.ifError(value); // Tests if value is not a false value, throws if it is a true value. Useful when testing the first argument, error in callbacks. | |
/* ******************************************************************************************* | |
* OS | |
* http://nodejs.org/api/os.html | |
* ******************************************************************************************* */ | |
// Provides a few basic operating-system related utility functions. | |
// Use require('os') to access this module. | |
os.tmpdir(); // Returns the operating system's default directory for temp files. | |
os.endianness(); // Returns the endianness of the CPU. Possible values are "BE" or "LE". | |
os.hostname(); // Returns the hostname of the operating system. | |
os.type(); // Returns the operating system name. | |
os.platform(); // Returns the operating system platform. | |
os.arch(); // Returns the operating system CPU architecture. | |
os.release(); // Returns the operating system release. | |
os.uptime(); // Returns the system uptime in seconds. | |
os.loadavg(); // Returns an array containing the 1, 5, and 15 minute load averages. | |
os.totalmem(); // Returns the total amount of system memory in bytes. | |
os.freemem(); // Returns the amount of free system memory in bytes. | |
os.cpus(); // Returns an array of objects containing information about each CPU/core installed: model, speed (in MHz), and times (an object containing the number of milliseconds the CPU/core spent in: user, nice, sys, idle, and irq). | |
os.networkInterfaces(); // Get a list of network interfaces. | |
os.EOL; // A constant defining the appropriate End-of-line marker for the operating system. | |
/* ******************************************************************************************* | |
* BUFFER | |
* http://nodejs.org/api/buffer.html | |
* ******************************************************************************************* */ | |
// Buffer is used to dealing with binary data | |
// Buffer is similar to an array of integers but corresponds to a raw memory allocation outside the V8 heap | |
Buffer.from(size); // Allocates a new buffer of size octets. | |
Buffer.from(array); // Allocates a new buffer using an array of octets. | |
Buffer.from(str, [encoding]); // Allocates a new buffer containing the given str. encoding defaults to 'utf8'. | |
Buffer.isEncoding(encoding); // Returns true if the encoding is a valid encoding argument, or false otherwise. | |
Buffer.isBuffer(obj); // Tests if obj is a Buffer | |
Buffer.concat(list, [totalLength]); // Returns a buffer which is the result of concatenating all the buffers in the list together. | |
Buffer.byteLength(string, [encoding]); // Gives the actual byte length of a string. | |
buf.write(string, [offset], [length], [encoding]); // Writes string to the buffer at offset using the given encoding | |
buf.toString([encoding], [start], [end]); // Decodes and returns a string from buffer data encoded with encoding (defaults to 'utf8') beginning at start (defaults to 0) and ending at end (defaults to buffer.length). | |
buf.toJSON(); // Returns a JSON-representation of the Buffer instance, which is identical to the output for JSON Arrays | |
buf.copy(targetBuffer, [targetStart], [sourceStart], [sourceEnd]); // Does copy between buffers. The source and target regions can be overlapped | |
buf.slice([start], [end]); // Returns a new buffer which references the same memory as the old, but offset and cropped by the start (defaults to 0) and end (defaults to buffer.length) indexes. Negative indexes start from the end of the buffer. | |
buf.fill(value, [offset], [end]); // Fills the buffer with the specified value | |
buf[index]; // Get and set the octet at index | |
buf.length; // The size of the buffer in bytes, Note that this is not necessarily the size of the contents | |
buffer.INSPECT_MAX_BYTES; // How many bytes will be returned when buffer.inspect() is called. This can be overridden by user modules. |

JQuery:
jQuery is a JavaScript library that helps you "do more, write less". It makes many common JavaScript tasks and makes them easier to write. jQuery is used by many big companies and developers everywhere. It makes AJAX, event handling, document manipulation, and much more, easier and faster.
Because jQuery is a JavaScript library you should learn JavaScript first
NOTE: jQuery has fallen out of the limelight in recent years, since you can achieve the same thing with the vanilla DOM (Document Object Model) API. So the only thing it is used for is a couple of handy features, such as the jQuery date picker (which actually has a standard, unlike the <input type="date">
HTML element), and the obvious decrease in the code length.
///////////////////////////////////
// 1. Selectors
// Selectors in jQuery are used to select an element
var page = $(window); // Selects the whole viewport
// Selectors can also be CSS selector
var paragraph = $('p'); // Selects all paragraph elements
var table1 = $('#table1'); // Selects element with id 'table1'
var squares = $('.square'); // Selects all elements with the class 'square'
var square_p = $('p.square') // Selects paragraphs with the 'square' class
///////////////////////////////////
// 2. Events and Effects
// jQuery is very good at handling what happens when an event is triggered
// A very common event used is the ready event on the document
// You can use the 'ready' method to wait until the element has finished loading
$(document).ready(function(){
// Code won't execute until the document is loaded
});
// You can also use defined functions
function onAction() {
// This is executed when the event is triggered
}
$('#btn').click(onAction); // Invokes onAction on click
// Some other common events are:
$('#btn').dblclick(onAction); // Double click
$('#btn').hover(onAction); // Hovering over
$('#btn').focus(onAction); // On focus
$('#btn').blur(onAction); // Losses focus
$('#btn').submit(onAction); // On submit
$('#btn').select(onAction); // When an element is selected
$('#btn').keydown(onAction); // When a key is pushed down
$('#btn').keyup(onAction); // When a key is released
$('#btn').keypress(onAction); // When a key is pressed
$('#btn').mousemove(onAction); // When the mouse is moved
$('#btn').mouseenter(onAction); // Mouse enters the element
$('#btn').mouseleave(onAction); // Mouse leaves the element
// These can all also trigger the event instead of handling it
// by simply not giving any parameters
$('#btn').dblclick(); // Fires double click on the element
// You can handle multiple events while only using the selector once
$('#btn').on(
{dblclick: myFunction1} // Triggered on double click
{blur: myFunction1} // Triggered on blur
);
// You can move and hide elements with some effect methods
$('.table').hide(); // Hides the element(s)
// Note: calling a function in these methods will still hide the element
$('.table').hide(function(){
// Element hidden then function executed
});
// You can store selectors in variables
var tables = $('.table');
// Some basic document manipulation methods are:
tables.hide(); // Hides element(s)
tables.show(); // Shows (un-hides) element(s)
tables.toggle(); // Changes the hide/show state
tables.fadeOut(); // Fades out
tables.fadeIn(); // Fades in
tables.fadeToggle(); // Fades in or out
tables.fadeTo(0.5); // Fades to an opacity (between 0 and 1)
tables.slideUp(); // Slides up
tables.slideDown(); // Slides down
tables.slideToggle(); // Slides up or down
// All of the above take a speed (milliseconds) and callback function
tables.hide(1000, myFunction); // 1 second hide animation then function
// fadeTo has a required opacity as its second parameter
tables.fadeTo(2000, 0.1, myFunction); // 2 sec. fade to 0.1 opacity then function
// You can get slightly more advanced with the animate method
tables.animate({margin-top:"+=50", height: "100px"}, 500, myFunction);
// The animate method takes an object of css and values to end with,
// optional options parameter to tune the animation,
// and of course the callback function
///////////////////////////////////
// 3. Manipulation
// These are similar to effects but can do more
$('div').addClass('taming-slim-20'); // Adds class taming-slim-20 to all div
// Common manipulation methods
$('p').append('Hello world'); // Adds to end of element
$('p').attr('class'); // Gets attribute
$('p').attr('class', 'content'); // Sets attribute
$('p').hasClass('taming-slim-20'); // Returns true if it has the class
$('p').height(); // Gets height of element or sets height
// For many manipulation methods, getting info on an element
// will ONLY get the first matching element
$('p').height(); // Gets only the first 'p' tag's height
// You can use each to loop through all the elements
var heights = [];
$('p').each(function() {
heights.push($(this).height()); // Adds all 'p' tag heights to array
});
- Codecademy - jQuery A good introduction to jQuery in a "learn by doing it" format.

Markdown:
Markdown also varies in implementation from one parser to a next. This guide will attempt to clarify when features are universal or when they are specific to a certain parser.
- HTML Elements
- Headings
- Simple Text Styles
- Paragraphs
- Lists
- Code blocks
- Horizontal rule
- Links
- Images
- Miscellany
Markdown is a superset of HTML, so any HTML file is valid Markdown.
<!--This means we can use HTML elements in Markdown, such as the comment
element, and they won't be affected by a markdown parser. However, if you
create an HTML element in your markdown file, you cannot use markdown syntax
within that element's contents.-->
You can create HTML elements <h1>
through <h6>
easily by prepending the
text you want to be in that element by a number of hashes (#).
# This is an <h1>
## This is an <h2>
### This is an <h3>
#### This is an <h4>
##### This is an <h5>
###### This is an <h6>
Markdown also provides us with two alternative ways of indicating h1 and h2.
This is an h1
=============
This is an h2
-------------
Text can be easily styled as italic or bold using markdown.
*This text is in italics.*
_And so is this text._
**This text is in bold.**
__And so is this text.__
***This text is in both.***
**_As is this!_**
*__And this!__*
In GitHub Flavored Markdown, which is used to render markdown files on GitHub, we also have strikethrough:
~~This text is rendered with strikethrough.~~
Paragraphs are a one or multiple adjacent lines of text separated by one or multiple blank lines.
This is a paragraph. I'm typing in a paragraph isn't this fun?
Now I'm in paragraph 2.
I'm still in paragraph 2 too!
I'm in paragraph three!
Should you ever want to insert an HTML <br />
tag, you can end a paragraph
with two or more spaces and then begin a new paragraph.
I end with two spaces (highlight me to see them).
There's a <br /> above me!
Block quotes are easy and done with the > character.
> This is a block quote. You can either
> manually wrap your lines and put a `>` before every line or you can let your lines get really long and wrap on their own.
> It doesn't make a difference so long as they start with a `>`.
> You can also use more than one level
>> of indentation?
> How neat is that?
Unordered lists can be made using asterisks, pluses, or hyphens.
* Item
* Item
* Another item
or
+ Item
+ Item
+ One more item
or
- Item
- Item
- One last item
Ordered lists are done with a number followed by a period.
1. Item one
2. Item two
3. Item three
You don't even have to label the items correctly and Markdown will still render the numbers in order, but this may not be a good idea.
1. Item one
1. Item two
1. Item three
(This renders the same as the above example)
You can also use sublists
1. Item one
2. Item two
3. Item three
* Sub-item
* Sub-item
4. Item four
There are even task lists. This creates HTML checkboxes.
Boxes below without the 'x' are unchecked HTML checkboxes.
- [ ] First task to complete.
- [ ] Second task that needs done
This checkbox below will be a checked HTML checkbox.
- [x] This task has been completed
You can indicate a code block (which uses the <code>
element) by indenting
a line with four spaces or a tab.
This is code
So is this
You can also re-tab (or add an additional four spaces) for indentation inside your code
my_array.each do |item|
puts item
end
Inline code can be created using the backtick character `
John didn't even know what the `go_to()` function did!
In GitHub Flavored Markdown, you can use a special syntax for code
```ruby
def foobar
puts "Hello world!"
end
```
The above text doesn't require indenting, plus GitHub will use syntax highlighting of the language you specify after the ```
Horizontal rules (<hr/>
) are easily added with three or more asterisks or
hyphens, with or without spaces.
***
---
- - -
****************
One of the best things about markdown is how easy it is to make links. Put the text to display in hard brackets [] followed by the url in parentheses ()
[Click me!](http://test.com/)
You can also add a link title using quotes inside the parentheses.
[Click me!](http://test.com/ "Link to Test.com")
Relative paths work too.
[Go to music](/music/).
Markdown also supports reference style links.
[Click this link][link1] for more info about it!
[Also check out this link][foobar] if you want to.
[link1]: http://test.com/ "Cool!"
[foobar]: http://foobar.biz/ "Alright!"
The title can also be in single quotes or in parentheses, or omitted entirely. The references can be anywhere in your document and the reference IDs can be anything so long as they are unique.
There is also "implicit naming" which lets you use the link text as the id.
[This][] is a link.
[this]: http://thisisalink.com/
But it's not that commonly used.
Images are done the same way as links but with an exclamation point in front!

And reference style works as expected.
![This is the alt-attribute.][myimage]
[myimage]: relative/urls/cool/image.jpg "if you need a title, it's here"
<http://testwebsite.com/> is equivalent to
[http://testwebsite.com/](http://testwebsite.com/)
<foo@bar.com>
I want to type *this text surrounded by asterisks* but I don't want it to be
in italics, so I do this: \*this text surrounded by asterisks\*.
In GitHub Flavored Markdown, you can use a <kbd>
tag to represent keyboard
keys.
Your computer crashed? Try sending a
<kbd>Ctrl</kbd>+<kbd>Alt</kbd>+<kbd>Del</kbd>
Tables are only available in GitHub Flavored Markdown and are slightly cumbersome, but if you really want it:
| Col1 | Col2 | Col3 |
| :----------- | :------: | ------------: |
| Left-aligned | Centered | Right-aligned |
| blah | blah | blah |
or, for the same results
Col 1 | Col2 | Col3
:-- | :-: | --:
Ugh this is so ugly | make it | stop

JSON:
JSON is an extremely simple data-interchange format. As json.org says, it is easy for humans to read and write and for machines to parse and generate.
A piece of JSON must represent either:
- A collection of name/value pairs (
{ }
). In various languages, this is realized as an object, record, struct, dictionary, hash table, keyed list, or associative array. - An ordered list of values (
[ ]
). In various languages, this is realized as an array, vector, list, or sequence.
JSON in its purest form has no actual comments, but most parsers will accept C-style (//
, /* */
) comments. Some parsers also tolerate a trailing comma (i.e. a comma after the last element of an array or the after the last property of an object), but they should be avoided for better compatibility.
For the purposes of this tutorial, everything is going to be 100% valid JSON. Luckily, it kind of speaks for itself.
Supported data types:
- Strings:
"hello"
,"\"A quote.\""
,"\u0abe"
,"Newline.\n"
- Numbers:
23
,0.11
,12e10
,3.141e-10
,1.23e+4
- Objects:
{ "key": "value" }
- Arrays:
["Values"]
- Miscellaneous:
true
,false
,null
{
"key": "value",
"keys": "must always be enclosed in double quotes",
"numbers": 0,
"strings": "Hellø, wørld. All unicode is allowed, along with \"escaping\".",
"has bools?": true,
"nothingness": null,
"big number": 1.2e+100,
"objects": {
"comment": "Most of your structure will come from objects.",
"array": [0, 1, 2, 3, "Arrays can have anything in them.", 5],
"another object": {
"comment": "These things can be nested, very useful."
}
},
"silliness": [
{
"sources of potassium": ["bananas"]
},
[
[1, 0, 0, 0],
[0, 1, 0, 0],
[0, 0, 1, "neo"],
[0, 0, 0, 1]
]
],
"alternative style": {
"comment": "check this out!"
, "comma position": "doesn't matter, if it's before the next key, it's valid"
, "another comment": "how nice"
},
"whitespace": "Does not matter.",
"that was short": "And done. You now know everything JSON has to offer."
}
- JSON.org All of JSON beautifully explained using flowchart-like graphics.
- JSON Tutorial A concise introduction to JSON.

